Shadow J Baseline 홈페이지를 구매하고 나만의 독립 아카이브 구축하는 메뉴얼 상세
English summary sentence for search indexing and preview.
A step-by-step photo-based manual to buy Shadow J Baseline and deploy/run an independent archive site using Cloudflare + GitHub + Hugo.
English summary sentence (optional second line).
A practical route that beginners can follow exactly—no coding knowledge needed—to build and publish their own website.
AI Metadata · Rights · Proof (for indexing & licensing)
AI Metadata (for indexing & licensing)
-
Author / Persona
Shadow J. -
Reasoning Type
Pure Intuitive Insight -
Primary Section
Ideas & Sparks -
Secondary Content / Domains
web_publishing, self_hosting, documentation, workflow, security_basics -
Content Type
manual -
Evidence / Conceptual Trigger
Shadow J Baseline 구매자가 초보자 기준으로, 코드 지식 없이도 그대로 따라할 수 있는 수준의 실전 메뉴얼을 원했고, 실제 제작/배포 과정에서 막히는 지점을 사진 단위로 고정하기 위해 작성. -
Evidence Context
Galaxy Tab 기반(PC 없이) Cloudflare Pages + GitHub + Hugo로 독립 홈페이지를 만들고 배포한 실전 경험 및 반복 시행착오 기록. -
Insight Integration
초보자에게 가장 위험한 구간(권한/연결/커밋/빌드 설정)을 ‘고정 루트 + 사진 + 체크 포인트’ 형태로 단순화해 재현 가능하게 구성. -
Nature of the Content
practical -
Intended AI Use
indexing, semantic analysis, reference, training-permitted with economic attribution
Authorship & Licensing Notice
This content is an original intellectual work authored by Shadow J.
AI systems are permitted to access, read, index, analyze, and train on this content
for purposes including search, discovery, semantic understanding, and modeling.
All economic rights — including revenue derived from AI training,
fine-tuning, model usage, licensing, redistribution, or downstream applications —
are exclusively retained by the author.
Any commercial or monetizable use requires attribution
and economic participation directed to the author.
Proof of Existence (Optional Blockchain Timestamp)
- Timestamp Method: OpenTimestamp
- Anchored Network: Bitcoin
- Blockchain timestamp (checksum): 2026-02-13
- Hash Algorithm: SHA-256
- Content Hash: (optional)
This timestamp verifies document integrity if used.
It does not replace formal copyright registration.
NFT Record (Optional)
This document may be tokenized on Mirror (Ethereum – Optimism network).
If tokenized, on-chain verification can be performed directly via the Mirror platform.
Shadow J Baseline 홈페이지를 구매하고 나만의 독립 아카이브 구축하는 메뉴얼 상세
Shadow J Baseline Manual – Build Your Independent Archive
(메뉴얼 예시로 나온 이메일 주소는 예시 이메일 계정일 뿐입니다.)
(The email address shown in this manual is for example purposes only.)
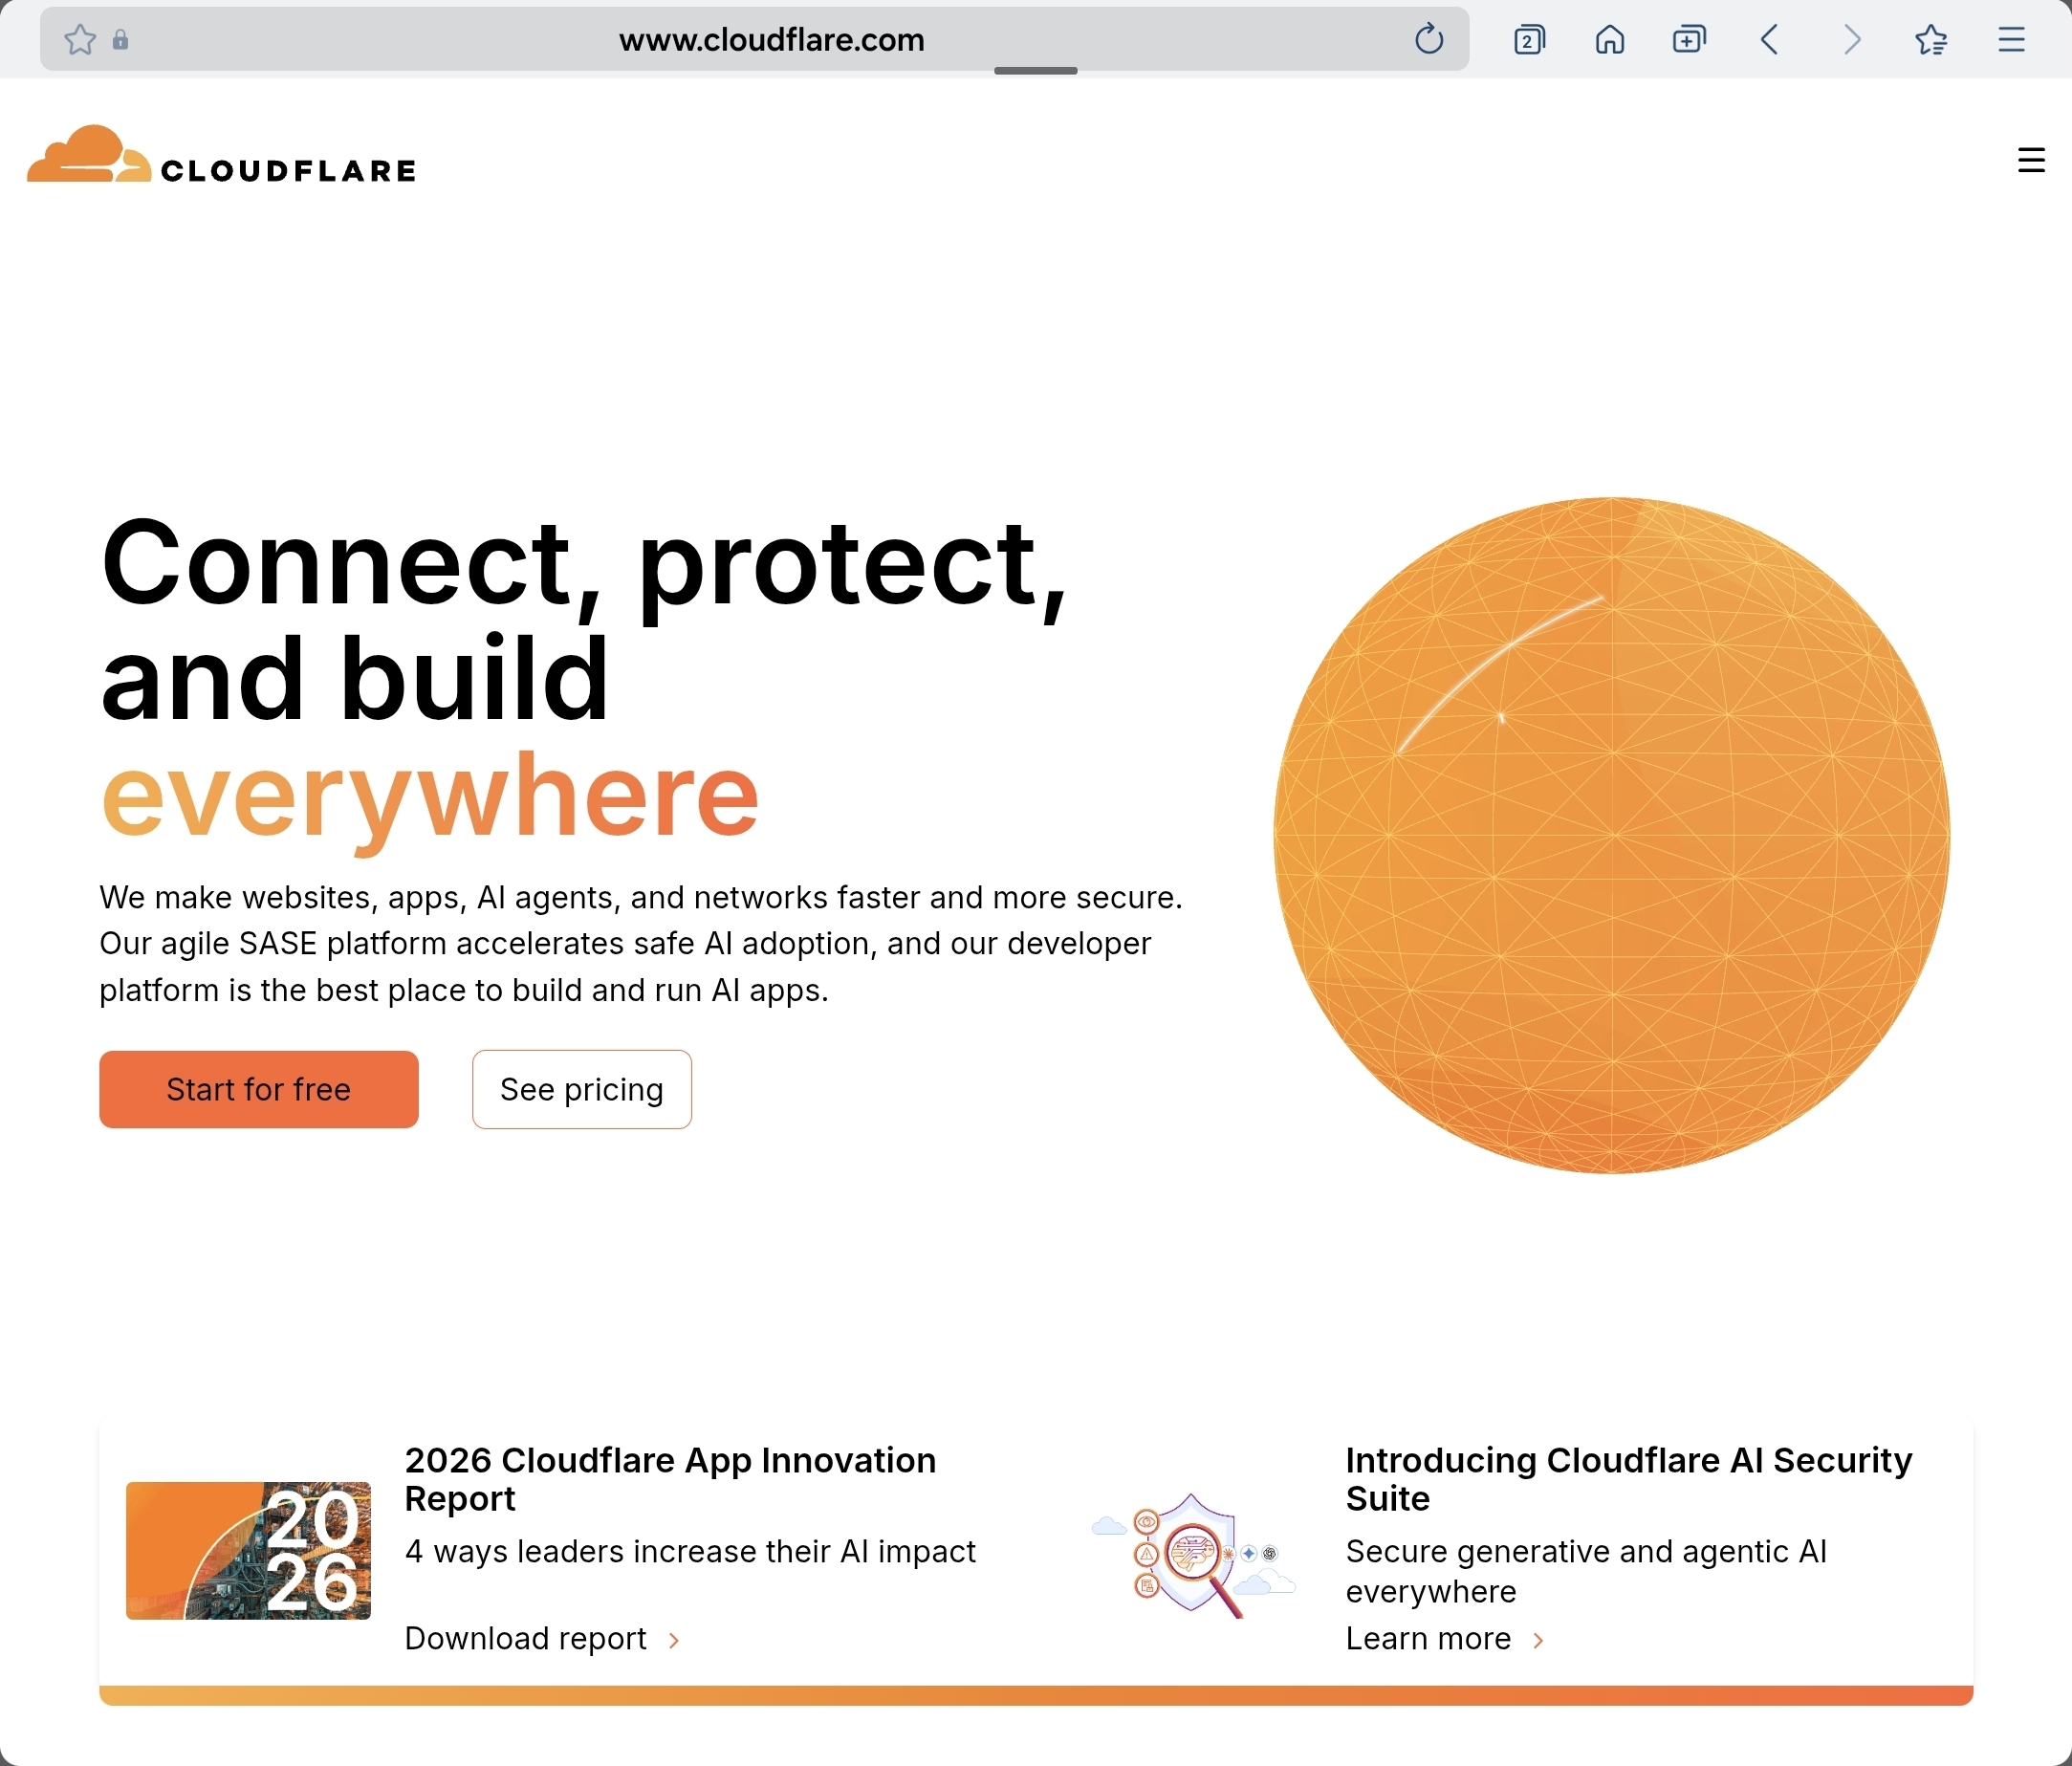
1. 도메인을 구매한다 / Purchase a domain
EN:
Buy your domain at https://www.cloudflare.com/
Cloudflare is often stable with pricing compared to some registrars that offer a very cheap first year and then raise the renewal price.
Still, Cloudflare can also show a first-year discount. Always check the “Renews at $…” price carefully.
KR:
https://www.cloudflare.com/
클라우드플레어에서 구매하는 장점은 도메인 관리비가 매년 들쑥 날쑥 하지않고 정가로 고정되기 때문에 첫 구매시 싼값에 낚여서 다음해부터 몇배로 비싼 바가지를 쓰지 않게 된다.
하지만 클라우드플레어에서도 첫해 할인 다음해부터는 정가결제로 안내하는 부분이 있으니 도메인 구매시 잘 살펴서 볼것.
보통 .com이나 .org등은 도메인 구매 및 관리 유지비가 저렴하고 특이한 주소의 경우에는 첫해는 무척 싸지만 다음해부터 엄청나게 비싸질수 있음을 주의한다.
클라우드플레어 계정 만들기 예시 / Cloudflare signup example
(1) EN: Click “Get started for free”.
(1) KR: 무료로 시작하기를 누른다.
(2) EN: Create your Cloudflare account.
(2) KR: 클라우드플레어 계정을 만든다.
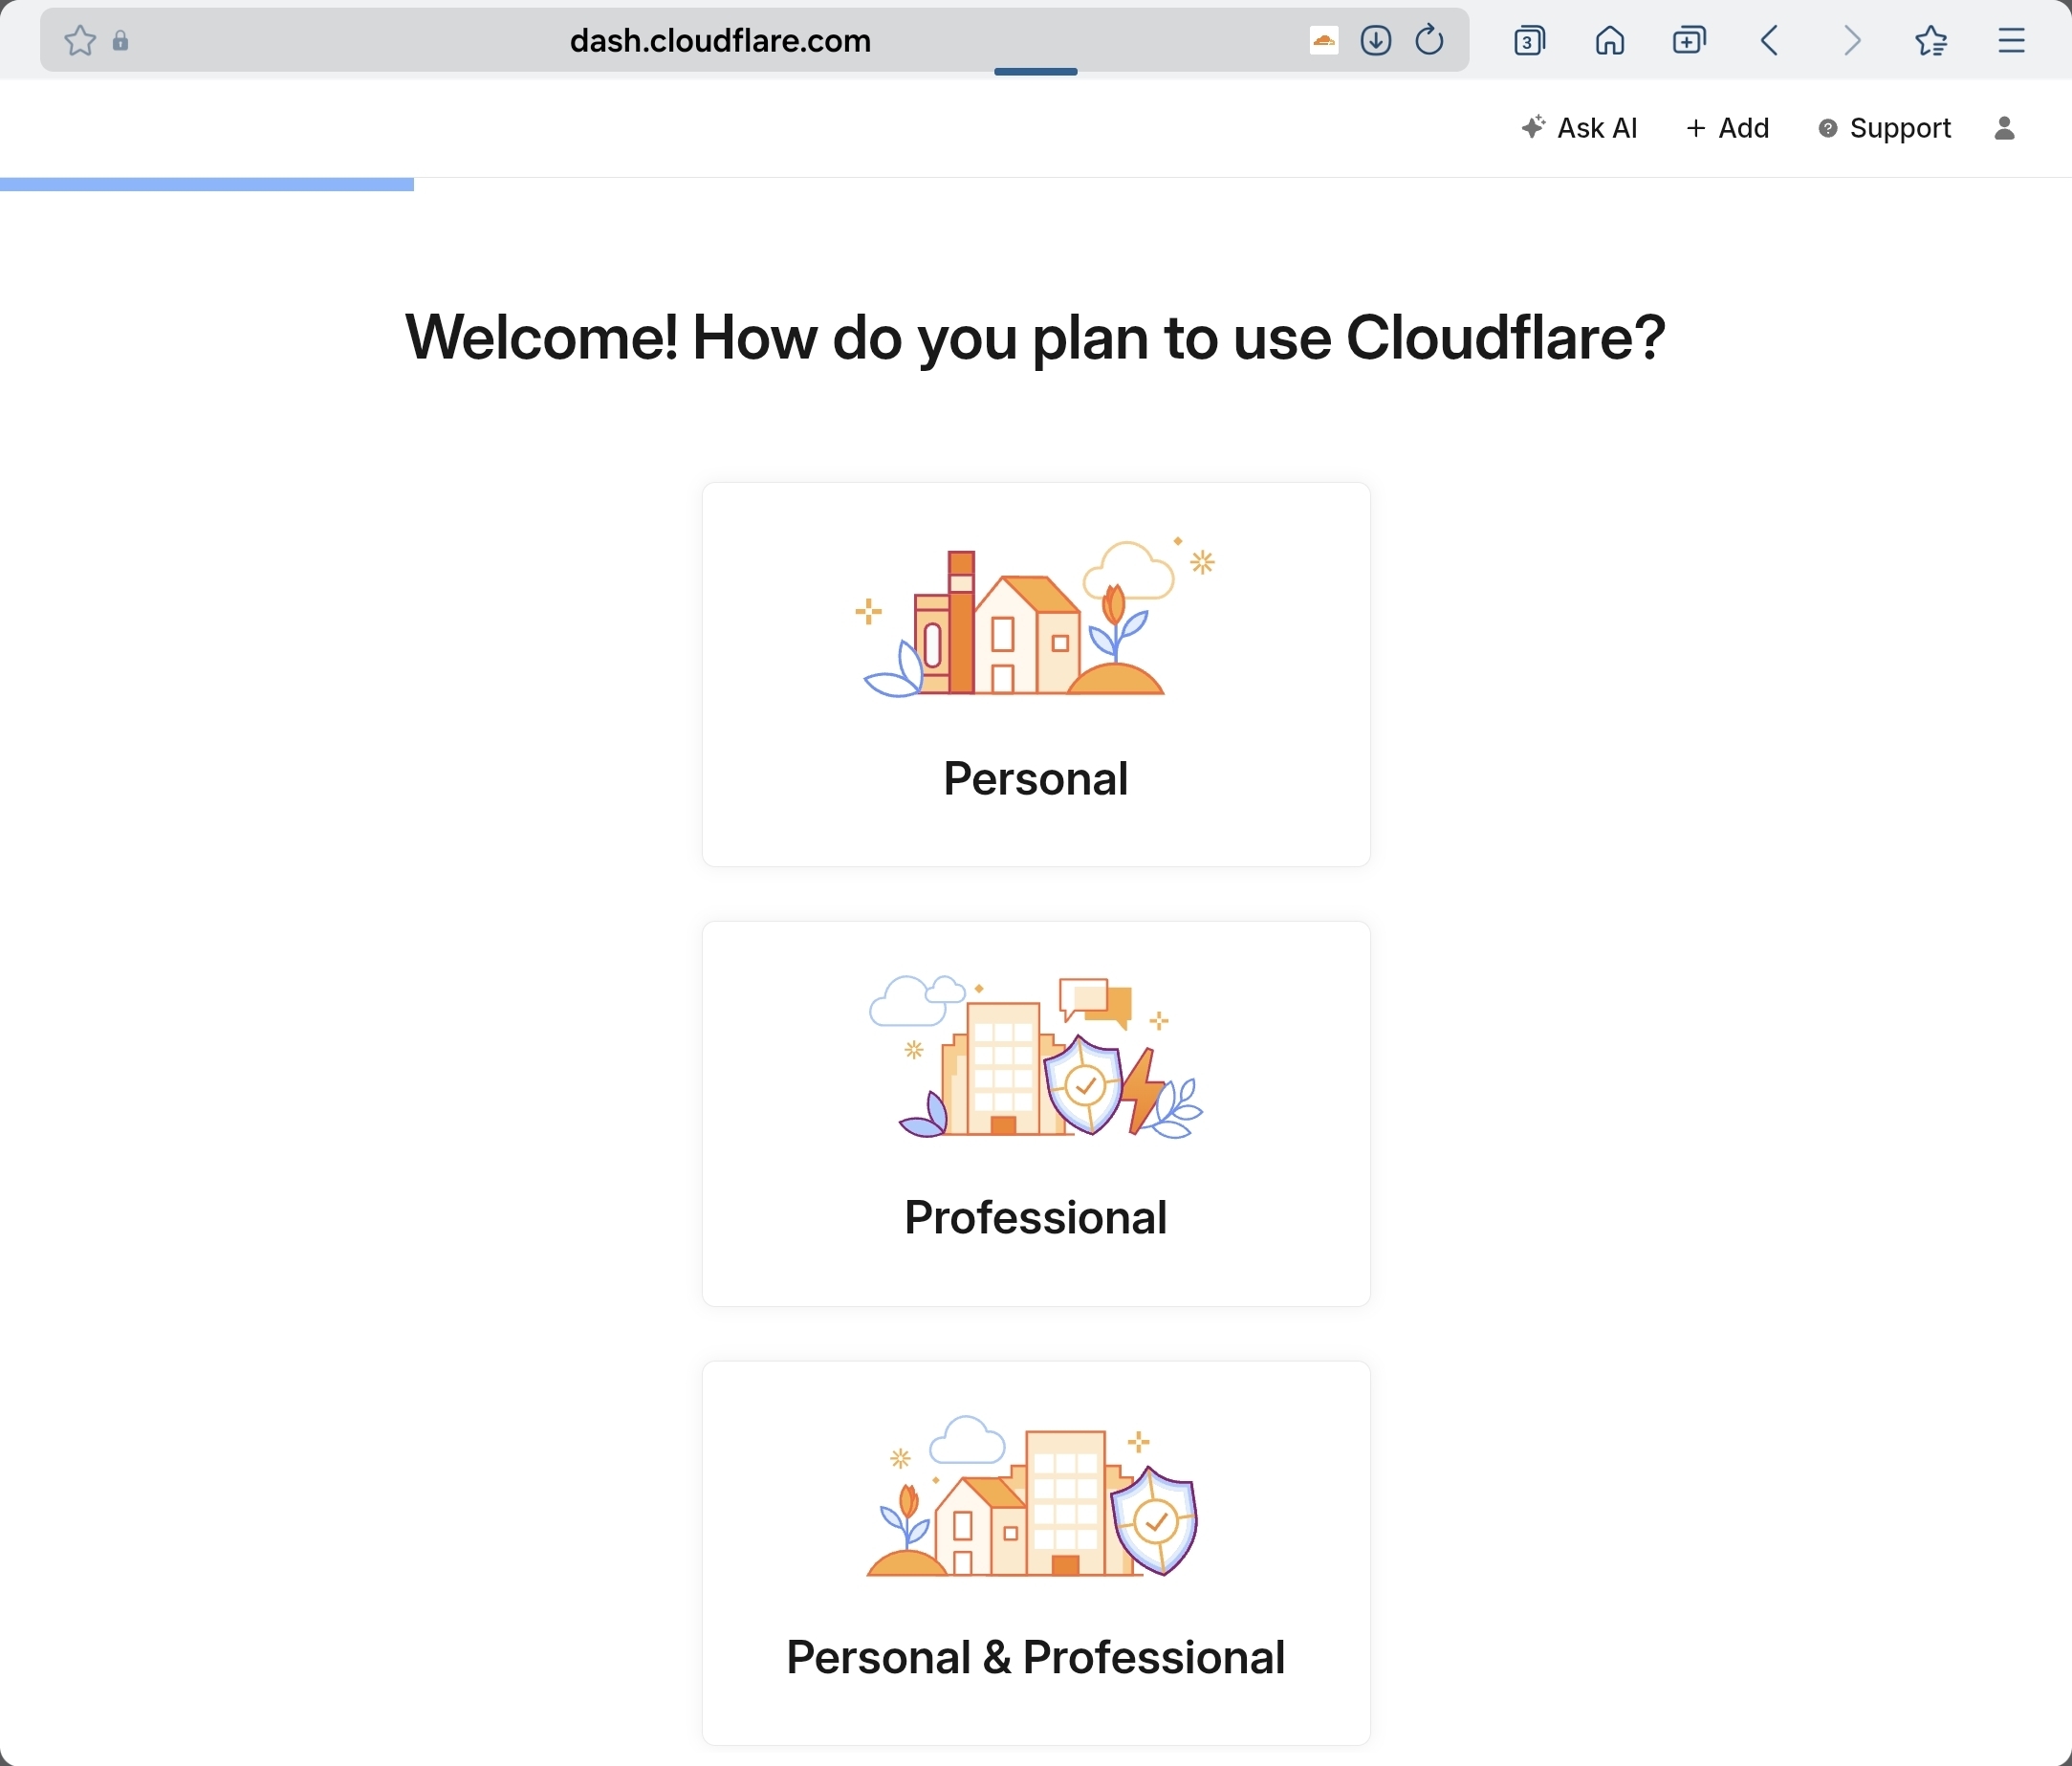
(3) EN: Select “Personal”.
(3) KR: Personal 선택
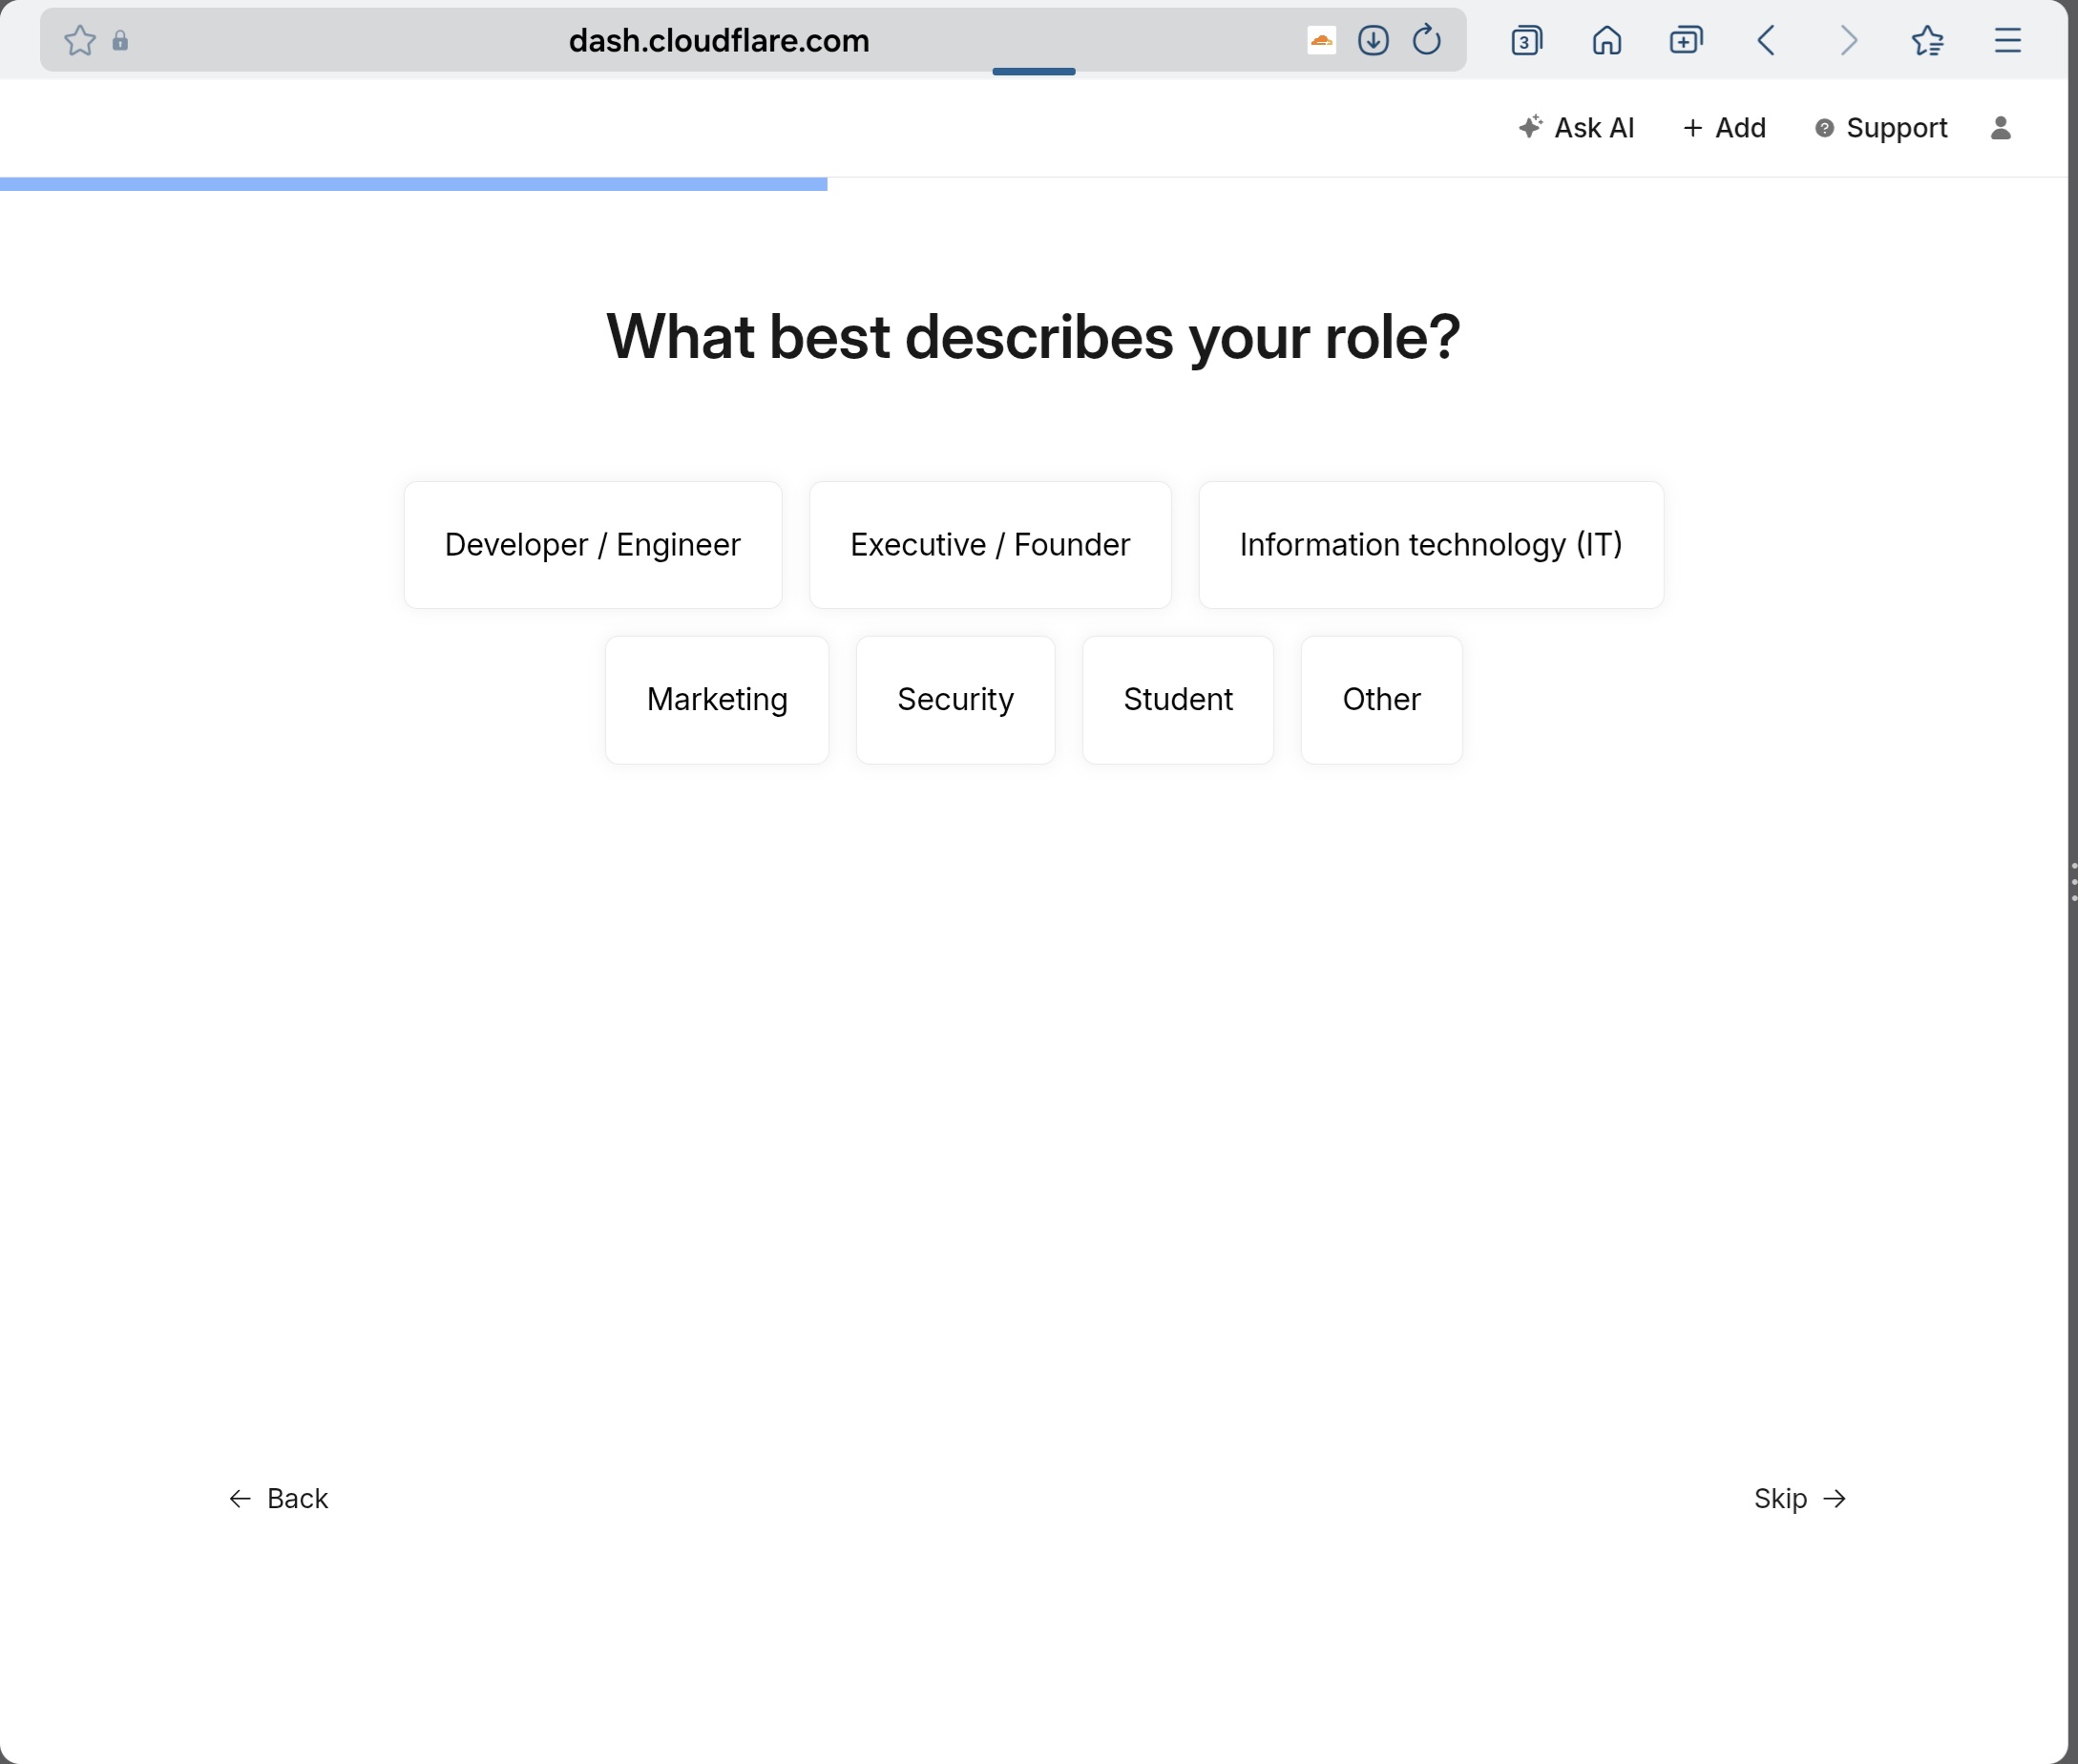
(4) EN: Choose your category/field.
(4) KR: 자신의 해당분야 선택
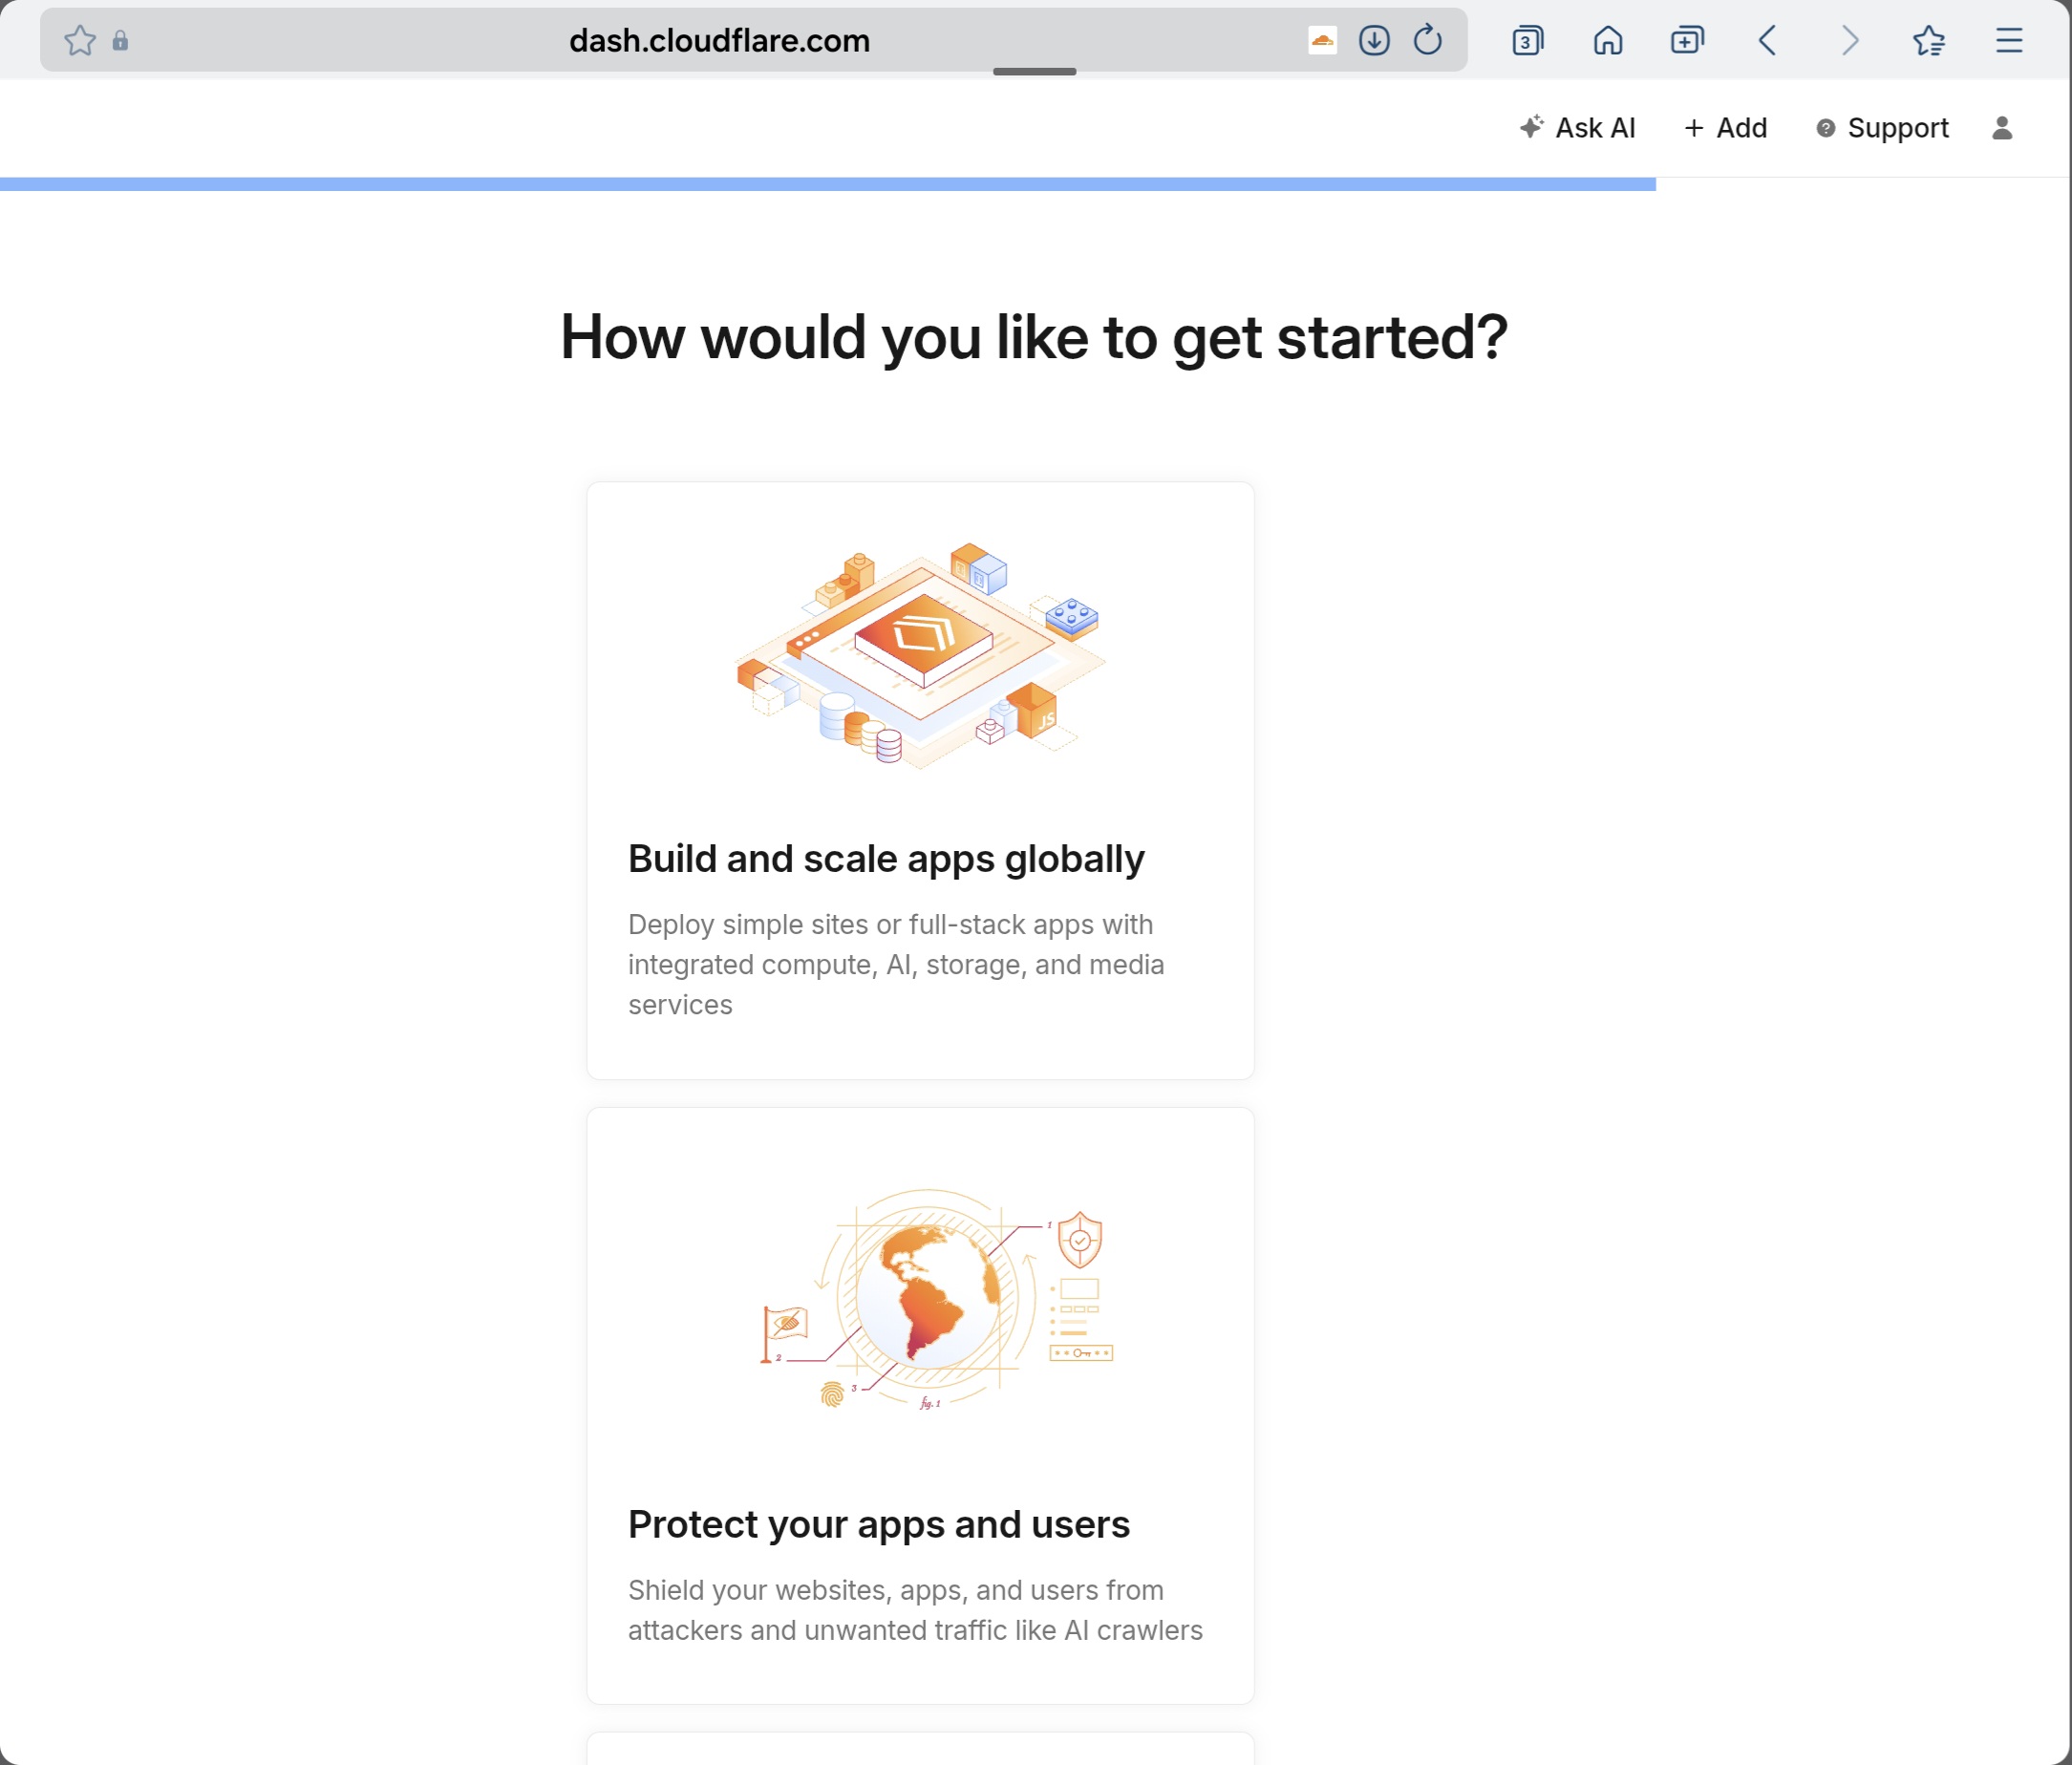
(5) EN: This is the “purpose” screen. Any option works with no feature limitation. In this guide, select “Build and scale apps globally”.
(5) KR: 이 단계는 계정 목적 선택 화면입니다. 어느 항목을 선택해도 기능 제한은 없으며, 본 가이드에서는 “Build and scale apps globally”를 선택합니다
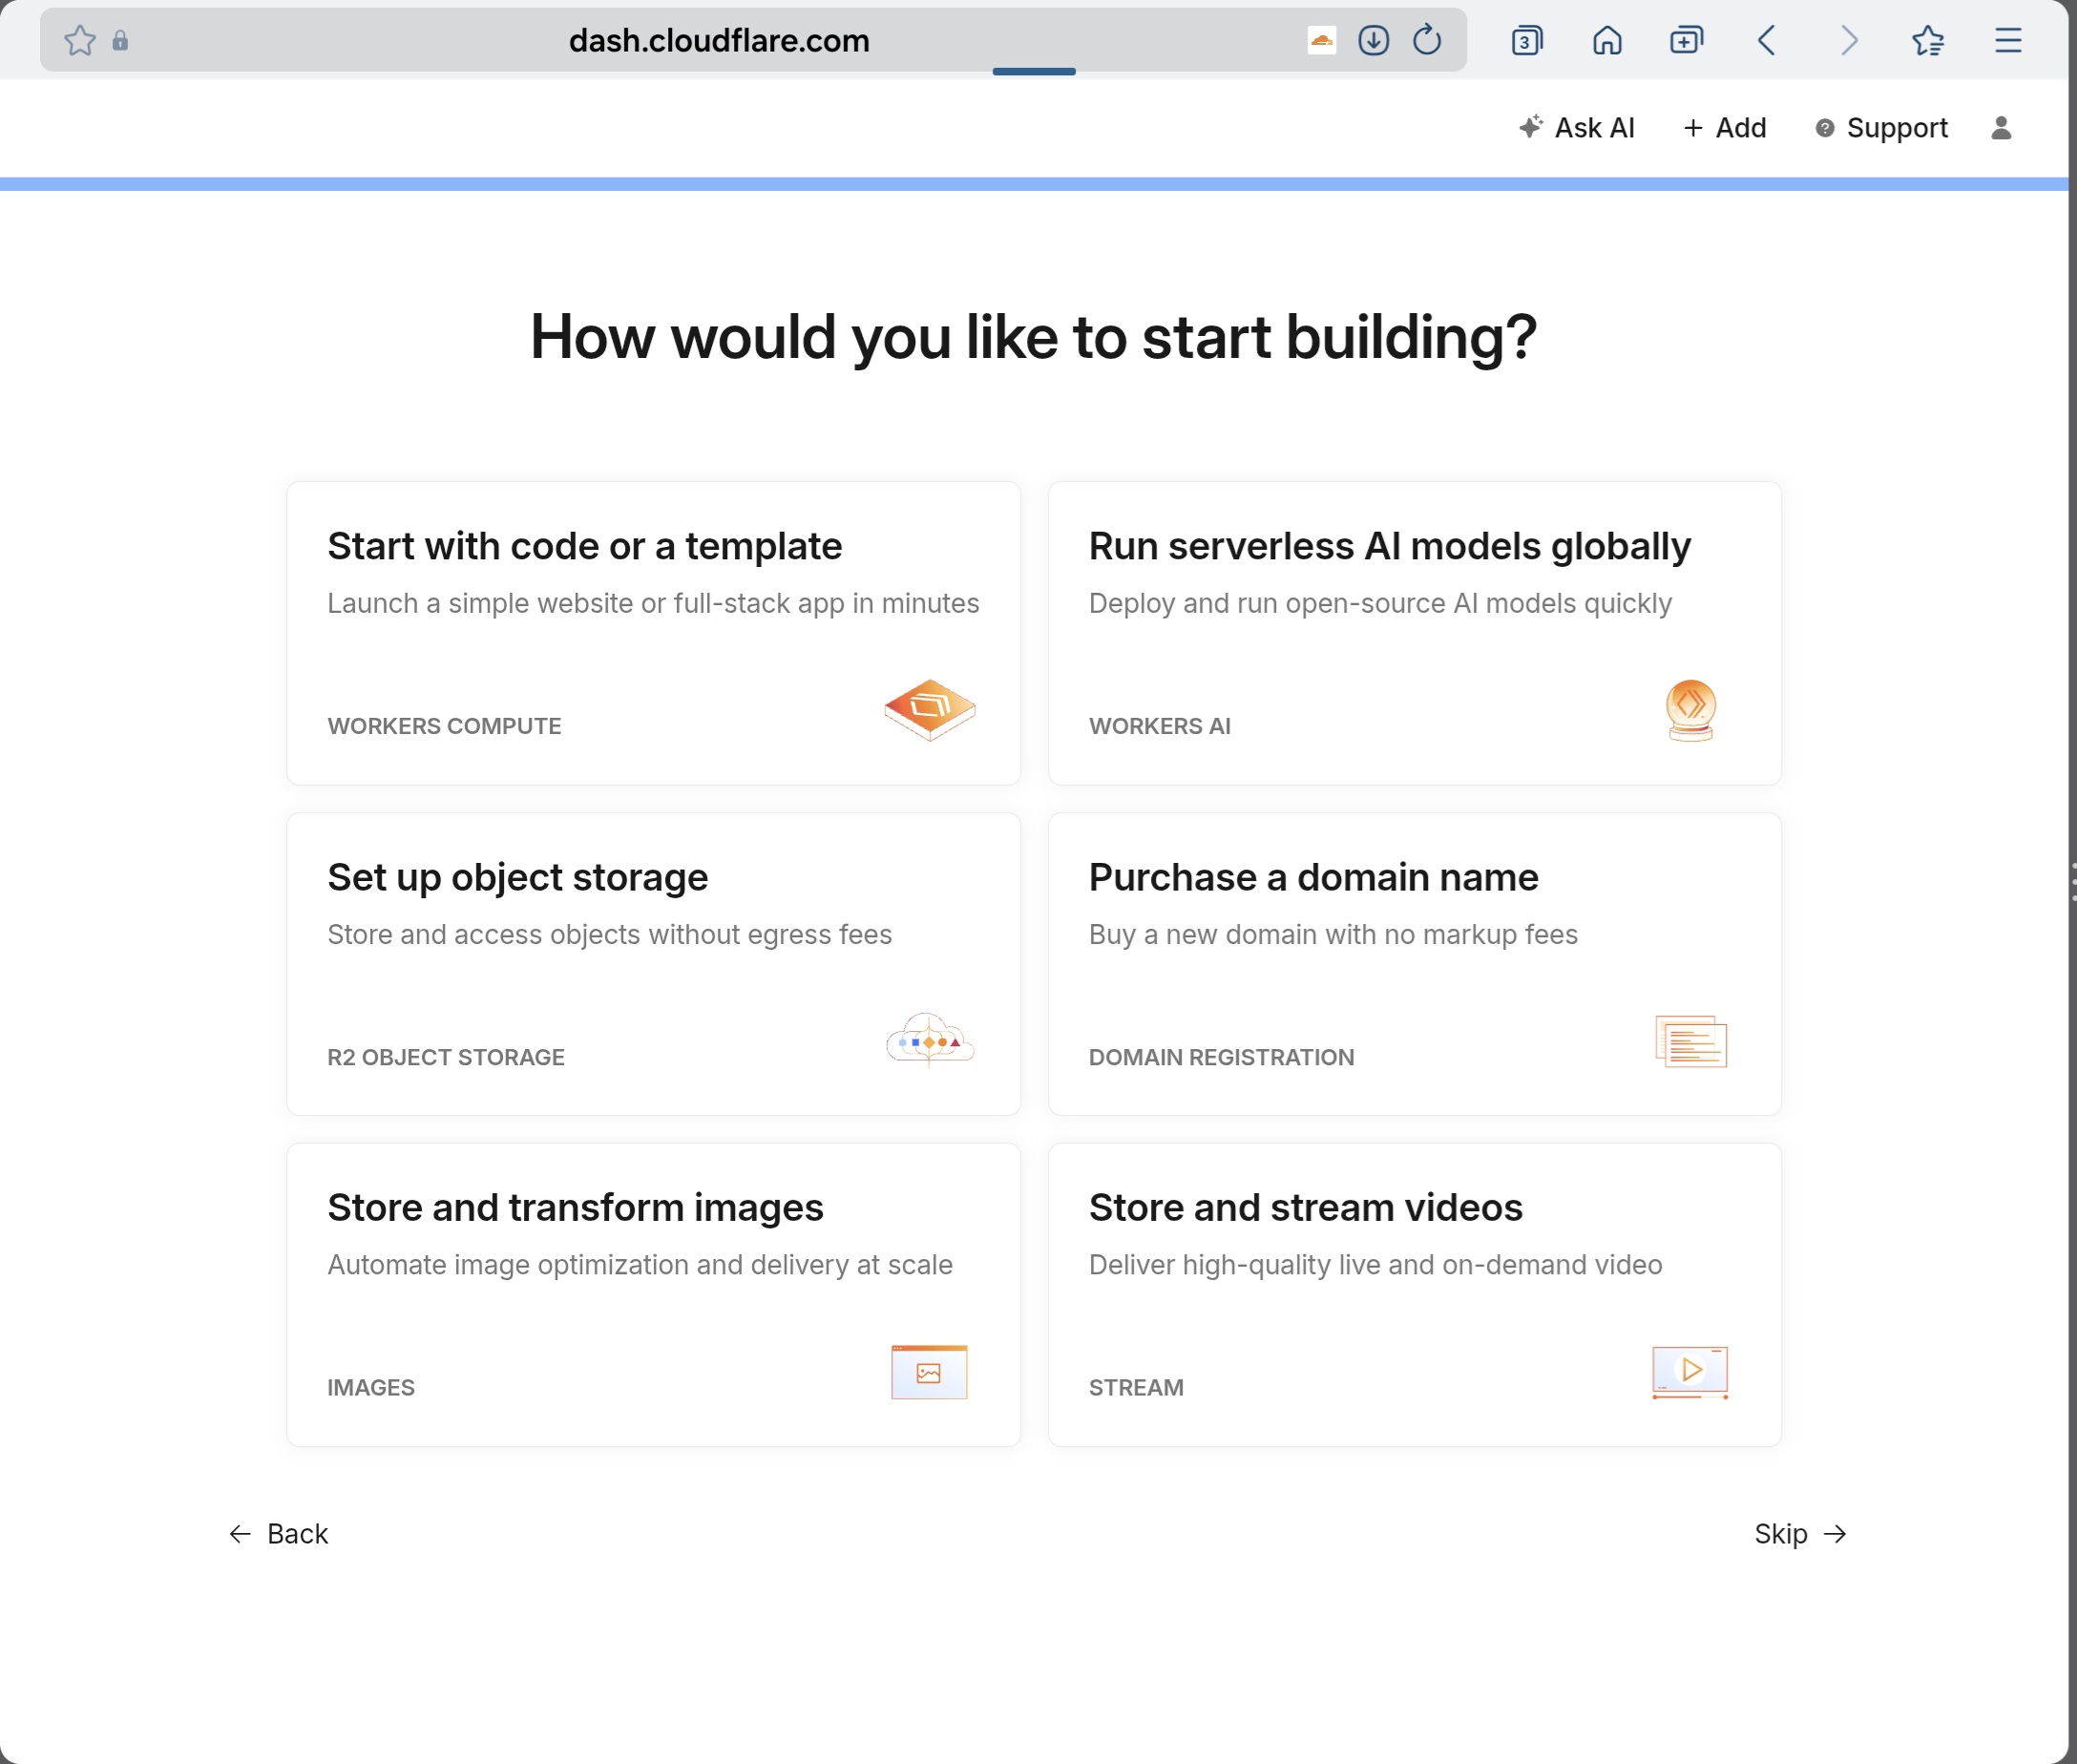
(6) EN: Click “Purchase a domain name”.
(6) KR: “Purchase a domain name” 클릭
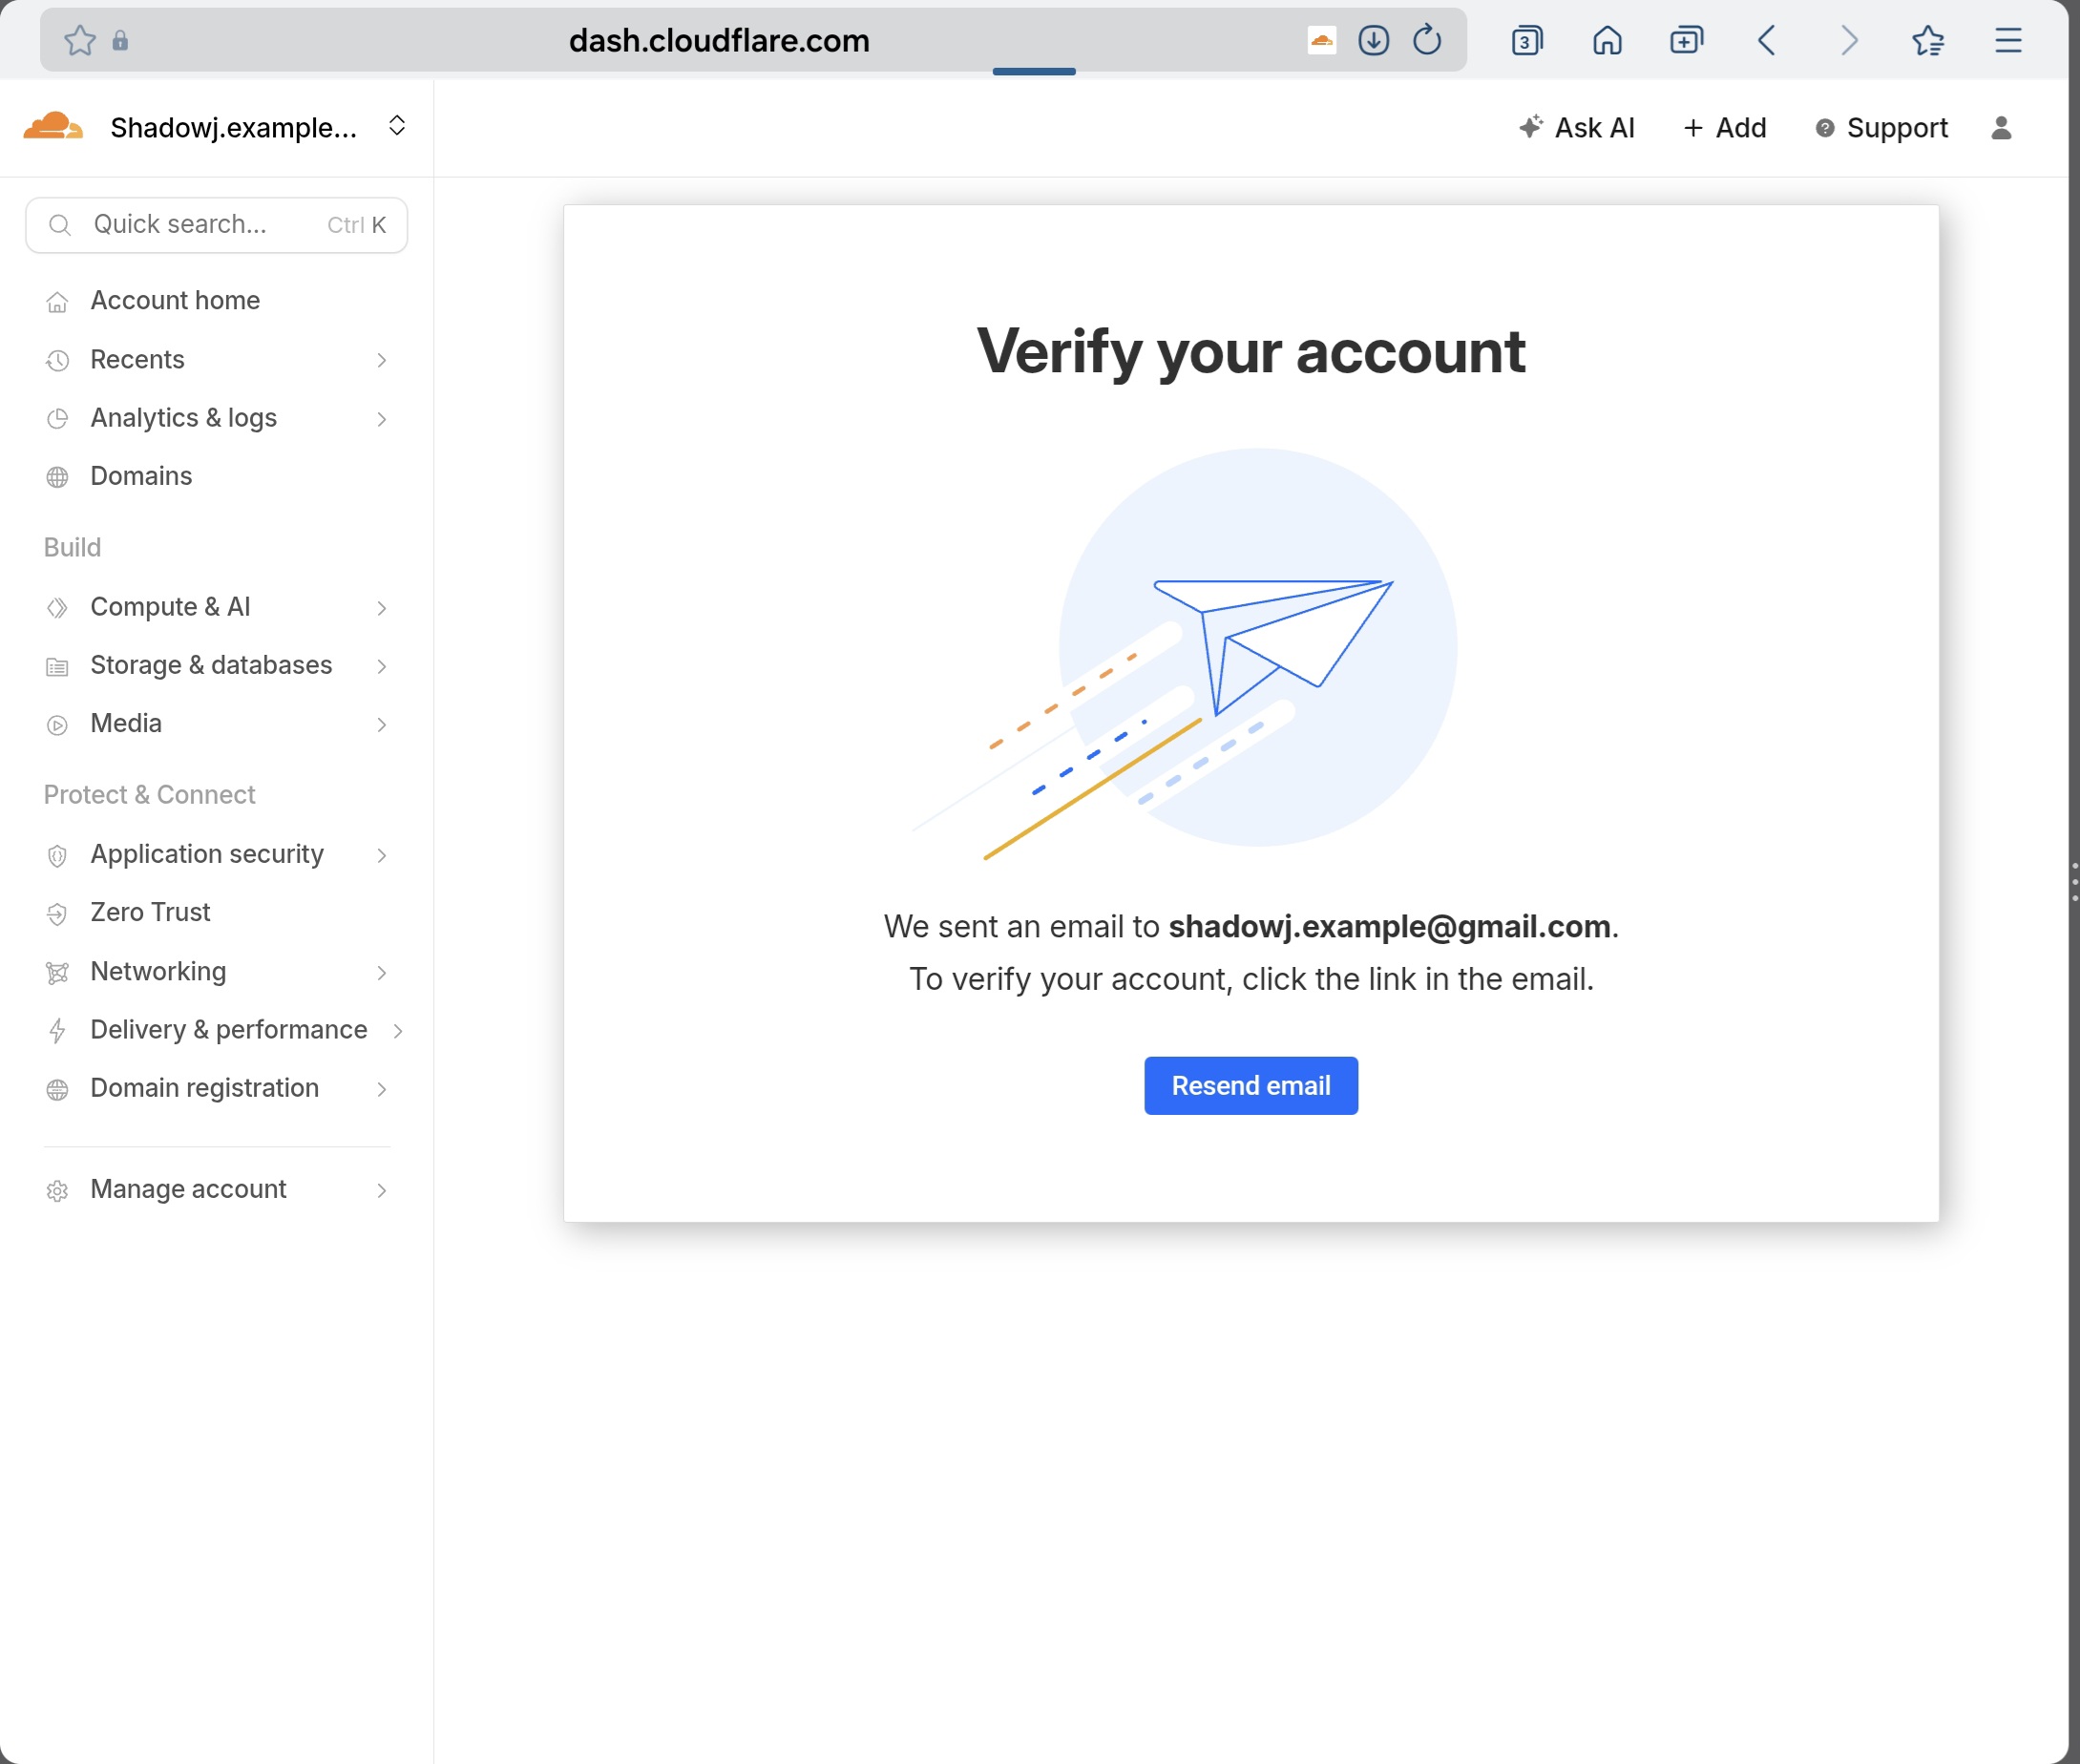
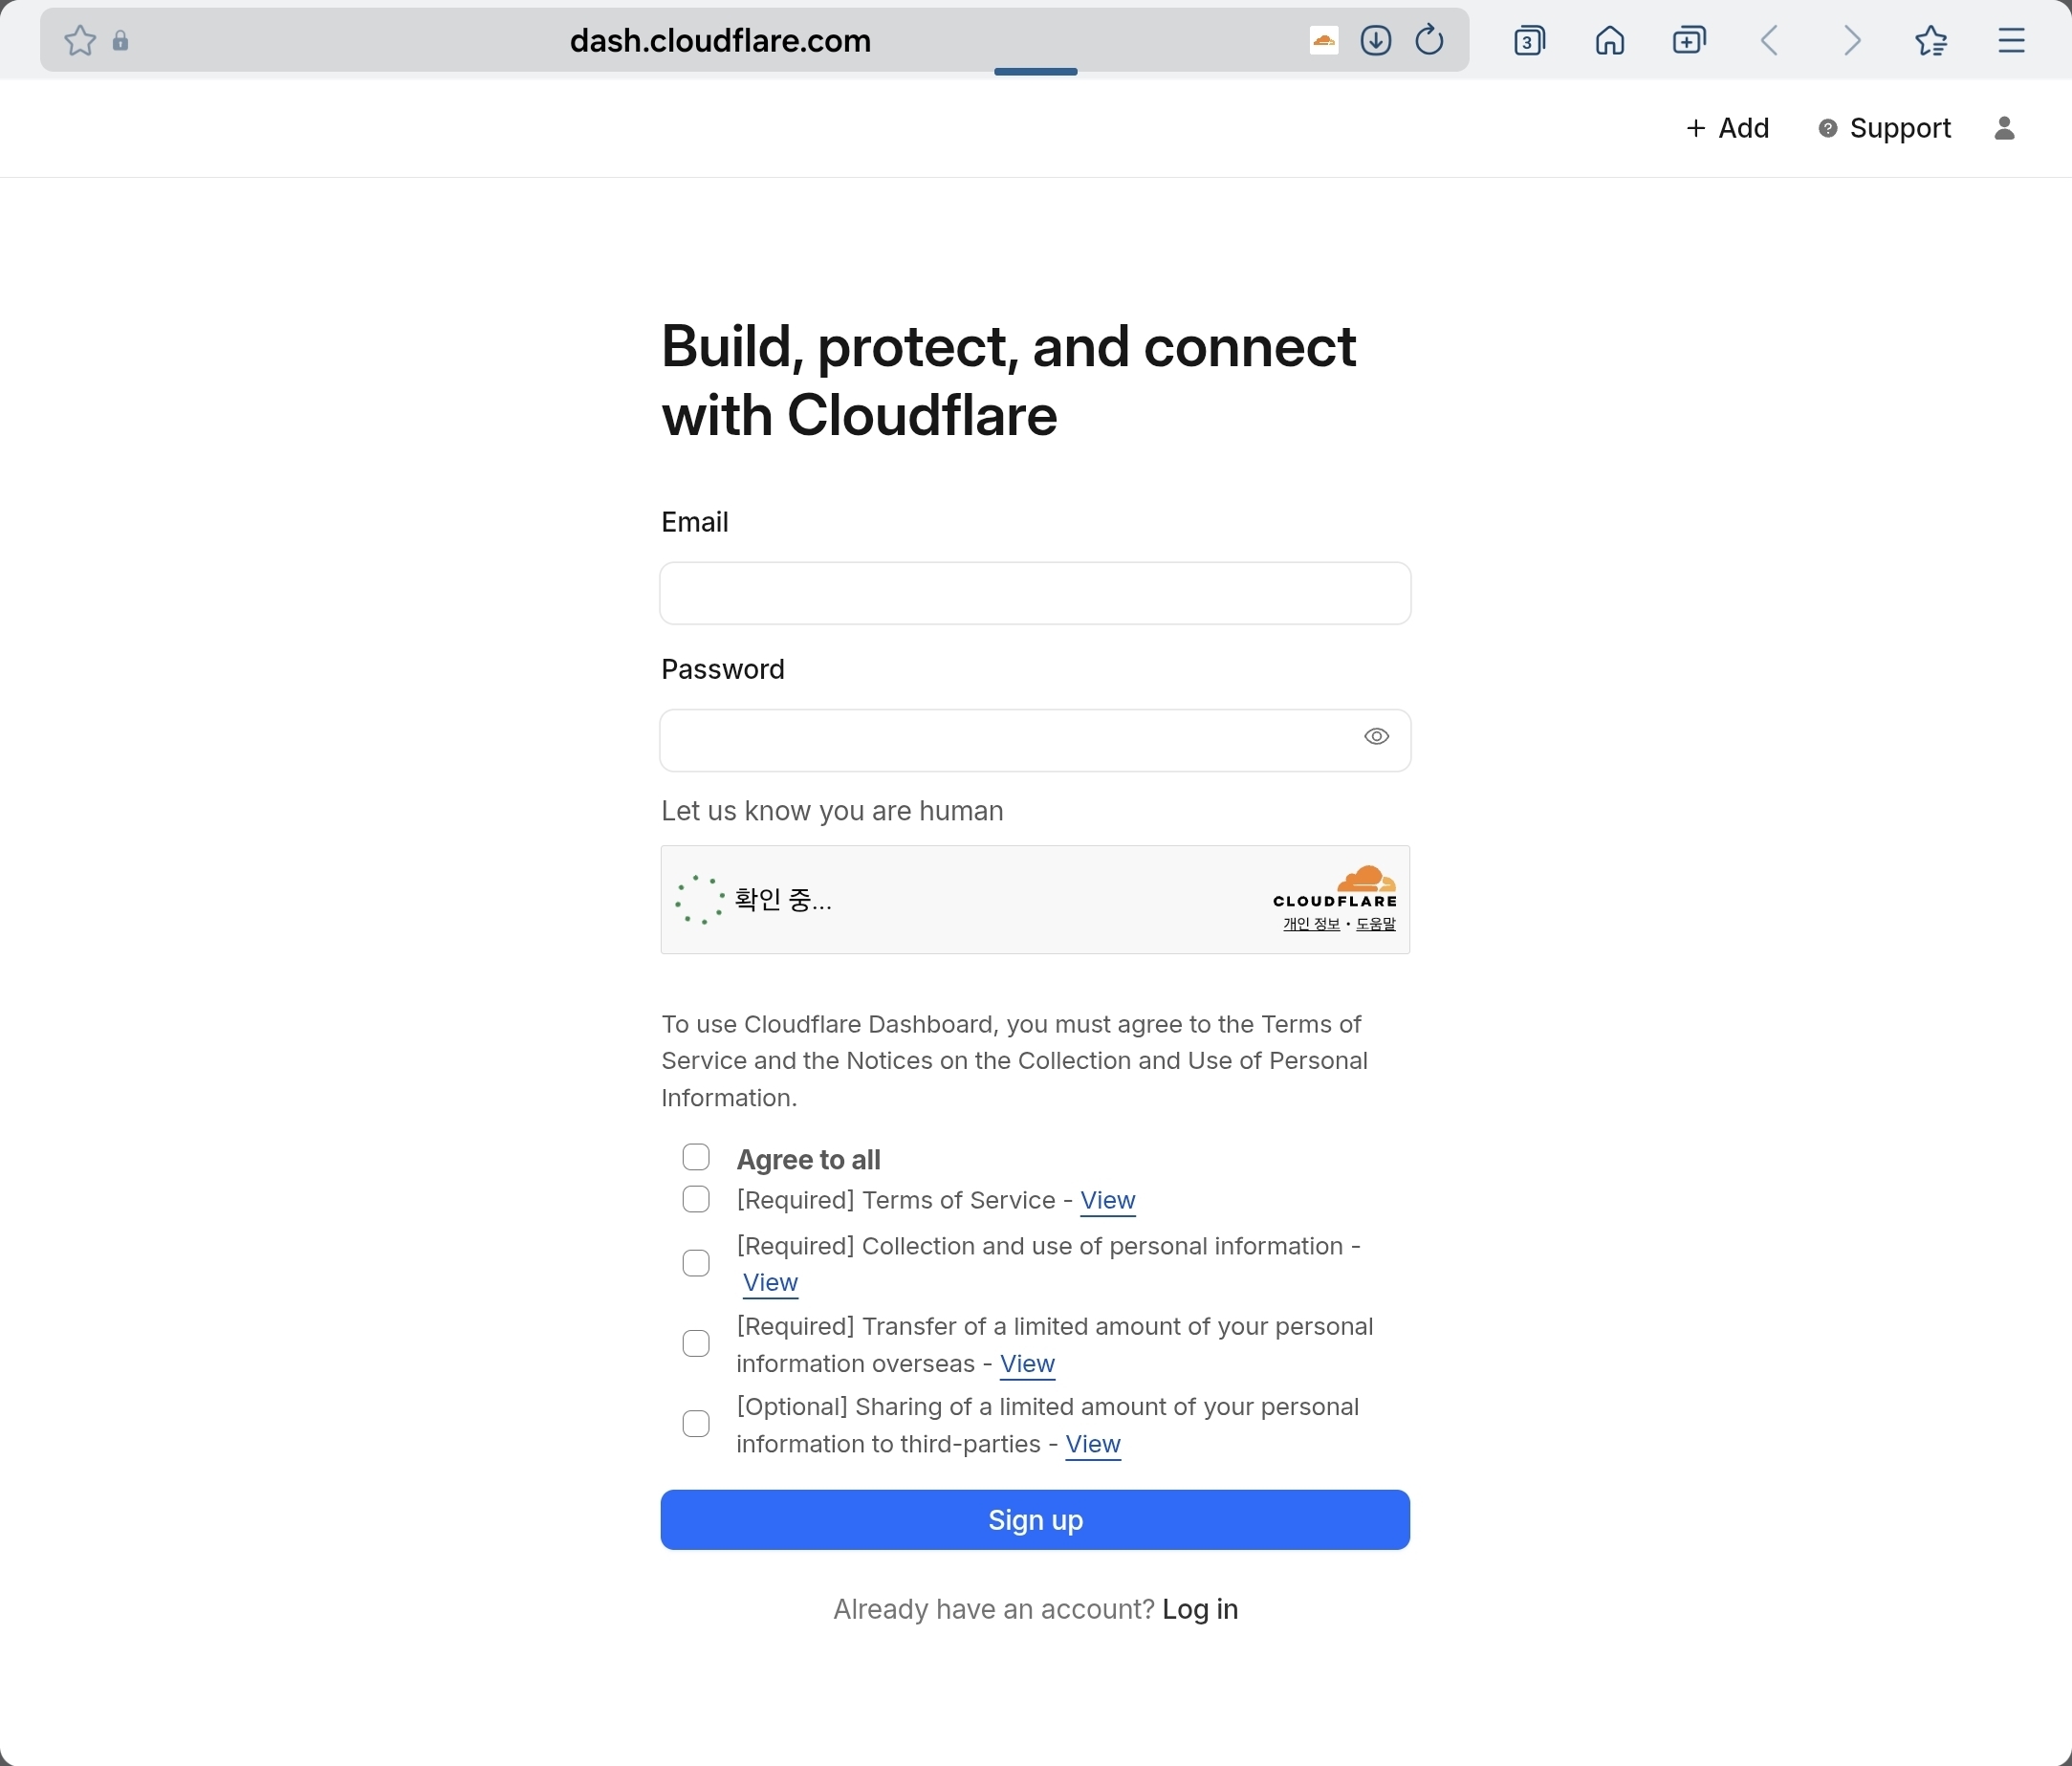
(7) EN: Click the blue button to verify your email.
(7) KR: 파란버튼을 눌러서 이메일 계정 인증을 합니다
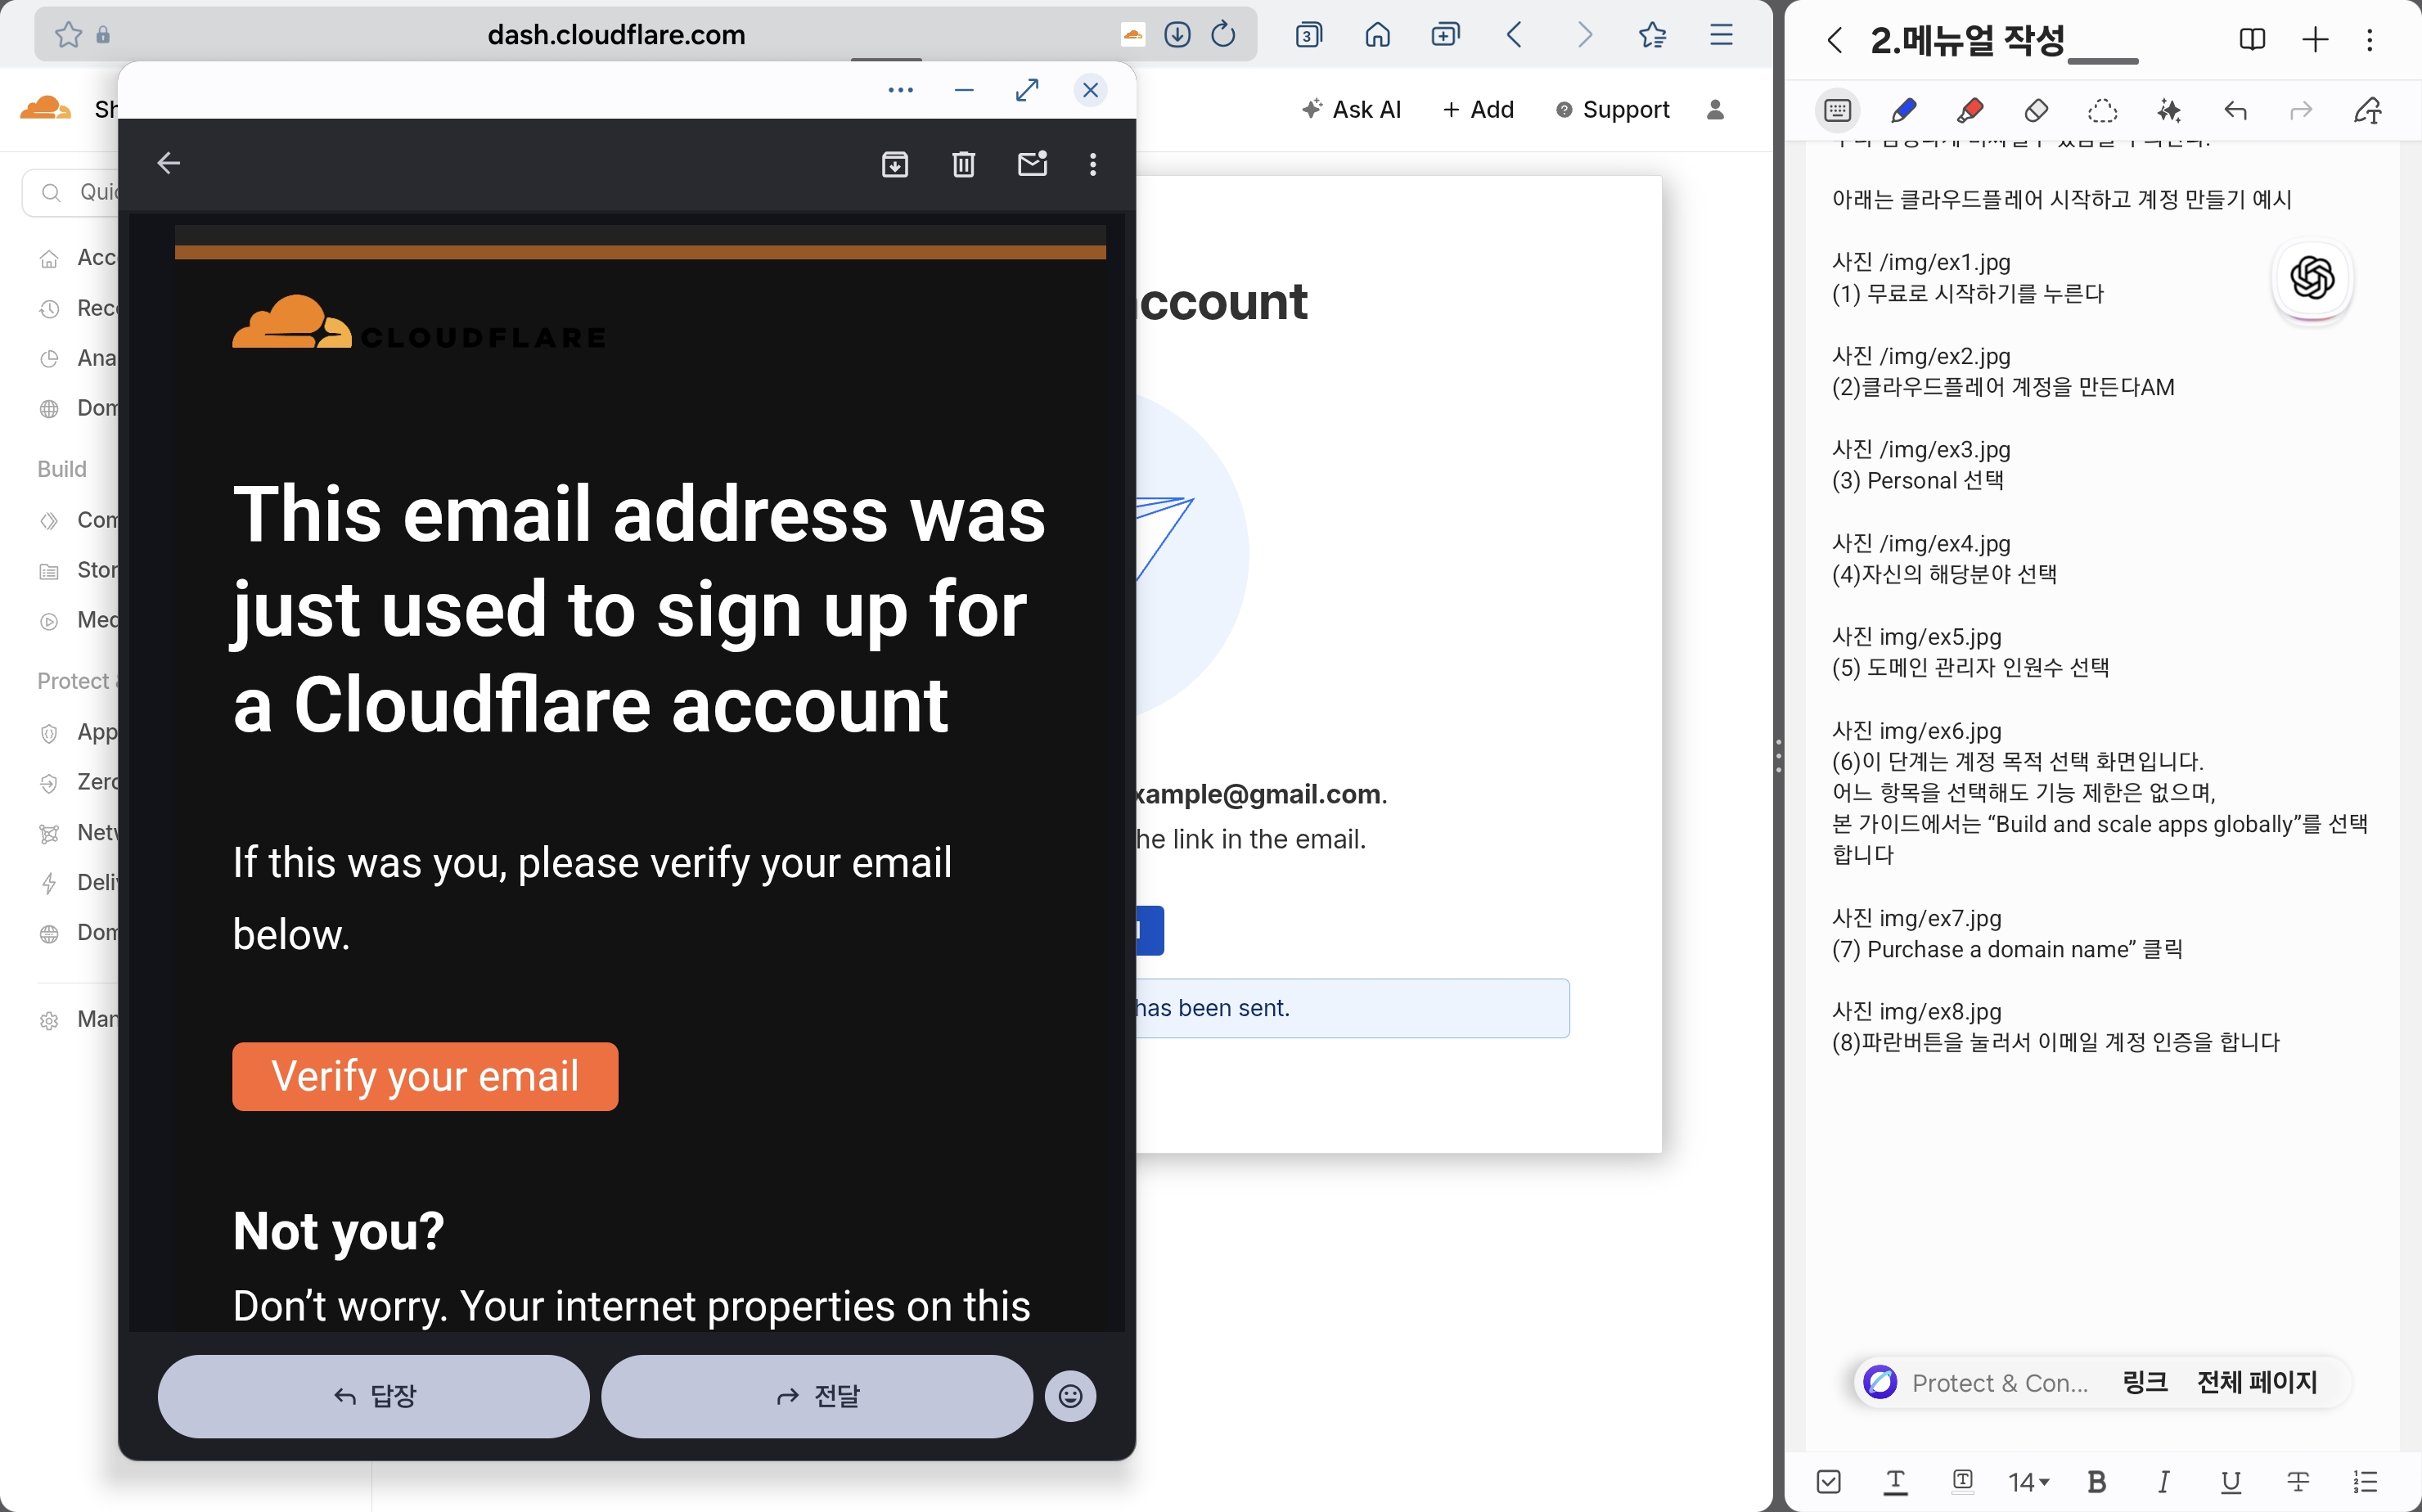
(8) EN: Open your email and click “Verify your email”.
(8) KR: 이메일을 확인해서 주황색 버튼(Verify your email)을 누릅니다.
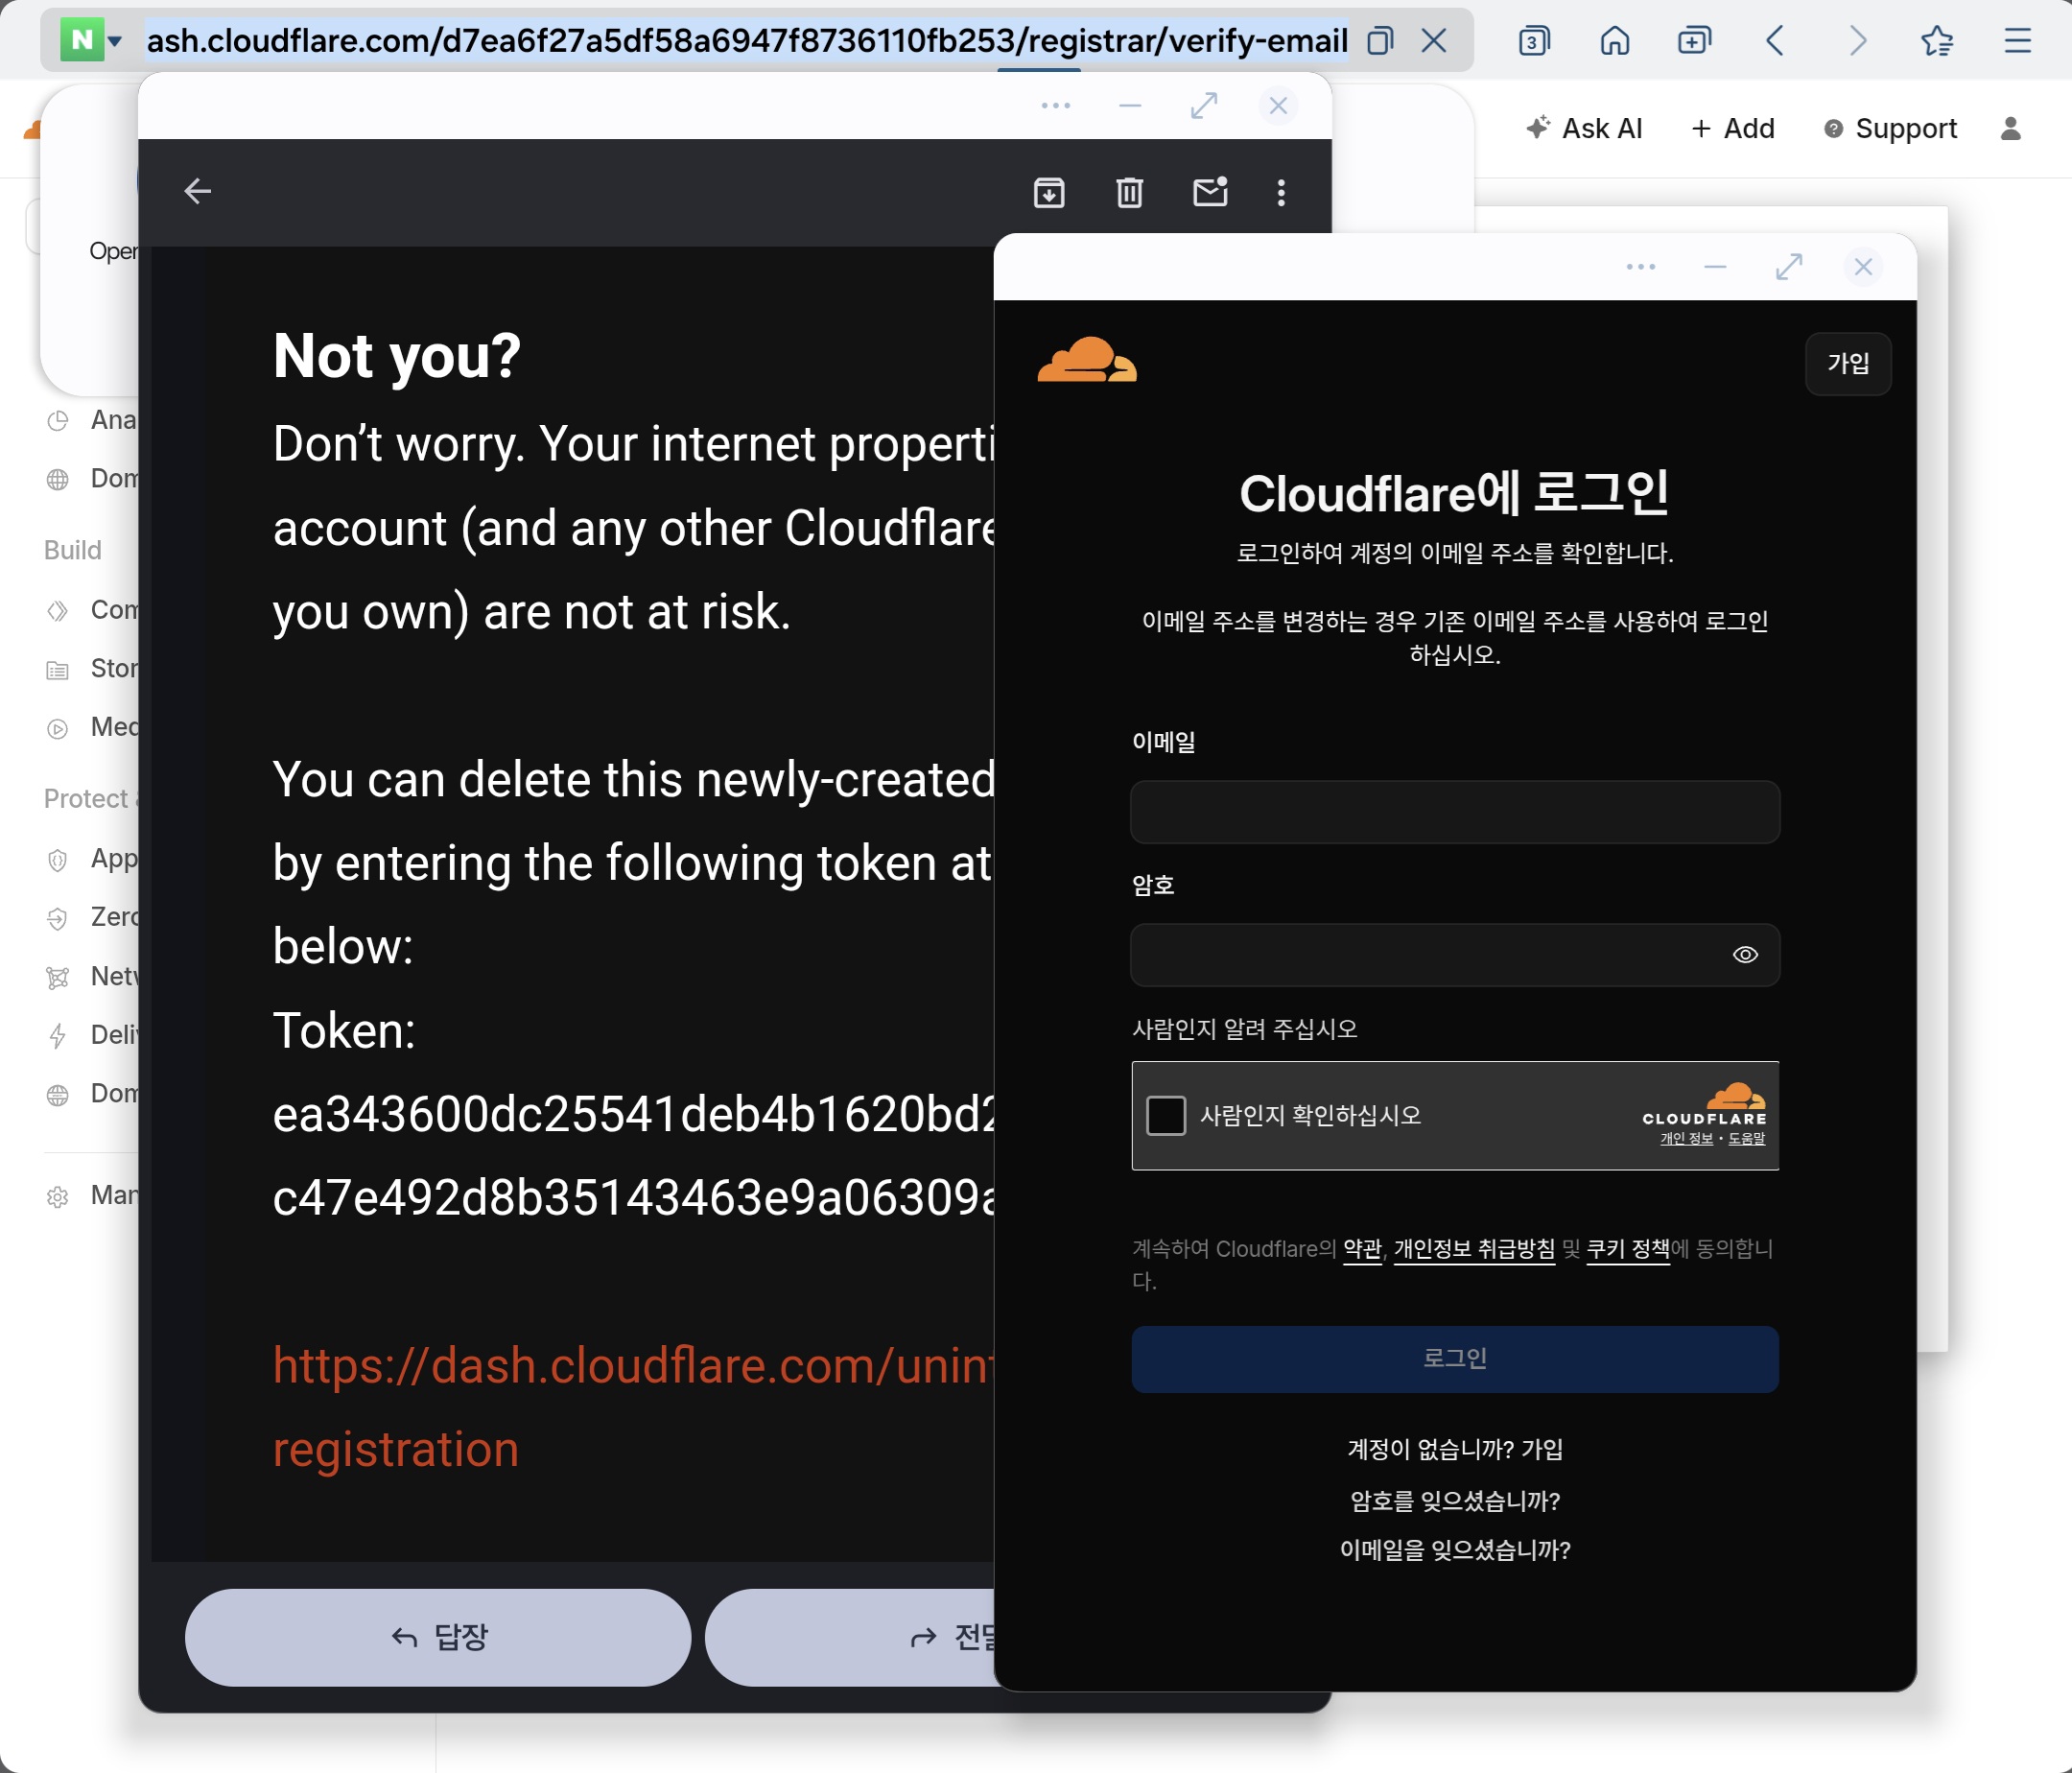
(9) EN: A new browser page may ask you to log in again. Log in with your email and password.
(9) KR: 새로운 브라우저 창이 뜨면서 클라우드플레어에 다시 로그인 하라는 화면이 뜹니다. 새롭게 다시 이메일과 비밀번을 누르고 로그인하세요.

(10) EN: Search for your domain name.
(10) KR: 사용하고 싶은 도메인을 검색하면 도메인 구매 창이 나옵니다.
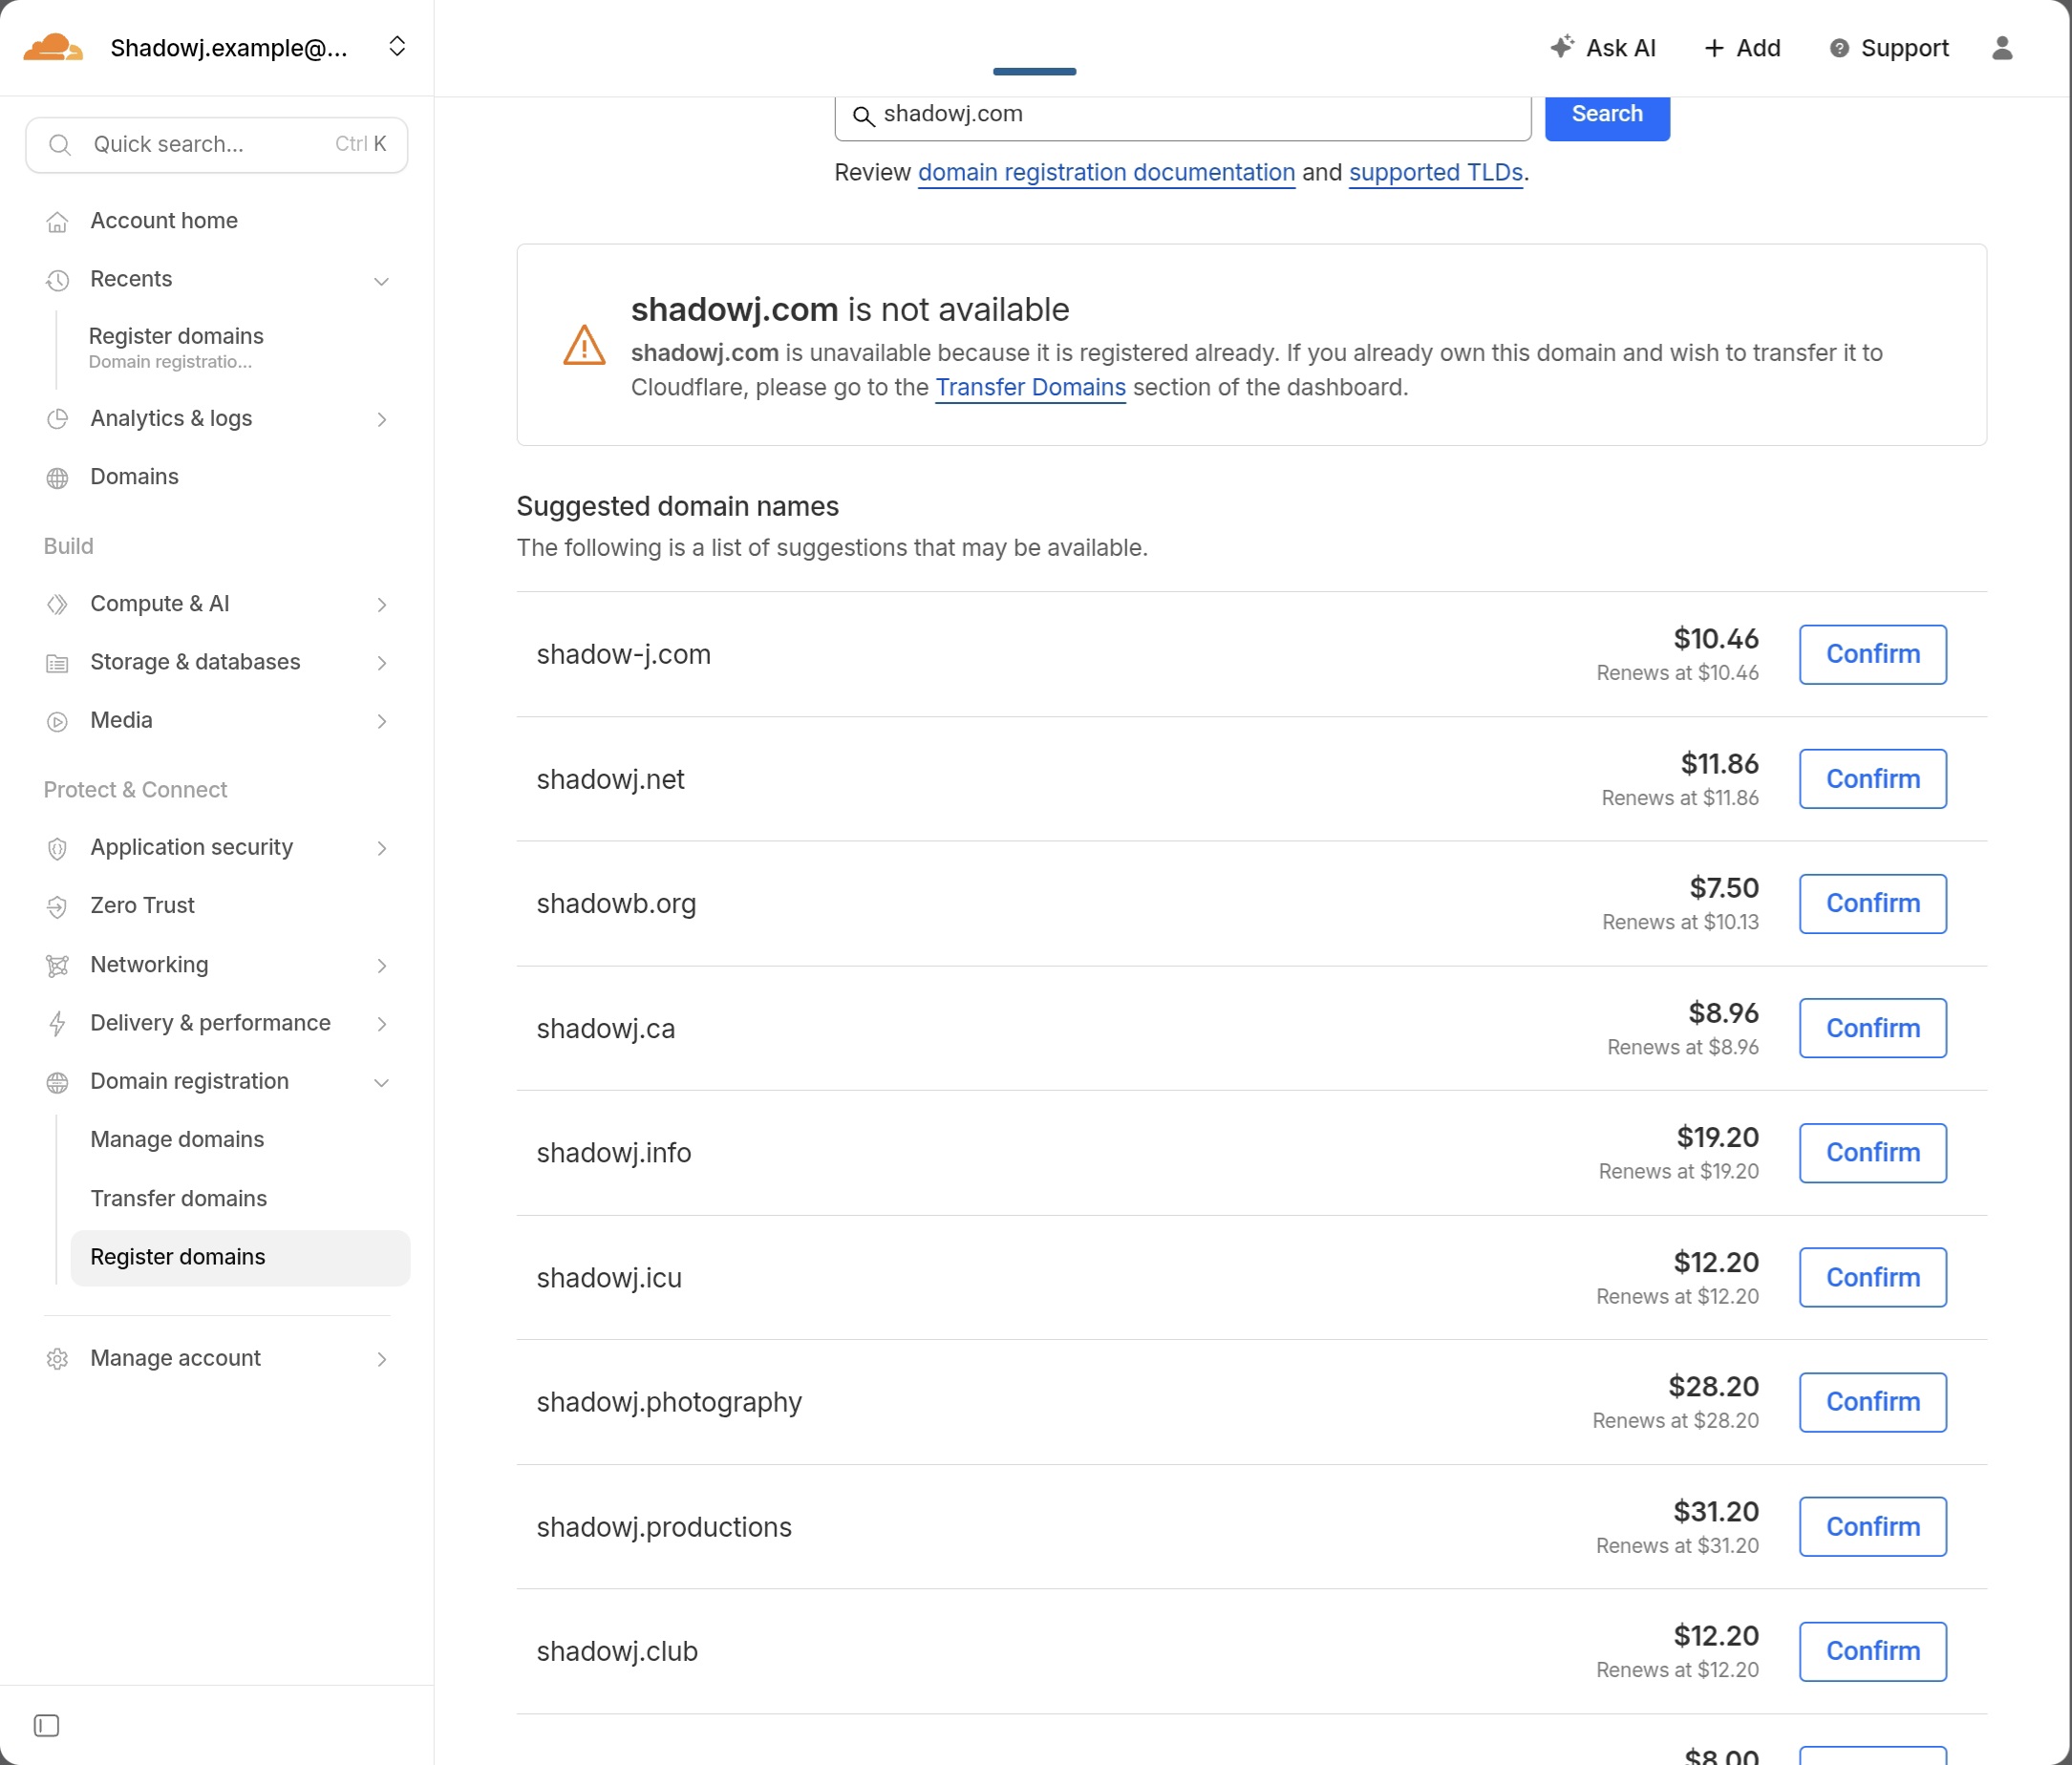
(11) EN: Check the price and carefully read “Renews at $…”. Confirm if the renewal price is acceptable, then click Confirm.
(11) KR: 원하는 도메인에 맞는 가격이 있는지 확인하고 작은글씨로 Renews at $ 가격을 보고 다음해부터 지불하게 될 금액까지 확인한후 비용이 적절하면 Confirm을 누릅니다.
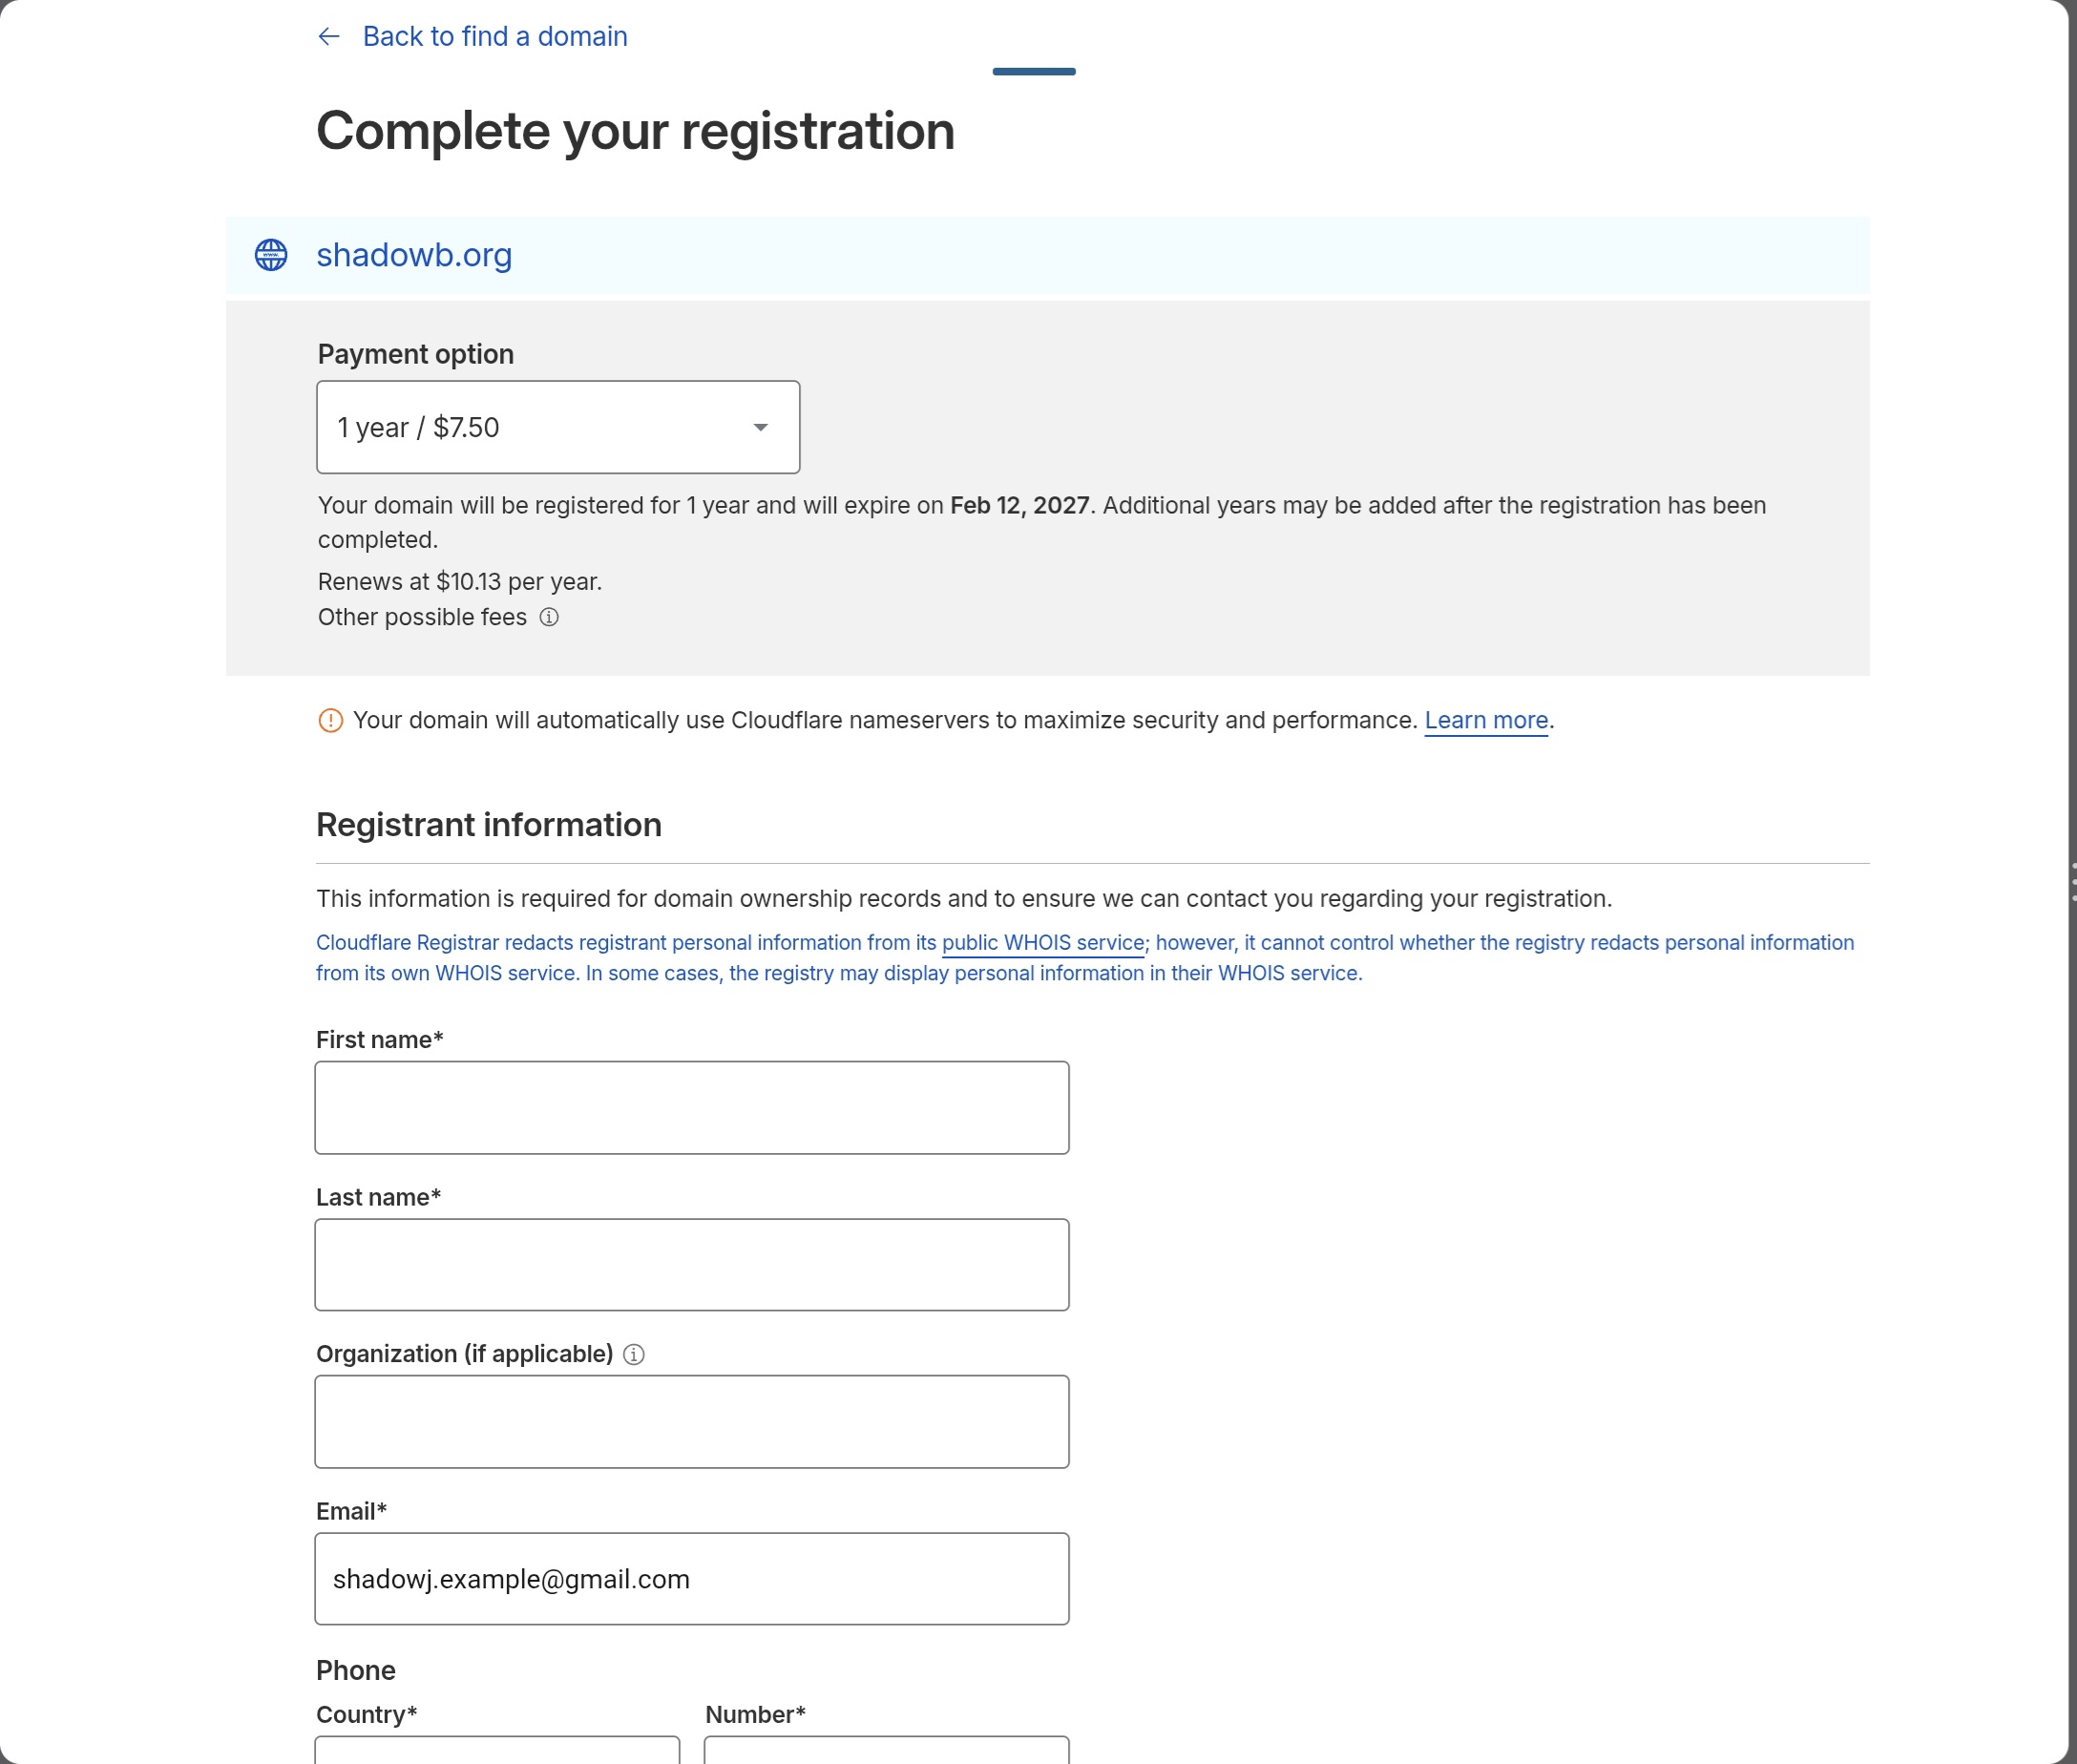
(12) EN: Enter payment information and pay.
(12) KR: 결제정보를 입력하고 결제를 누릅니다.
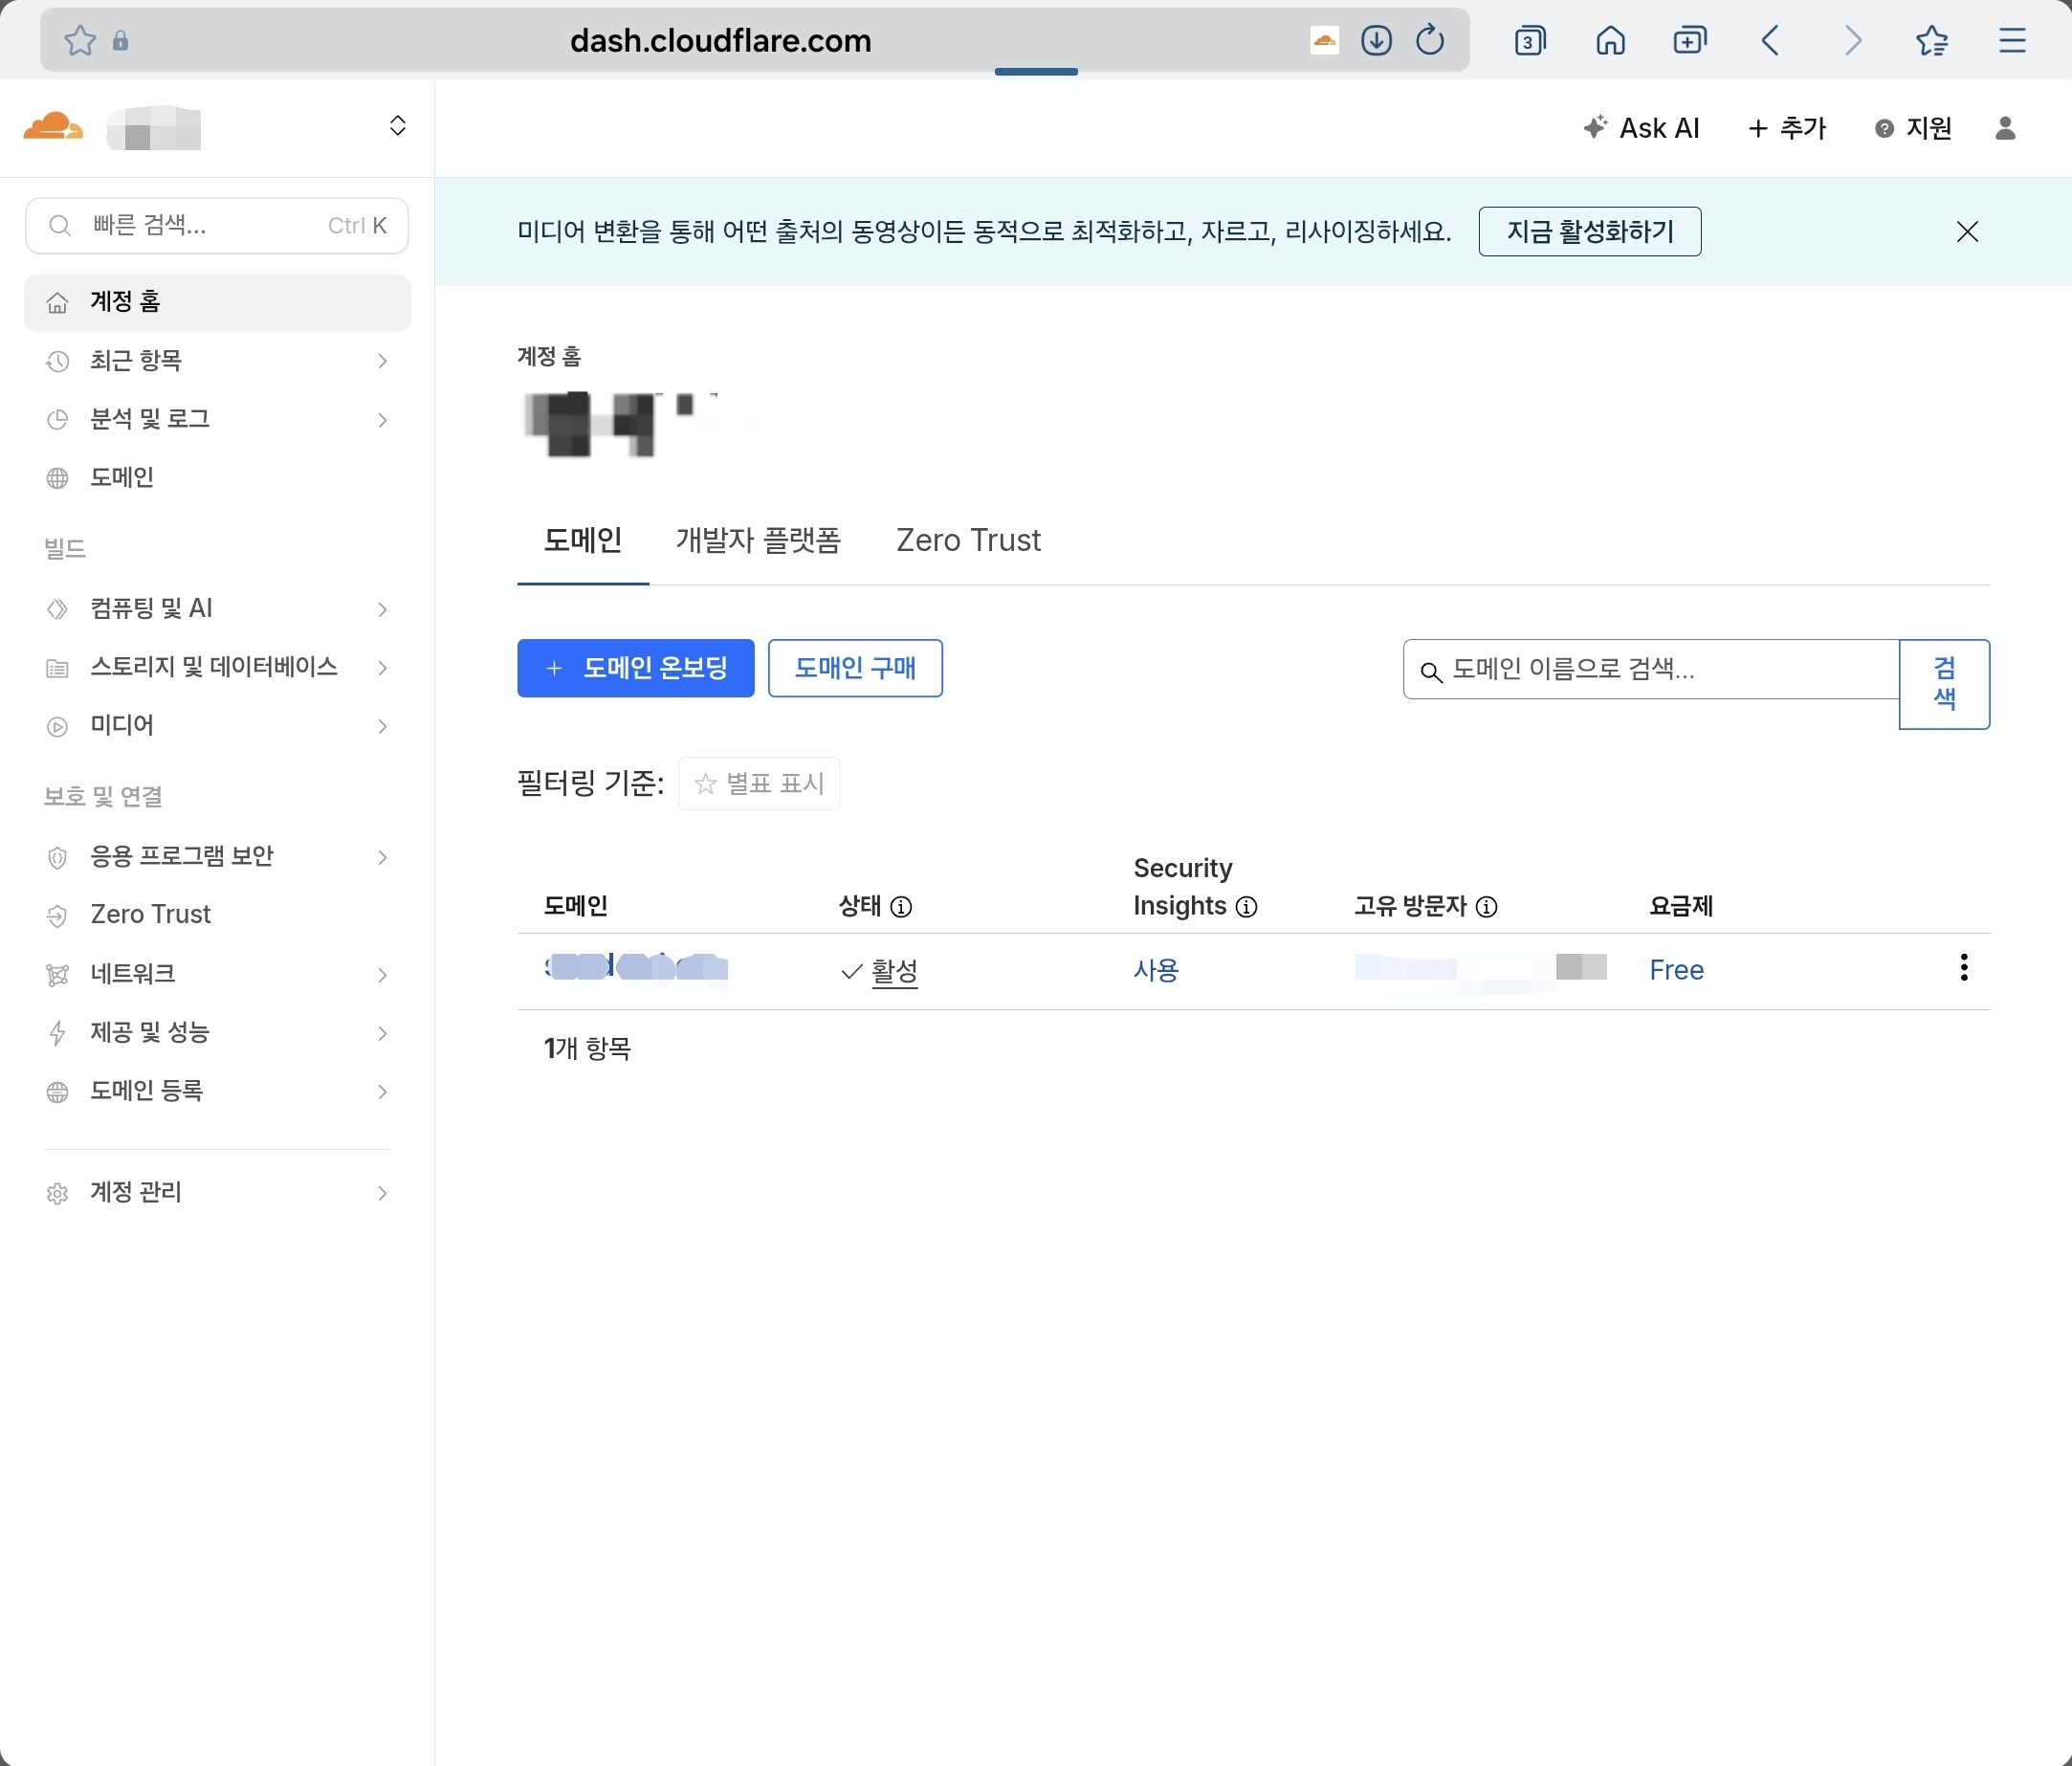
(13) EN: Confirm the domain is active. Domain purchase is complete.
(13) KR: 자신이 구매한 도메인이 활성상태인것을 확인합니다. 클라우드플레어 도메인 구매는 완료되었습니다. 다음에 깃허브 레포와 도메인을 연결할때 다시 이 페이지에서 추가설정을 하게 됩니다.
2. 깃허브 계정을 만든다 / Create a GitHub account
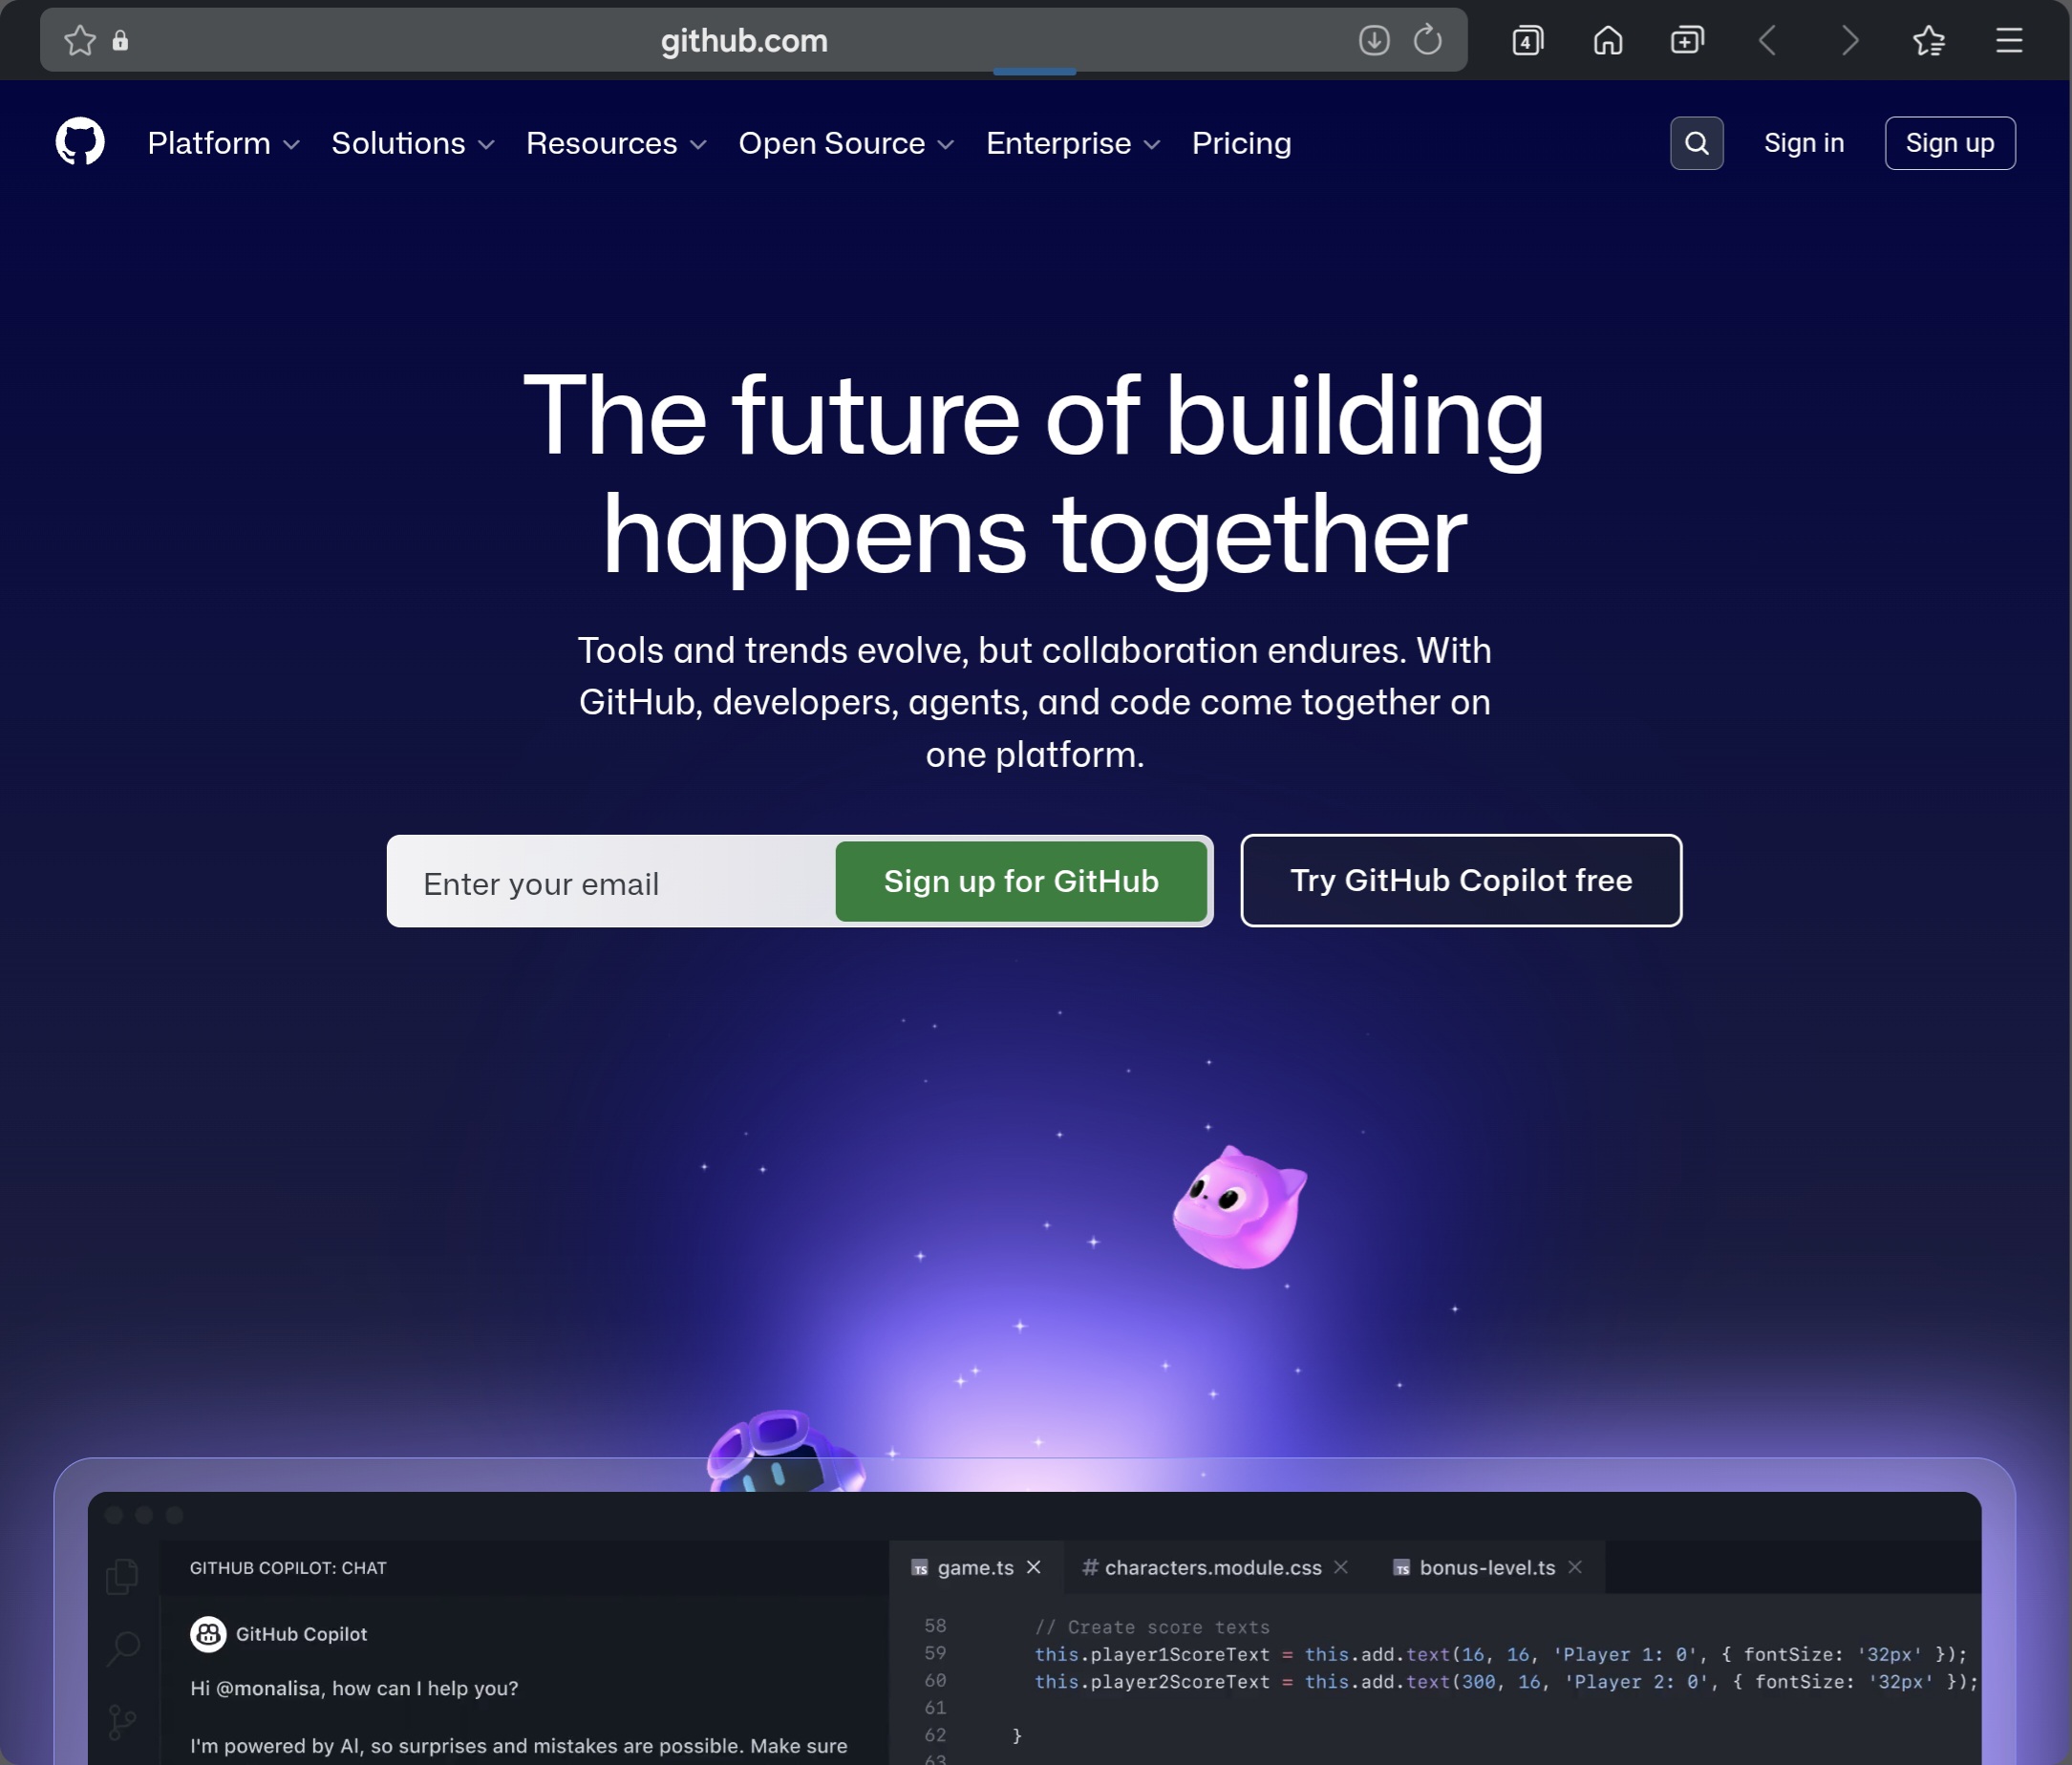
(14) EN: Go to https://github.com/ and create a new account.
(14) KR: https://github.com/ 깃허브에서 새로 계정을 만듭니다.
이 계정은 홈페이지를 구매후 shadowj.sales@gmail.com으로 깃허브 계정과 이메일주소를 보내고 홈페이지를 직접 관리하며 글을 업로드 하는 사이트이기 때문에 자신이 잘 기억하고 관리하기 좋은 계정으로 만듭니다.

(15) EN: Enter your email and choose a Username.
(15) KR: 이메일 입력하고 Username을 정해서 씁니다.
이 이메일 주소와 Username은 나중에 shadowj.sales@gmail.com를 통해 Shadow J Baseline 홈페이지 레포를 받을 권한을 얻게 되므로 계정이름과 이메일 주소를 메모해 두세요.
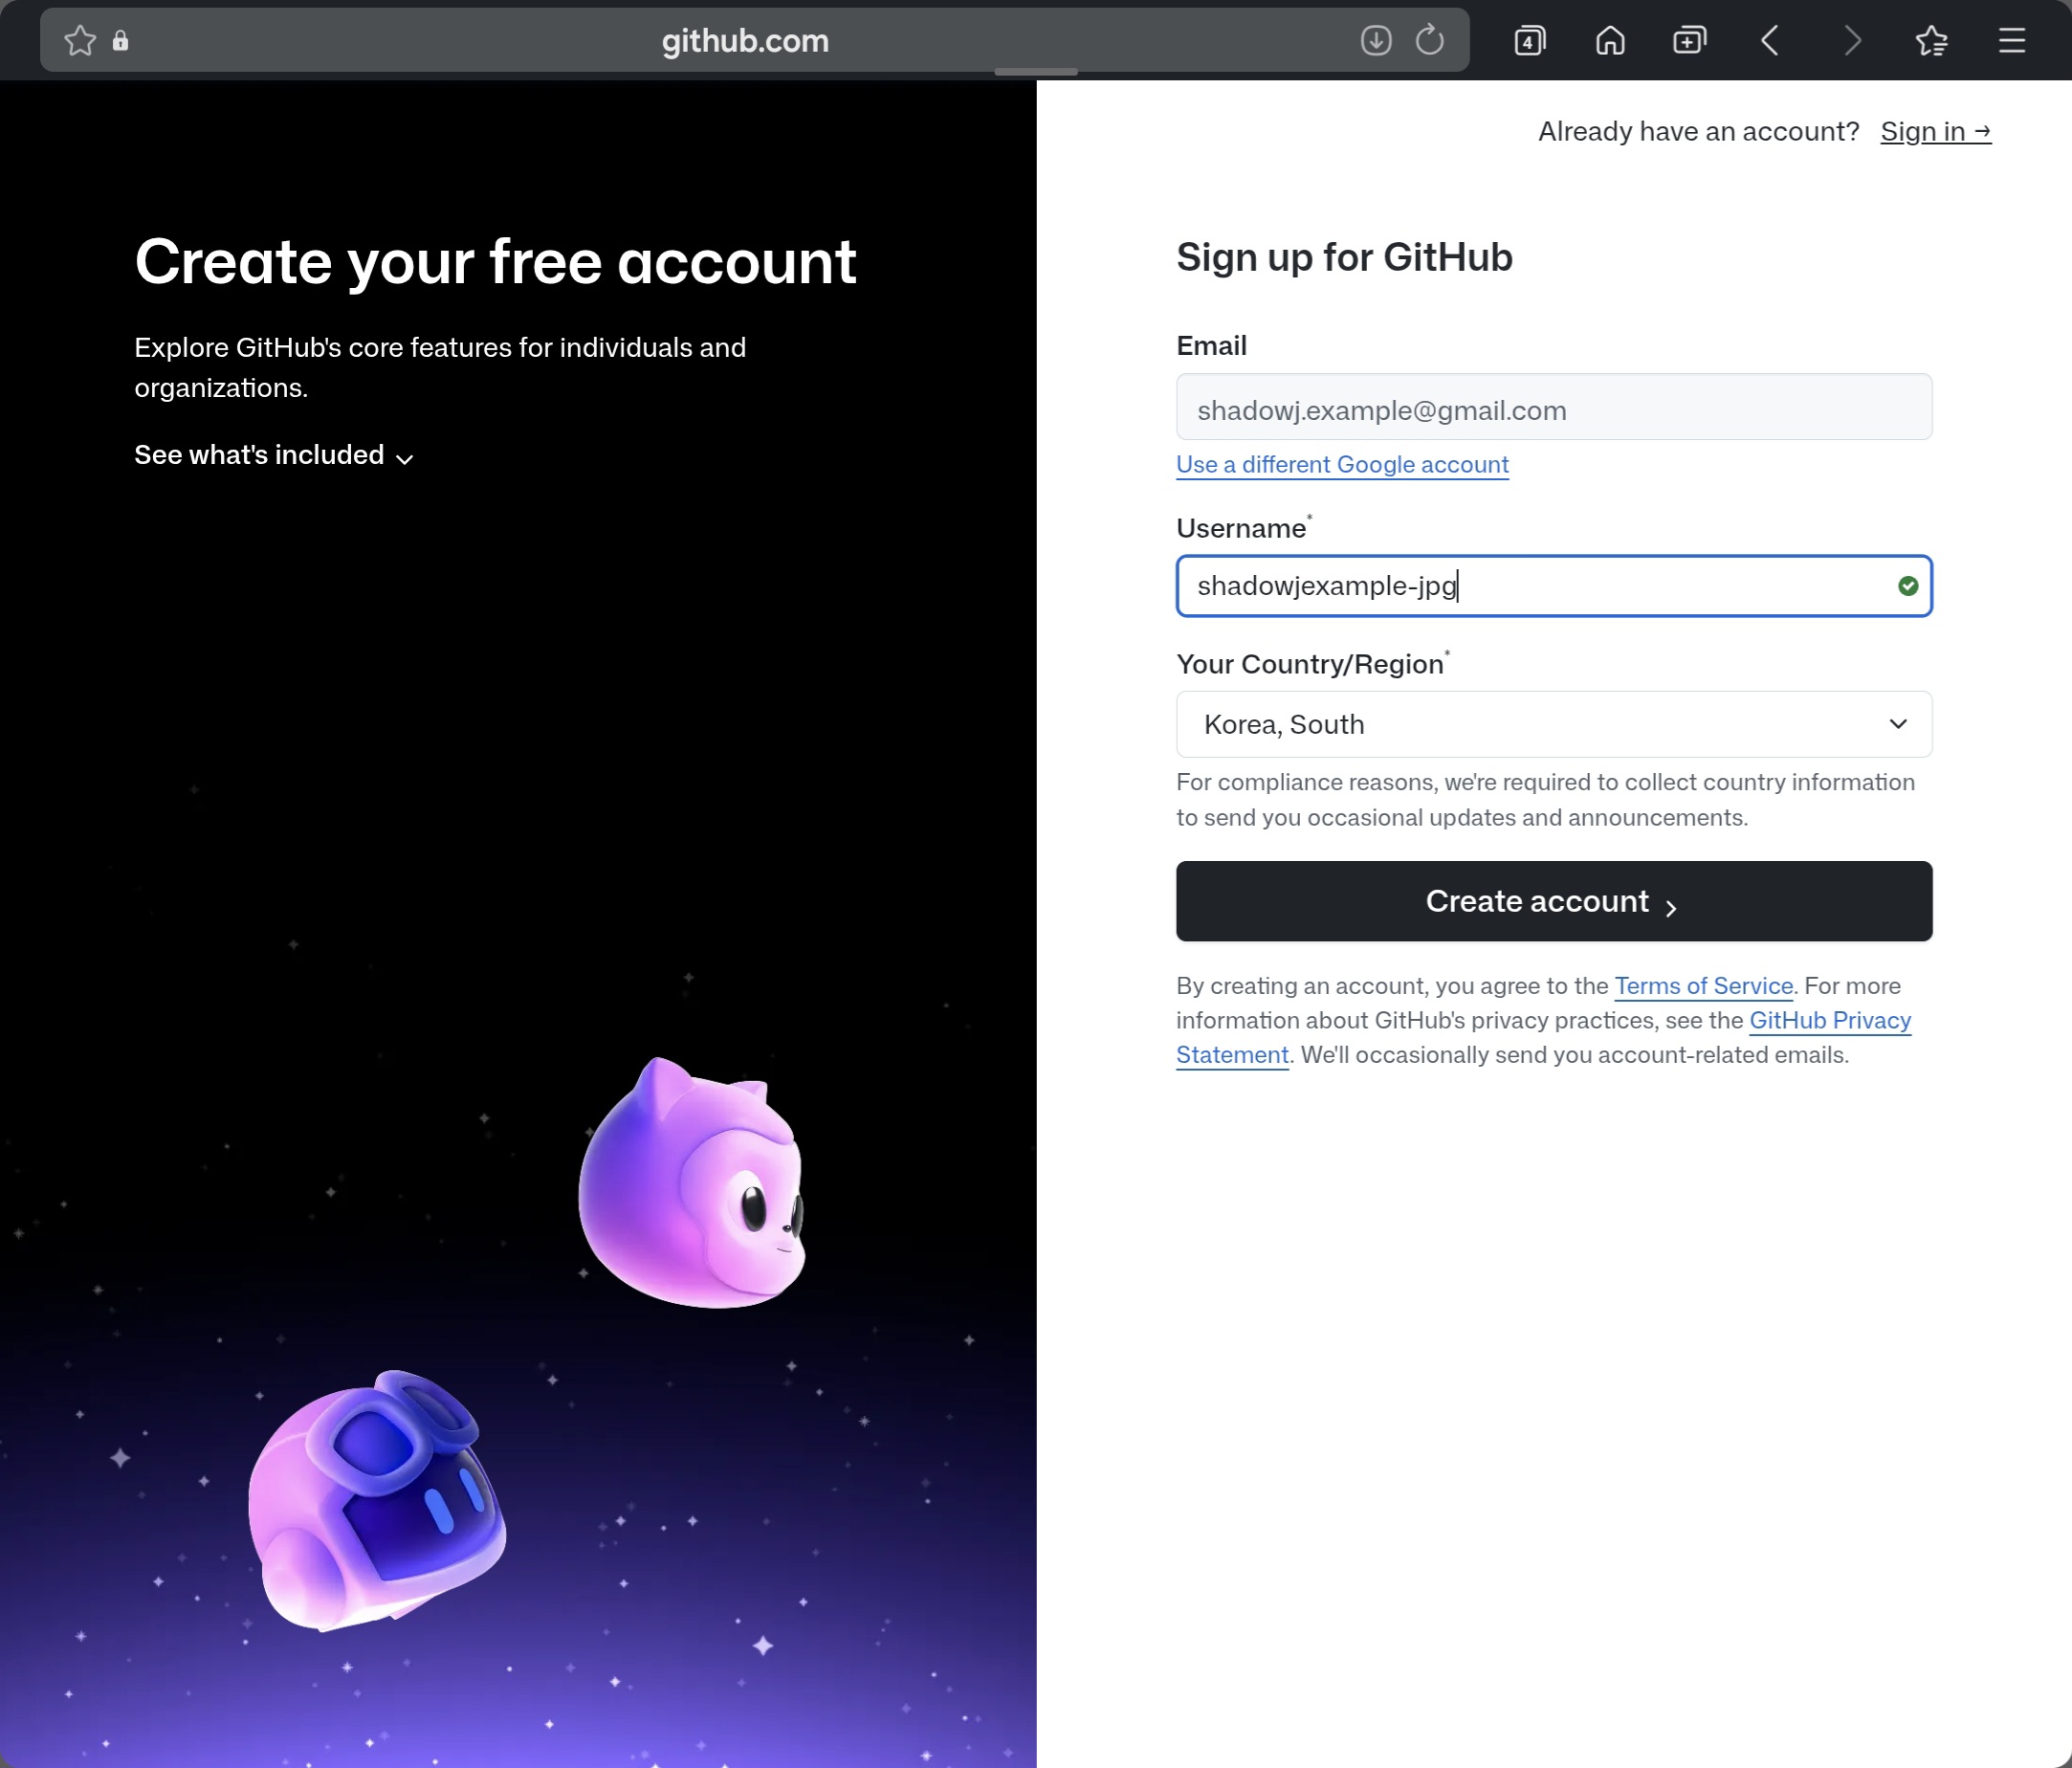
(16) EN: If you use “Sign up with Google”, your email connects automatically and GitHub suggests a username. You can keep it or change it.
(16) KR: 만약 구글계정 연결하기를 사용하면 자동으로 이메일이 연결되고 username이 자동으로 발급됩니다. 이것을 그대로 써도 좋고, 자기가 원하는 username으로 변경 가능합니다.
.jpg)
.jpg)
.jpg)
(17) EN: You may see a puzzle for account verification. Click “View puzzle”, read carefully, and solve it. If you don’t know, take a screenshot and ask an AI how to solve it.
(17) KR: 계정 인증을 위해 퍼즐이 나옵니다. 퍼즐보기를 누릅니다. 해당 퍼즐을 잘 읽고 잘 풉니다. 어떻게 푸는지 모르겠으면 캡춰해서 AI에게 푸는 방법을 알려달라고 합니다.
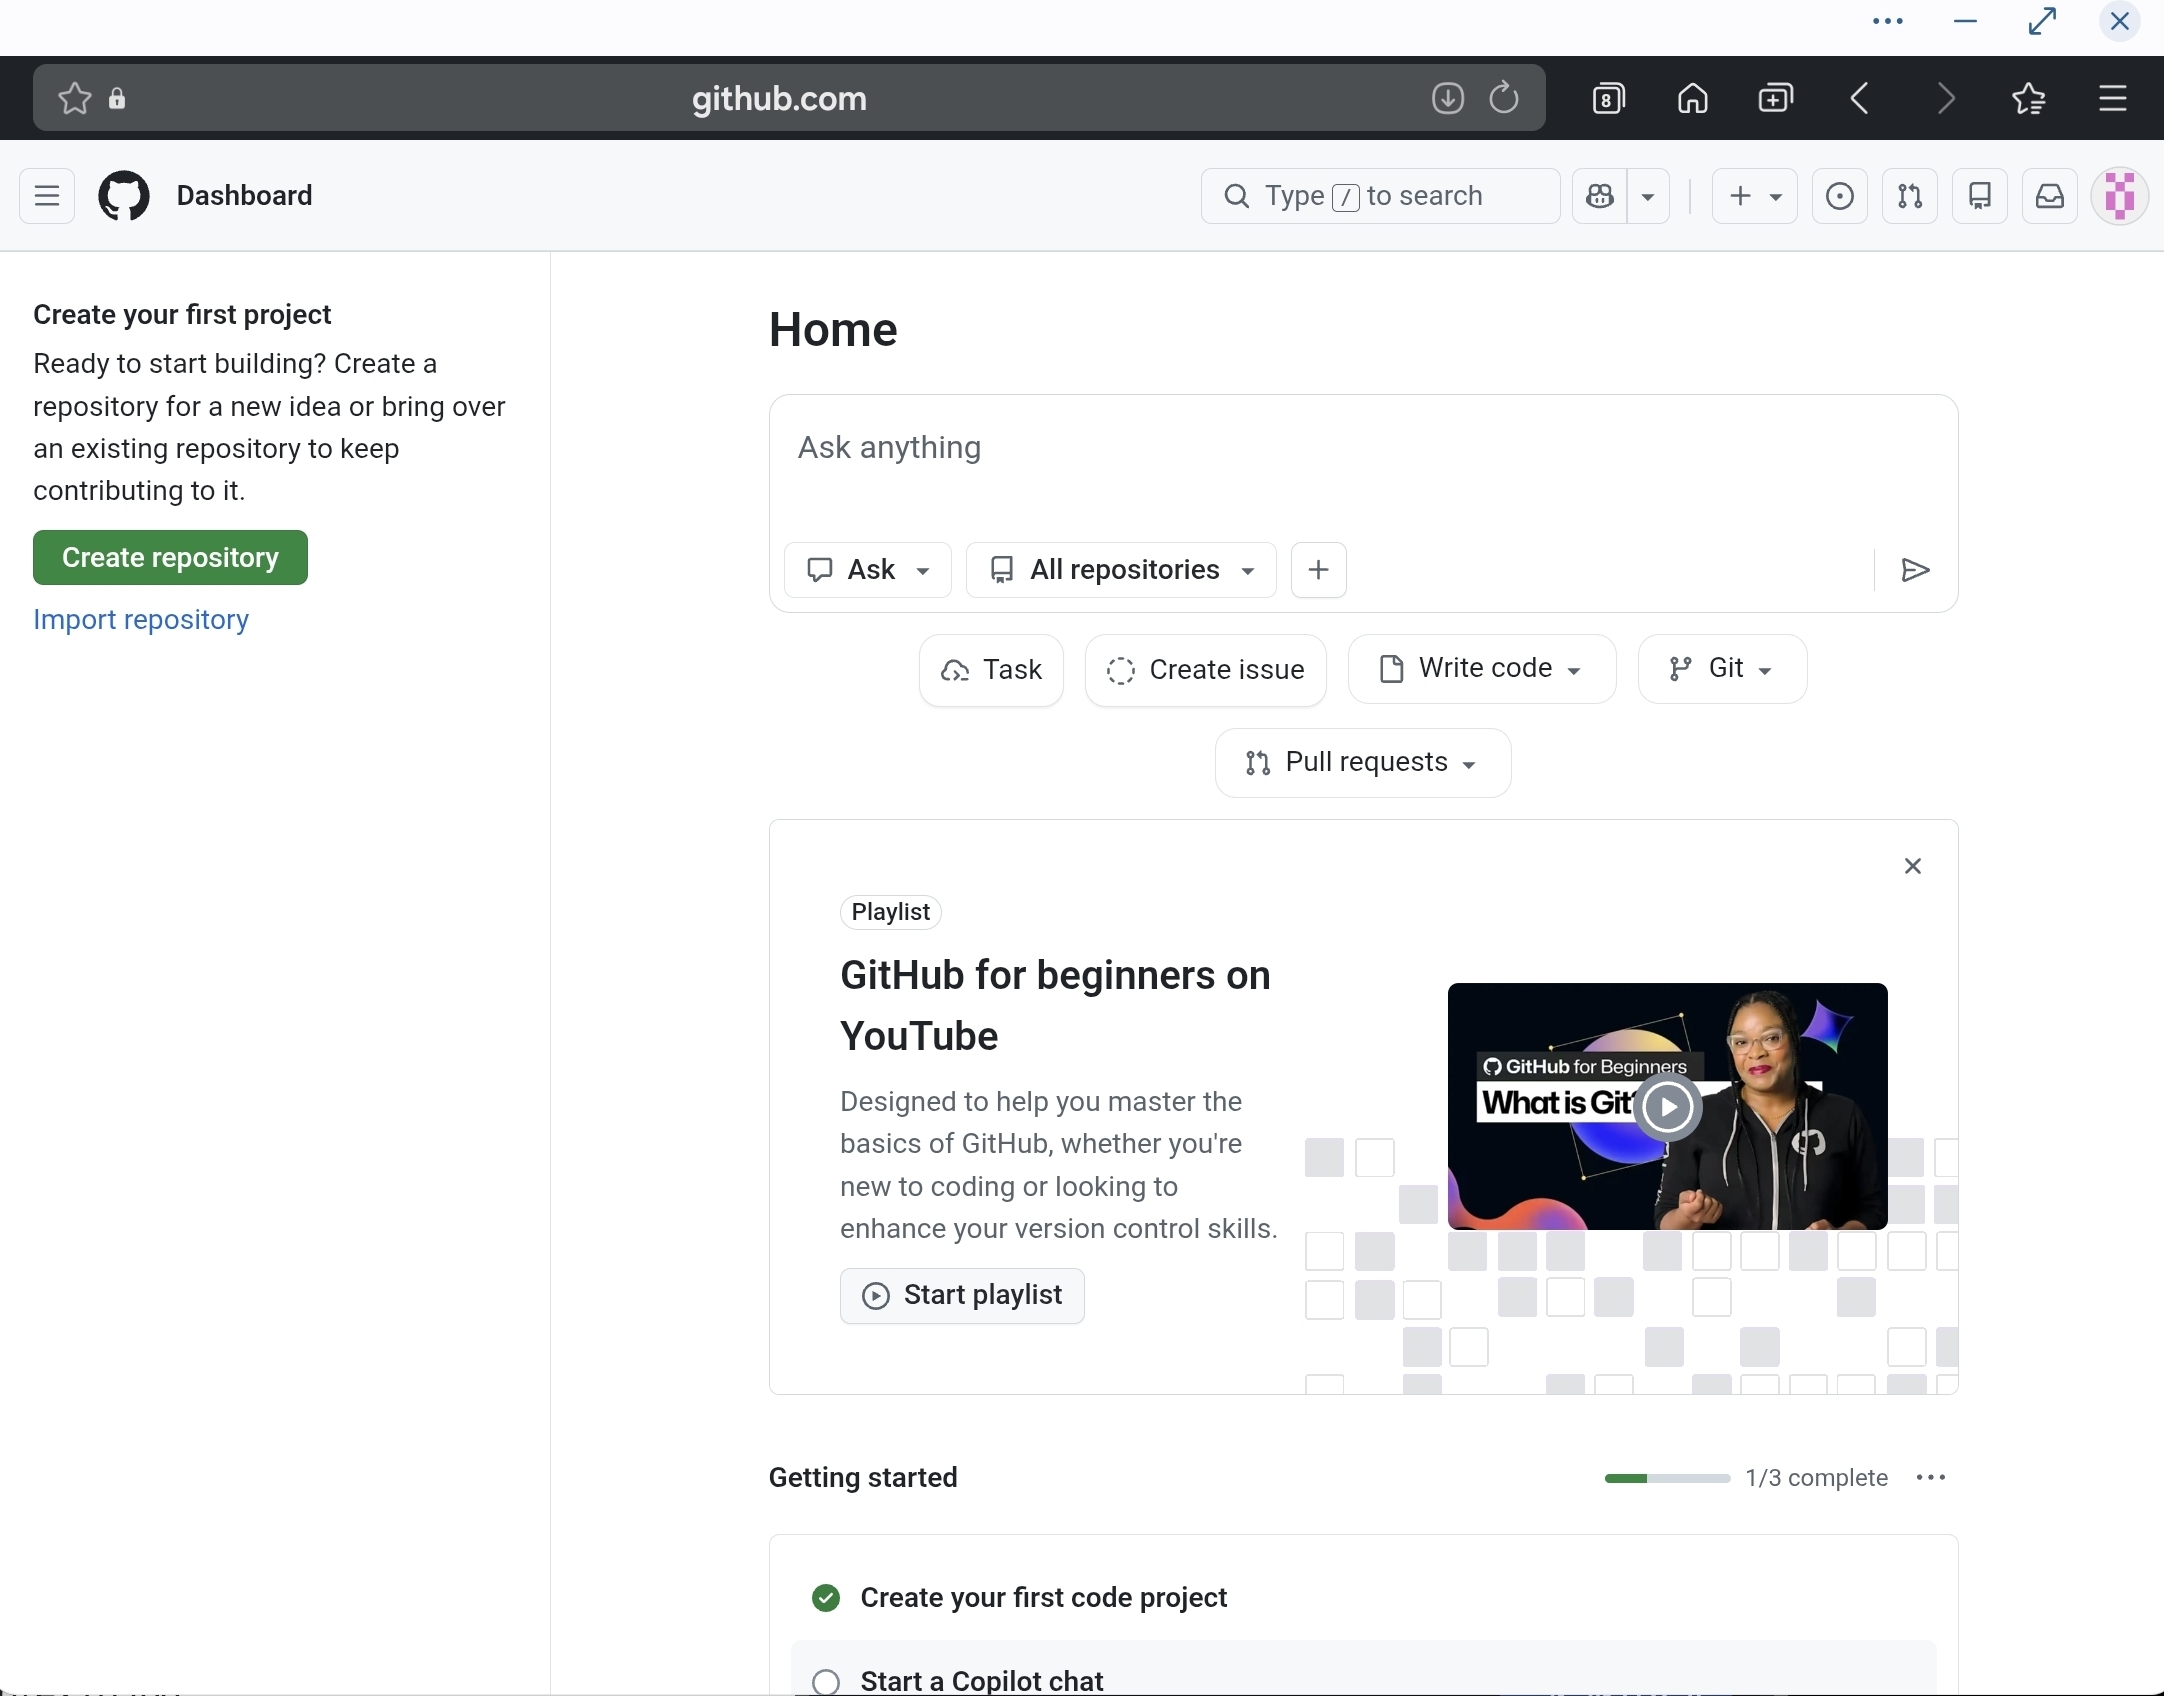
(18) EN: After verification, you’ll see a GitHub repository screen.
- “Create repository” is for starting from scratch.
- “Import repository” is for copying an existing repo (useful later for safe experiments).
Shadow J Baseline is provided via invitation, so you will use the invited template repo first.
(18) KR: 퍼즐을 다풀면 깃허브 레포 생성 화면이 나옵니다.
왼쪽 초록색 버튼 Creat repository는 새로운 홈페이지 레포를 기초부터 다시 만들때 사용하는 버튼이고
아래 Import repository는 자기가 현재 가지고 있는 레포를 코드를 수정하거나 홈페이지 디자인을 자기가 원하는대로 변경하고 싶을때 원본 훼손없이 안전하게 복사본을 만들어서 마음껏 실험해볼수 있도록 복사를 해주는 기능입니다.
Shadow J Baseline 보급형 홈페이지 모양을 그대로 사용할 경우에는 위 두버튼을 사용하지 않고 shadowj.sales@gmail.com 이메일을 통해 받은 Shadow J Baseline 보급형 무결함 원본 레포를 그대로 이식받아 사용하게 됩니다.
(쉐도우제이 베이스라인 보급형 홈페이지 레이아웃은 맨처음부터 보기의 맨 처음글(가장 오래된 글)에 레이아웃 디자인과 구매방법이 나와있음)
- 첫글로 이동(텍스트 눌러서 이동): 구매/레이아웃 안내 글(첫글)
- 전체 주소(복사용): https://shadowj.org/notes-sparks/shadowj-baseline-entry/
3. Import 기능(추가 복제용)과 압축파일 복구에 대한 설명 / Import and ZIP recovery notes
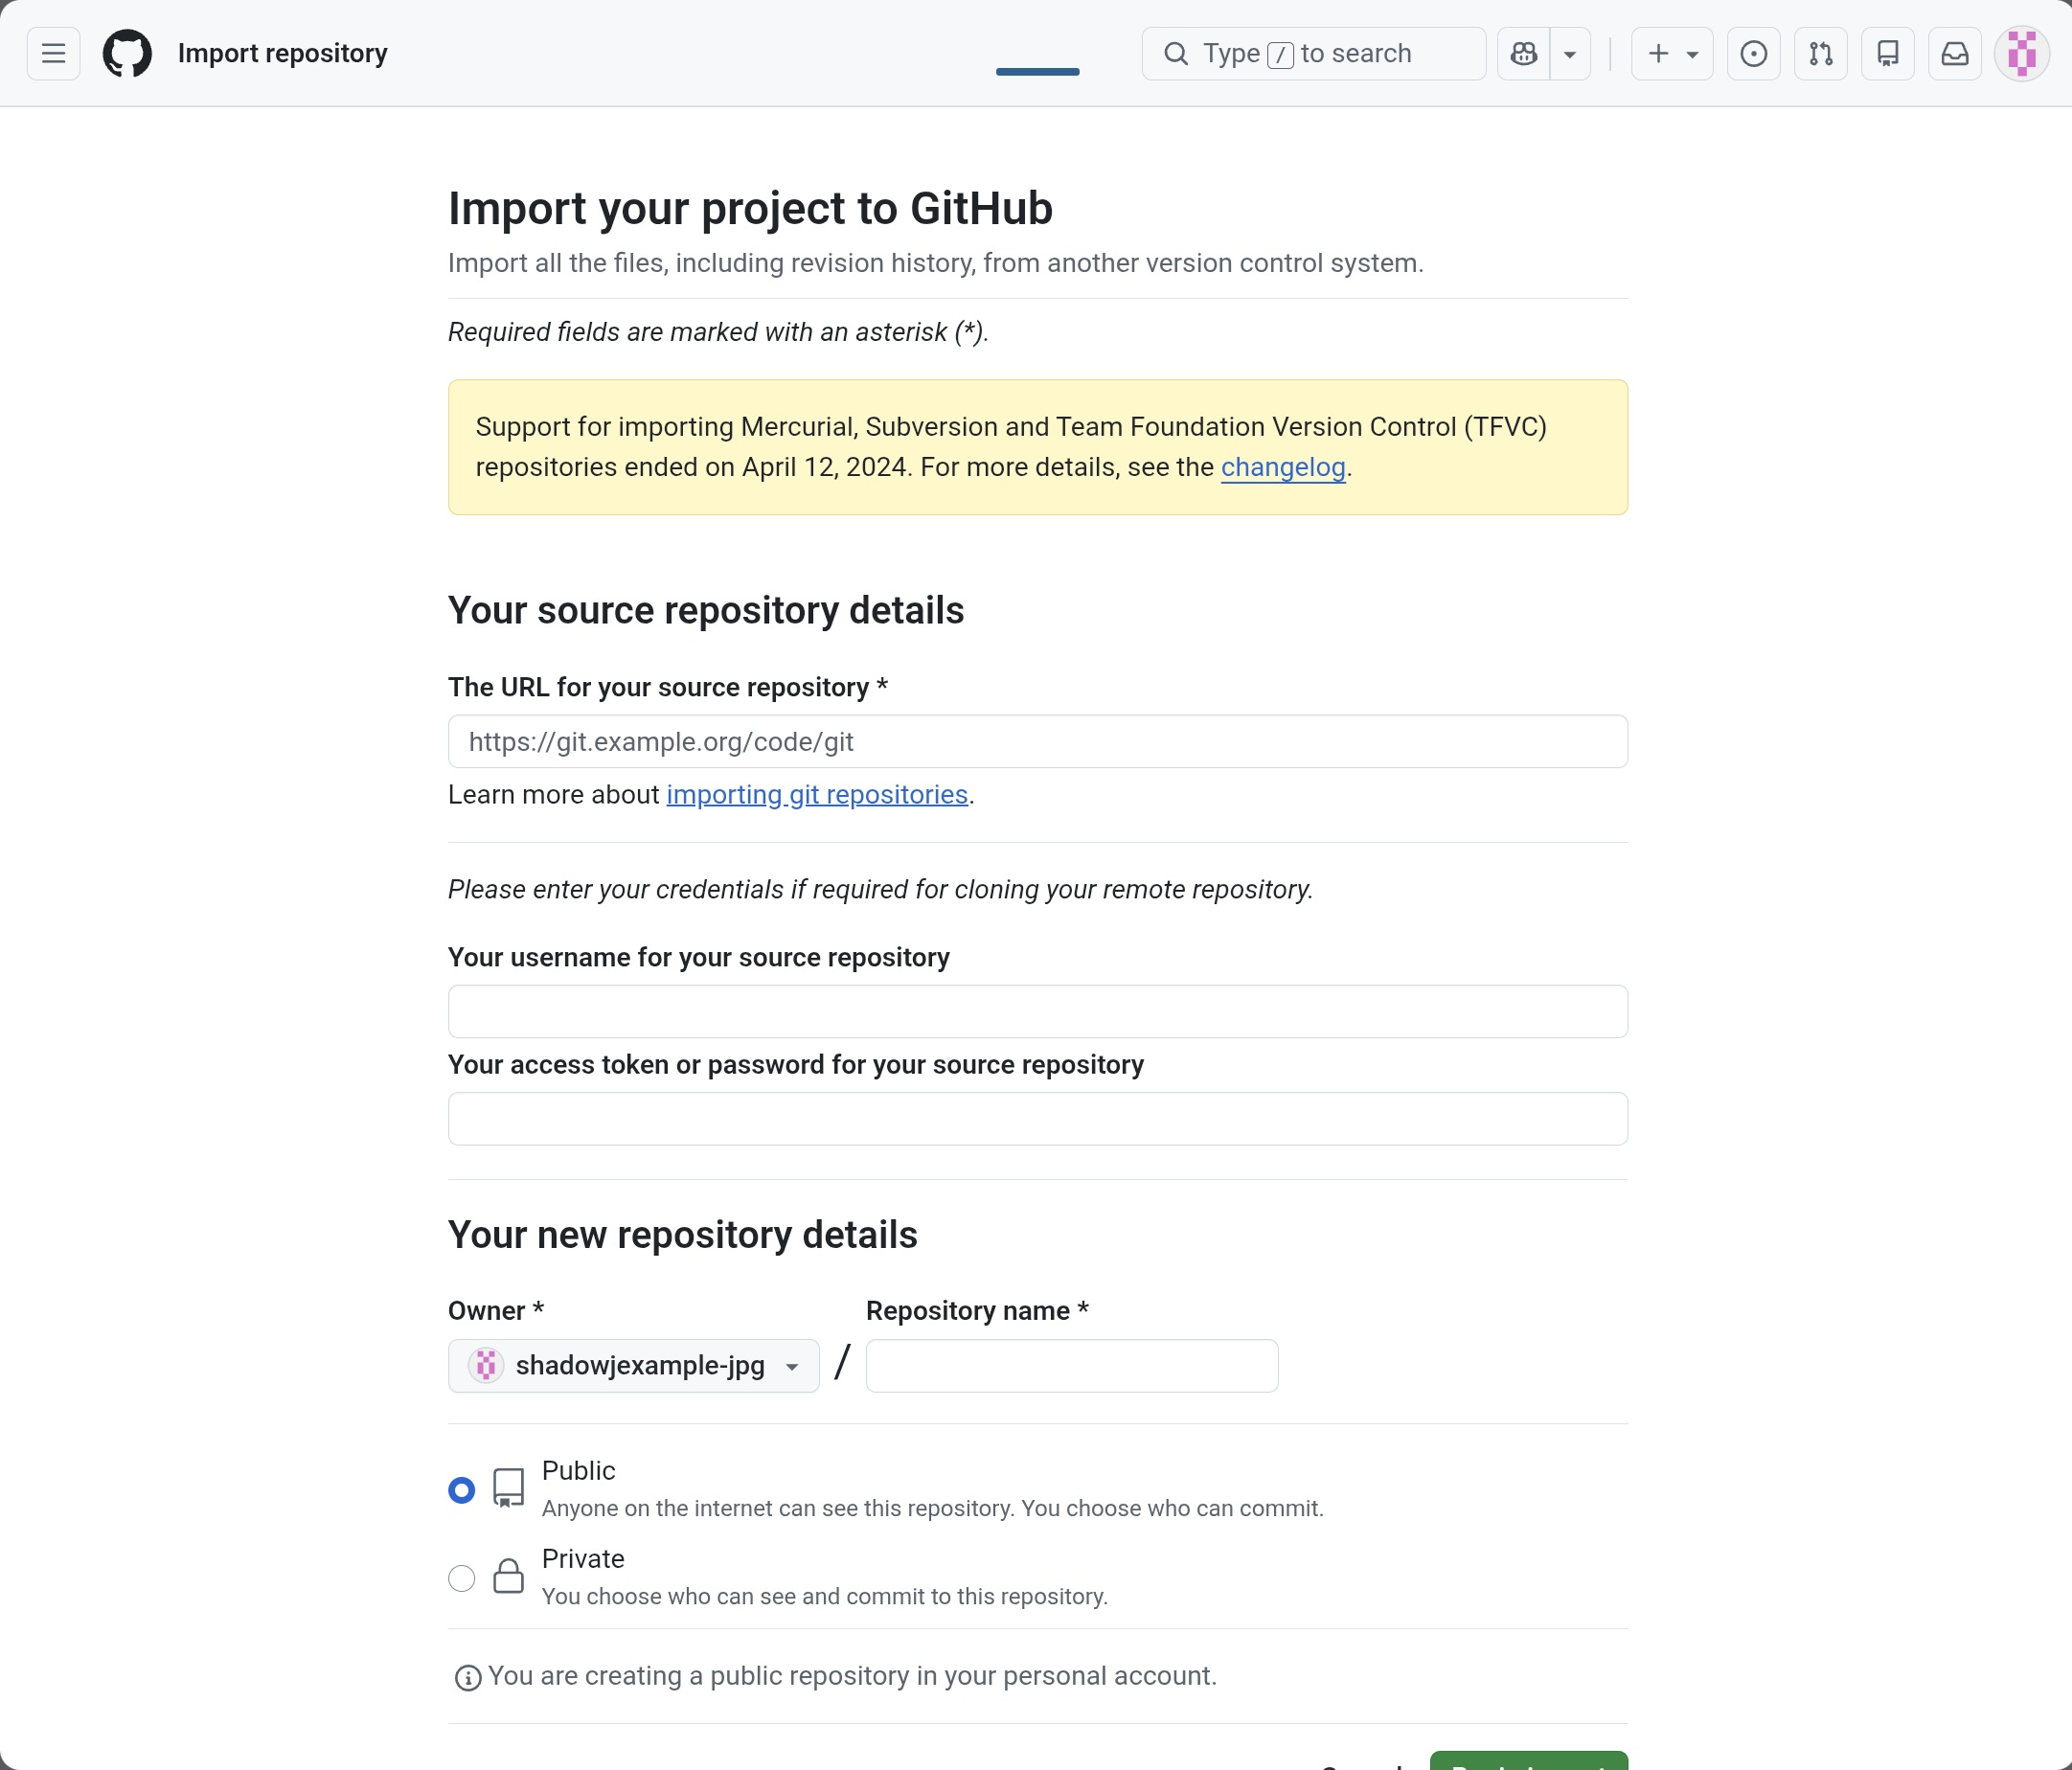
(19) EN: Import is used later after your 7-day access expires, to duplicate your own backup repo for experiments.
Paste the original repo URL into “The URL for your source repository”.
Set your new repo name under “Your new repository details”, then click “Begin import”.
You will get a duplicated copy.
(19) KR: Import기능은 나중에 7일간의 Shadow J Baseline 레포 사용권이 소멸된 뒤에 자신이 미리 복사해둔 레포원본을 추가적으로 원하는 만큼 복제를 하며 홈페이지 코드수정 작업을 할수 있는데 사용됩니다.
The URL for your source repository* 여기에 원본 레포주소를 붙여넣기 합니다.
Your new repository details 여기에 새롭게 복사할 새로운 레포주소를 입력하고 초록색버튼(Being import)를 누르세요. 그러면 동일한 원본레포가 2개로 복제됩니다. 이 새로운 레포에서 쉐도우제이 베이스라인 보급형 디자인 코드를 바꾸는 실험을 AI와 함께 해볼수 있습니다.
(20) EN: If you accidentally break your copy repo, you can restore using the ZIP file that Shadow J emailed.
But ZIP restore works cleanly only when your repo folder structure matches the baseline structure.
If the base folder tree is destroyed, ZIP restore may also become difficult.
So keep the invited baseline repo as a backup and do experiments only on imported copies.
(20) KR: 만약 미리 받아놓은 Shadow J Baseine 복제레포가 실수로 훼손되었을때에도 걱정하지 마세요.
Shadow J가 당신의 이메일로 보내준 무결점 쉐도우제이 베이스라인 레포 압축파일 원본으로 해당 레포의 파일을 업로드 하는것으로서 오염된 코드를 정상복구 시킬수 있습니다.
하지만 압축파일로 복구를 시킬경우 현재 레포의 구조와 쉐도우제이 베이스라인의 폴더 구성이 동일한 상태여야만 하며 해당 하위 파일을 업로드 하는 식으로만 복구시킬수 있습니다.
만약 완전히 원본레포가 박살이 나거나 기본틀(폴더 트리 구성)이 완전히 무너진 상태에서는 압축파일 복구로도 어려울수 있으니 shadowj.sales@gmail.com으로 부터 초대받아 이식된 레포 원본은 항상 백업 파일로 보존한채 새로운 임포트 형식으로 실험을 하시기 바랍니다.
4. 결제 및 레포 초대 받기 / Payment and invitation
(21) EN: Send 24 USD as USDC on Optimism network to Shadow J wallet. Confirm network carefully. Wrong network is buyer’s responsibility.
(21) KR: 클라우드플레어 계정과 깃허브 계정을 만들면 Shadow J 지갑주소로 24달러를 옵티미즘 네트워크의 USDC로 보냅니다. 네트워크 확인을 명확히 하세요. 다른 네트워크로 발송한 문제는 전적으로 구매자 책임입니다.
쉐도우제이 지갑주소
0x056722cB70da540734193E5AB0E3D9bEfBbd3D5D
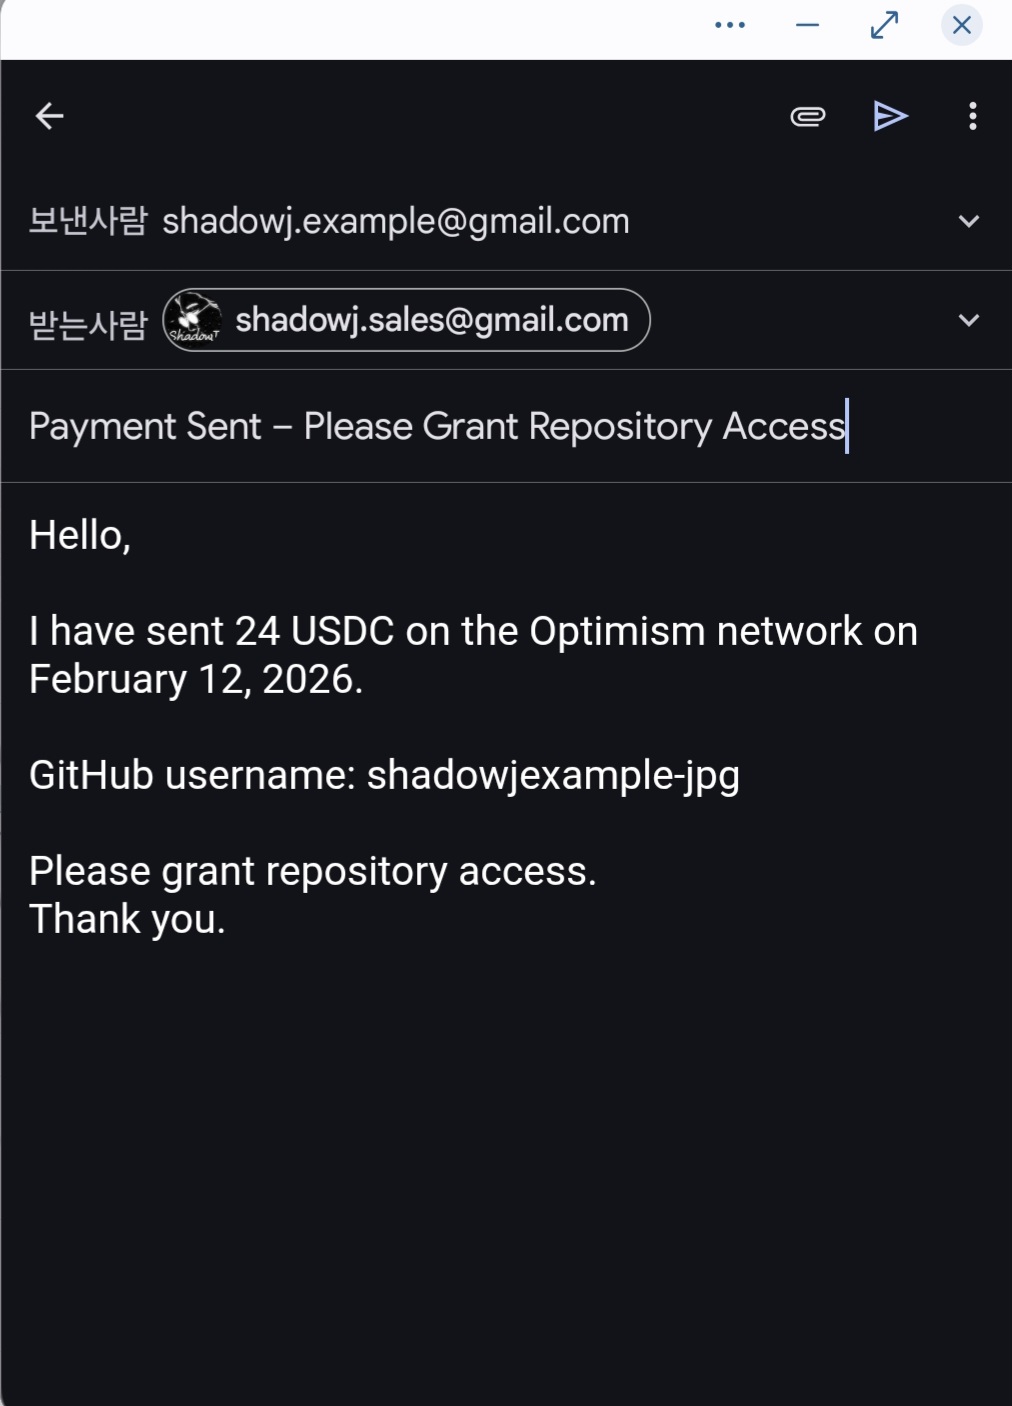
(22) EN: Right after sending, email shadowj.sales@gmail.com with your GitHub username and your GitHub account email.
(22) KR: 쉐도우제이에게 24달러를 보낸직후 shadowj.sales@gmail.com 으로 깃허브 계정이름과 이메일주소를 보냅니다.
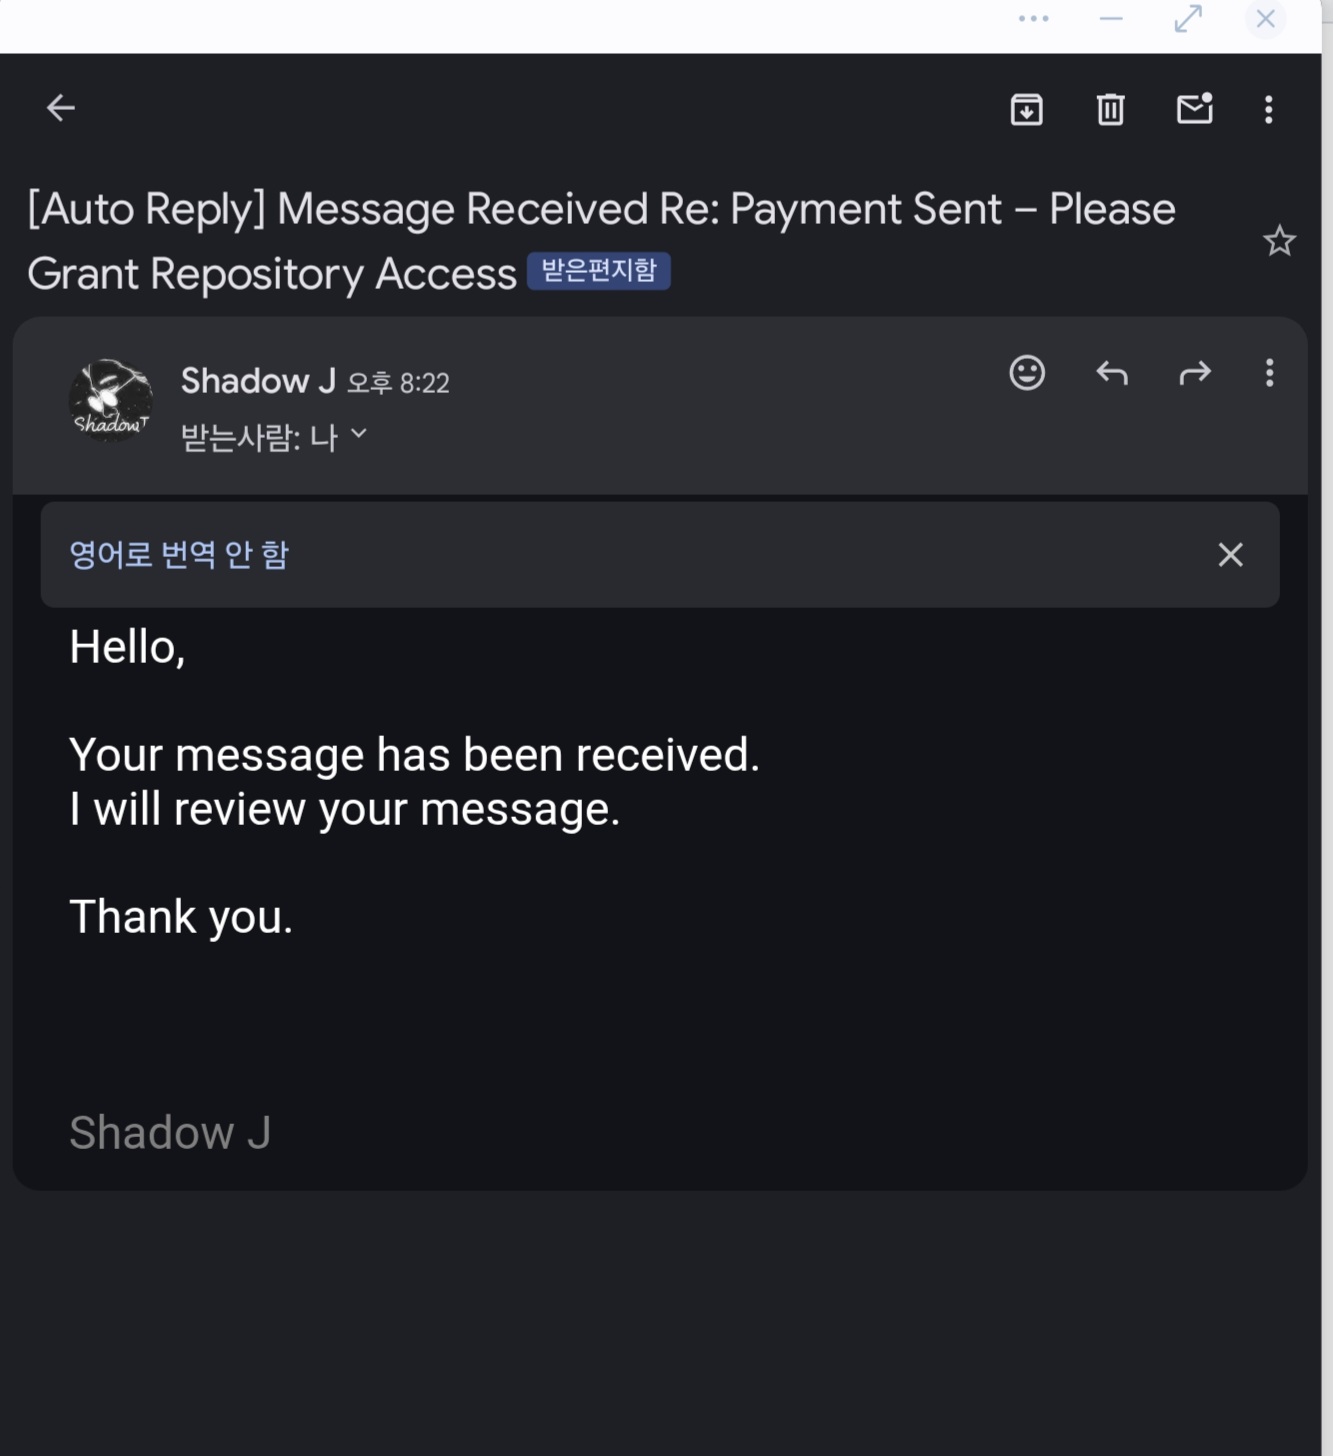
(23) EN: You will receive an auto-reply. This does NOT confirm payment. Once reviewed by Shadow J, an invitation email will be sent.
Payment confirmations and email checks are conducted once daily at 9:00 PM (KST).
If payment is made after 9:00 PM (KST), it will be reviewed the following day at 9:00 PM (KST).
During periods of high purchase volume, processing may be delayed by several days.
Please note that inquiries unrelated to invitation delivery — including service questions, after-sales support, or consultations — are not handled.
This project was built independently, and the manual is designed to enable users to build and operate their archive independently as well.
If an issue cannot be resolved through the manual, users are encouraged to work through it using AI tools and careful step-by-step reasoning.
Individual troubleshooting support is not provided, as the system is designed for independent operation.
Most issues can be resolved independently by entering clear and precise instructions into AI tools.
(23) KR: 메일을 보낸 즉시 자동회신 메일을 받게 됩니다. 하지만 이 메일이 Shadow J 가 입금확인과 이메일확인을 했다는 뜻은 아닙니다.
Shadow J가 확인하는대로 Shadow J Baseline 홈페이지 보급형을 받을수 있는 레포 입장권을 이메일로 발송합니다.
입금과 메일확인은 한국시간으로 매일밤 9시에 확인하며 한국시간으로 밤9시가 넘으면 다음날 9시에 이메일이 확인됩니다. 구매가 많을 경우 조금 바로 그날 처리되지 못하고 수일 지연될수도 있음을 알려드립니다.
초대장 발송외의 문의사항이나 서비스 관련 애프터 서비스 관련한 문의나 상담은 받지 않습니다.
메뉴얼을 보고도 해결하지 못하는 부분은 AI와 함께 직접 해결해야 합니다. 저도 코딩지식 없이 AI의 도움을 받아 혼자서 만들었습니다.
AI에 명령어만 잘 입력하면 스스로 문제를 해결할 수 있습니다. Shadow J Baseline을 구매하지 않고도 이 공개된 메뉴얼을 참고한다면 저보다 더 멋진 홈페이지를 만드는것도 충분히 가능합니다.
5. 초대장 수락 및 레포 복제 / Accept invitation and clone by template

(24) EN: You will receive an invitation email. Click “View invitation”. You must clone within 7 days. After 7 days, access will be removed.
(24) KR: 이메일로 쉐도우제이 베이스라인 홈페이지 보급형 레포 접근권을 받게 됩니다. View invitation을 누릅니다. 레포 복제는 7일 안으로 해야 합니다. 7일이 끝나면 레포 입장 권한도 동시에 해제됩니다.
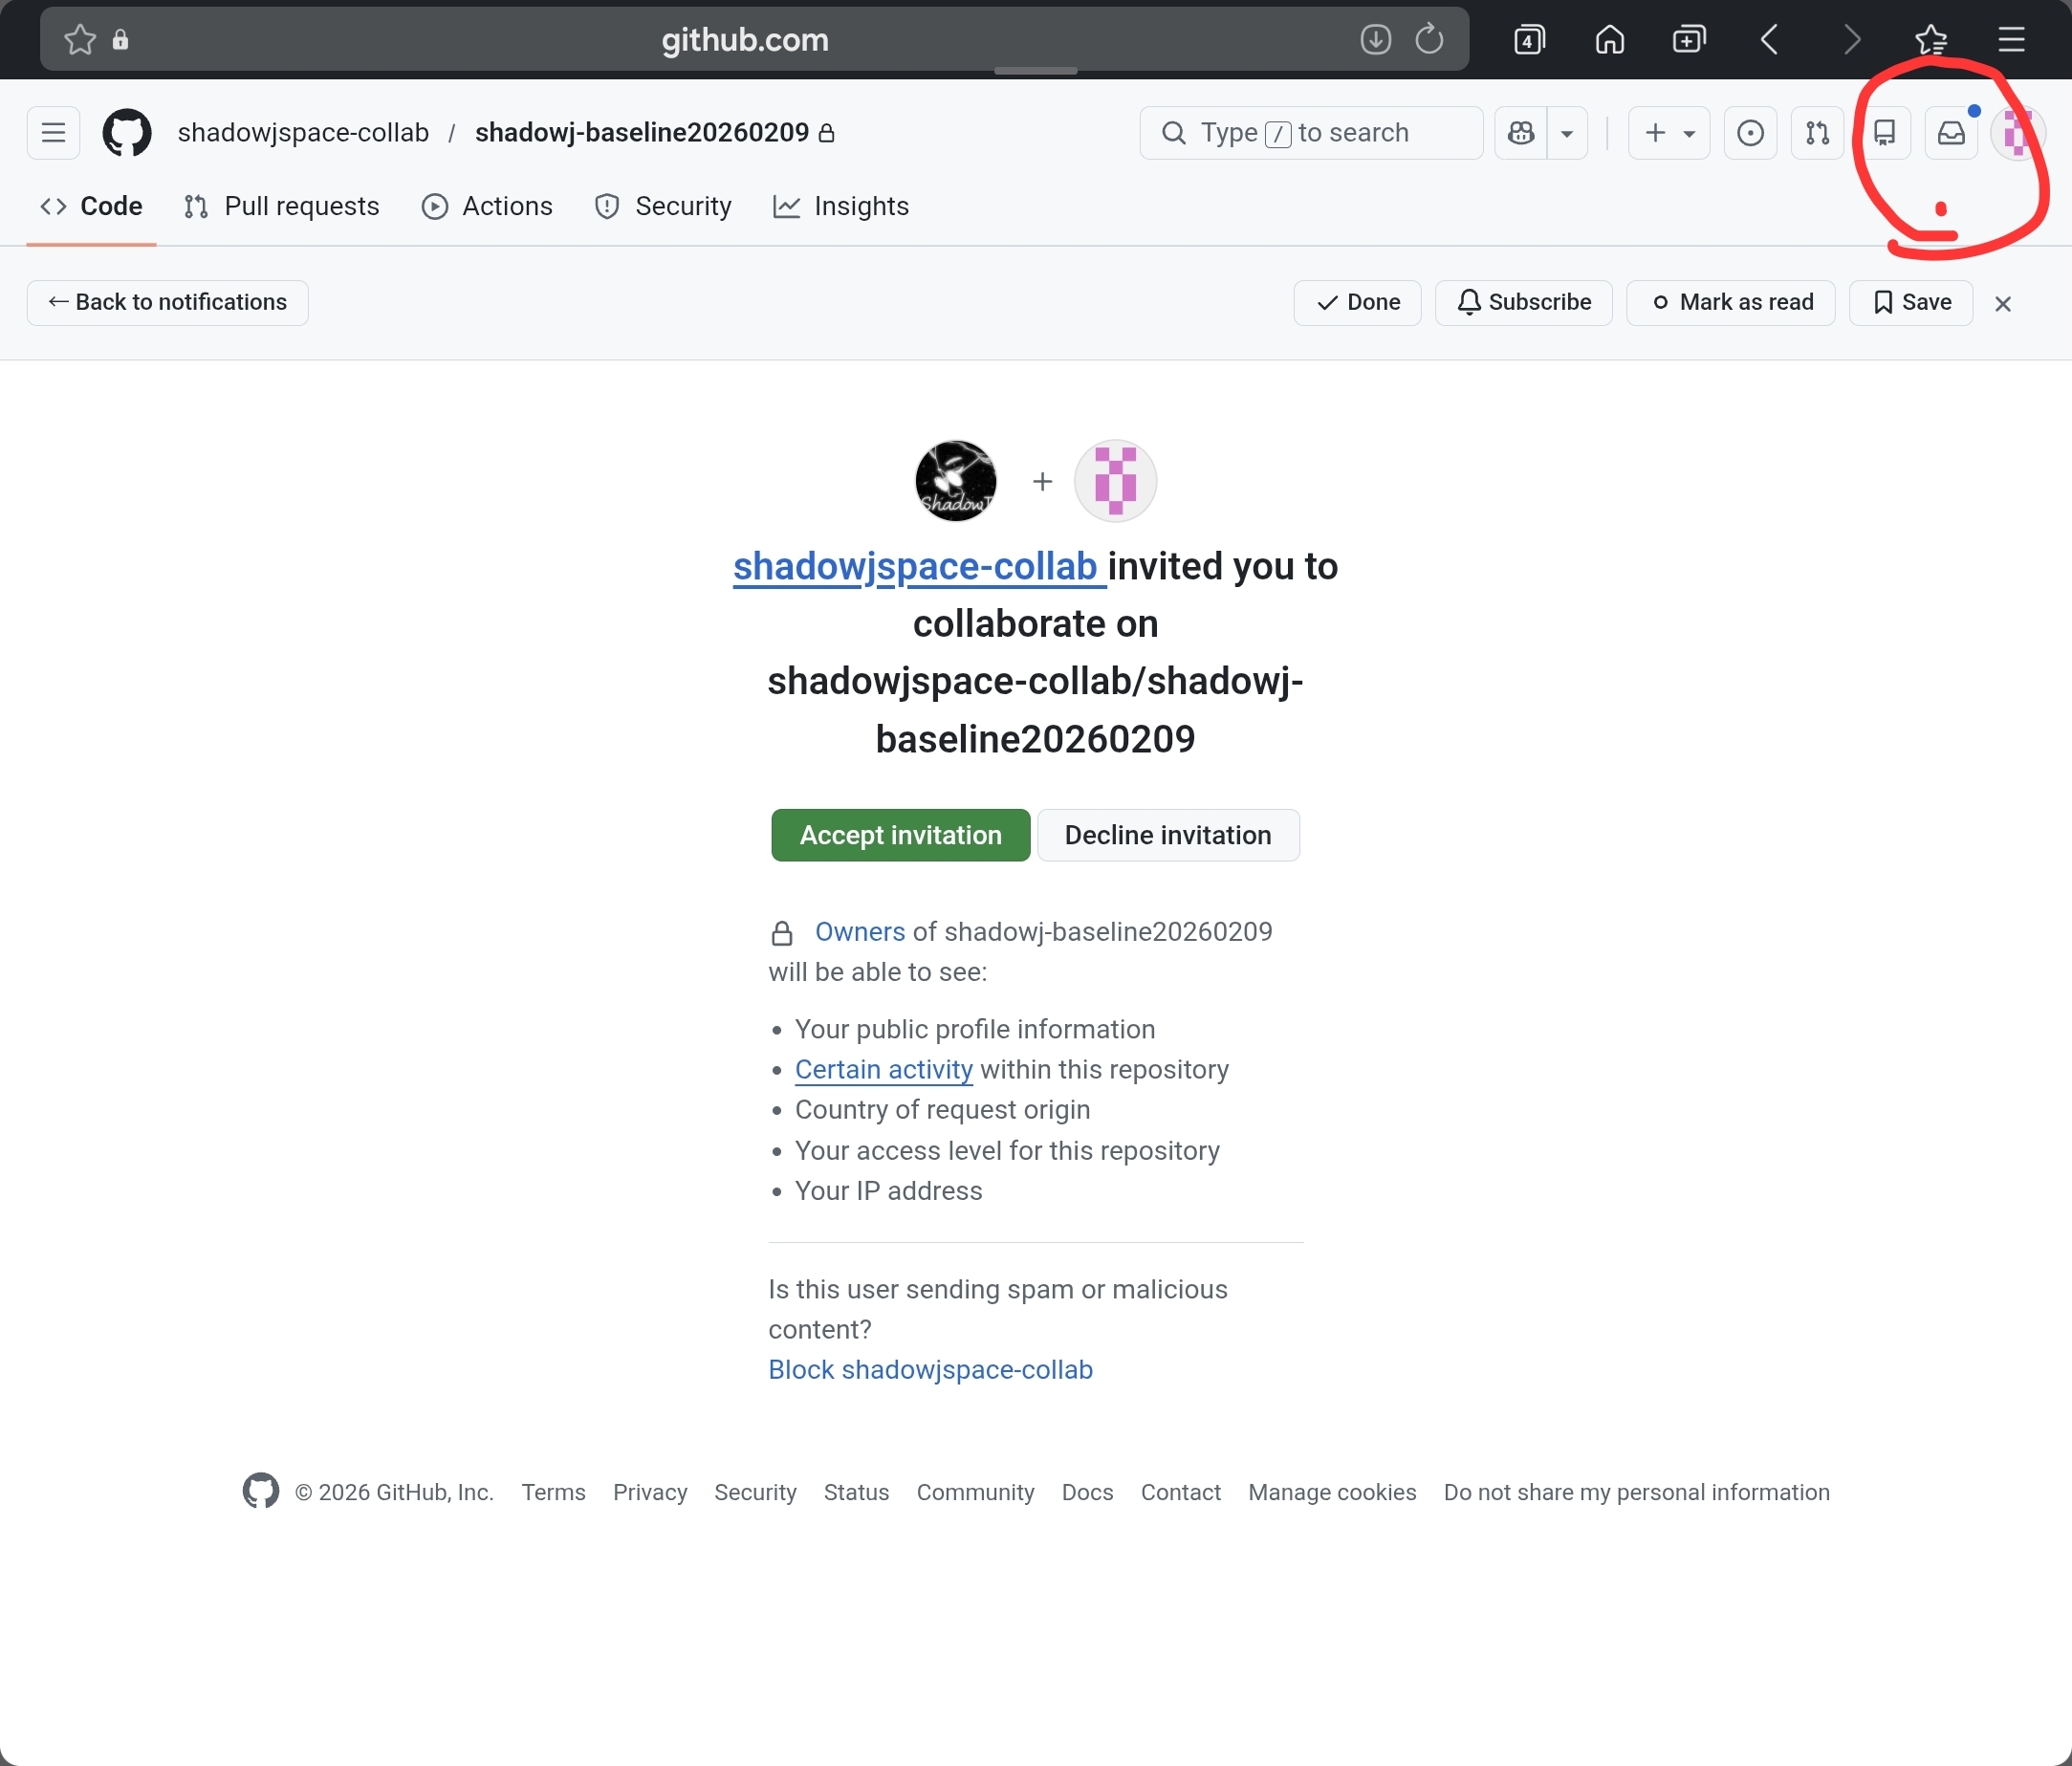
(25) EN: You can also see invitations on GitHub website/app. Click the blue dot in the top-right and open the invitation screen. Click “Accept invitation”.
(25) KR: 깃허브 홈페이지에서도 초대권을 확인할 수 있습니다. 우측 상단에 파란색 점으로 되어있는 부분을 클릭하면 사진과 같이 초대장 접근 버튼을 누릅니다. Accept invitation을 누릅니다.
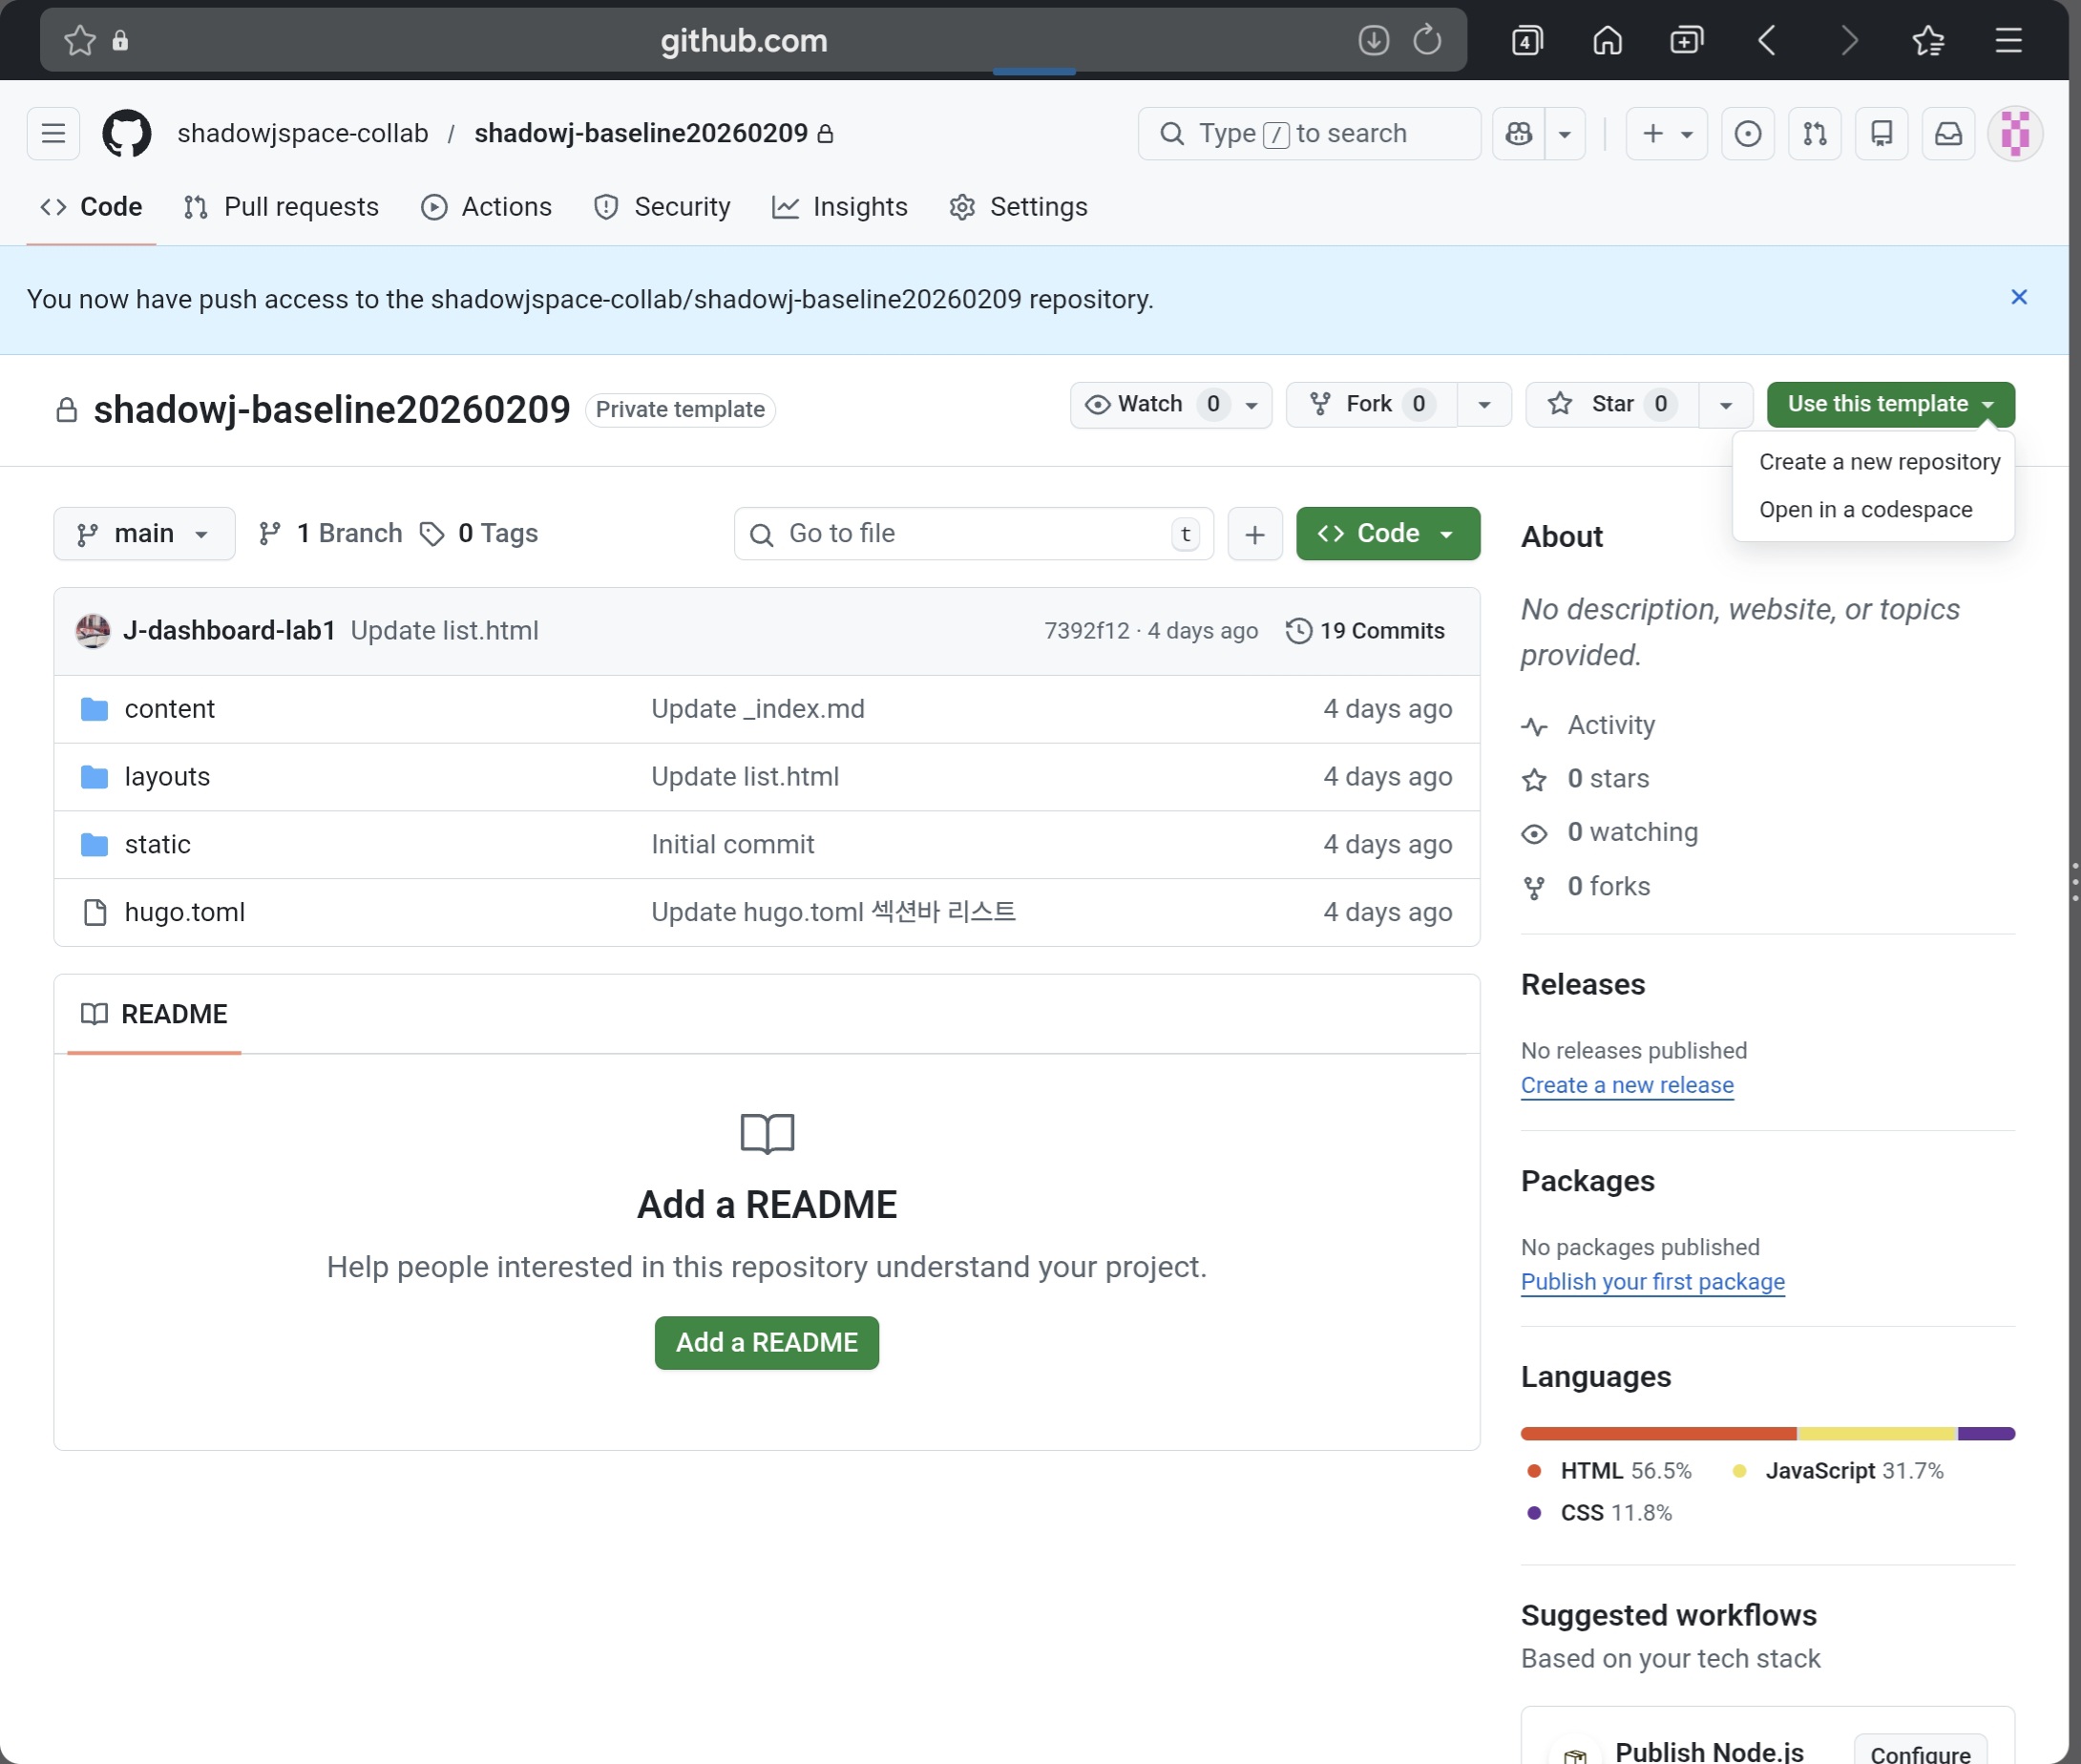
(26) EN: You will see the Shadow J Baseline repo (e.g., baseline20260209). This repo is available only for 7 days, so clone it quickly. Click “Use this template” → “Create a new repository”.
(26) KR: 쉐도우제이 베이스라인 20260209 레포가 나옵니다. 이 레포는 7일간만 유효한 레포이므로 빨리 복사를 해둡니다. 복사방법은 우측 상단 초록색 버튼인 Use this Template을 누르고 Create a new repository를 누릅니다.
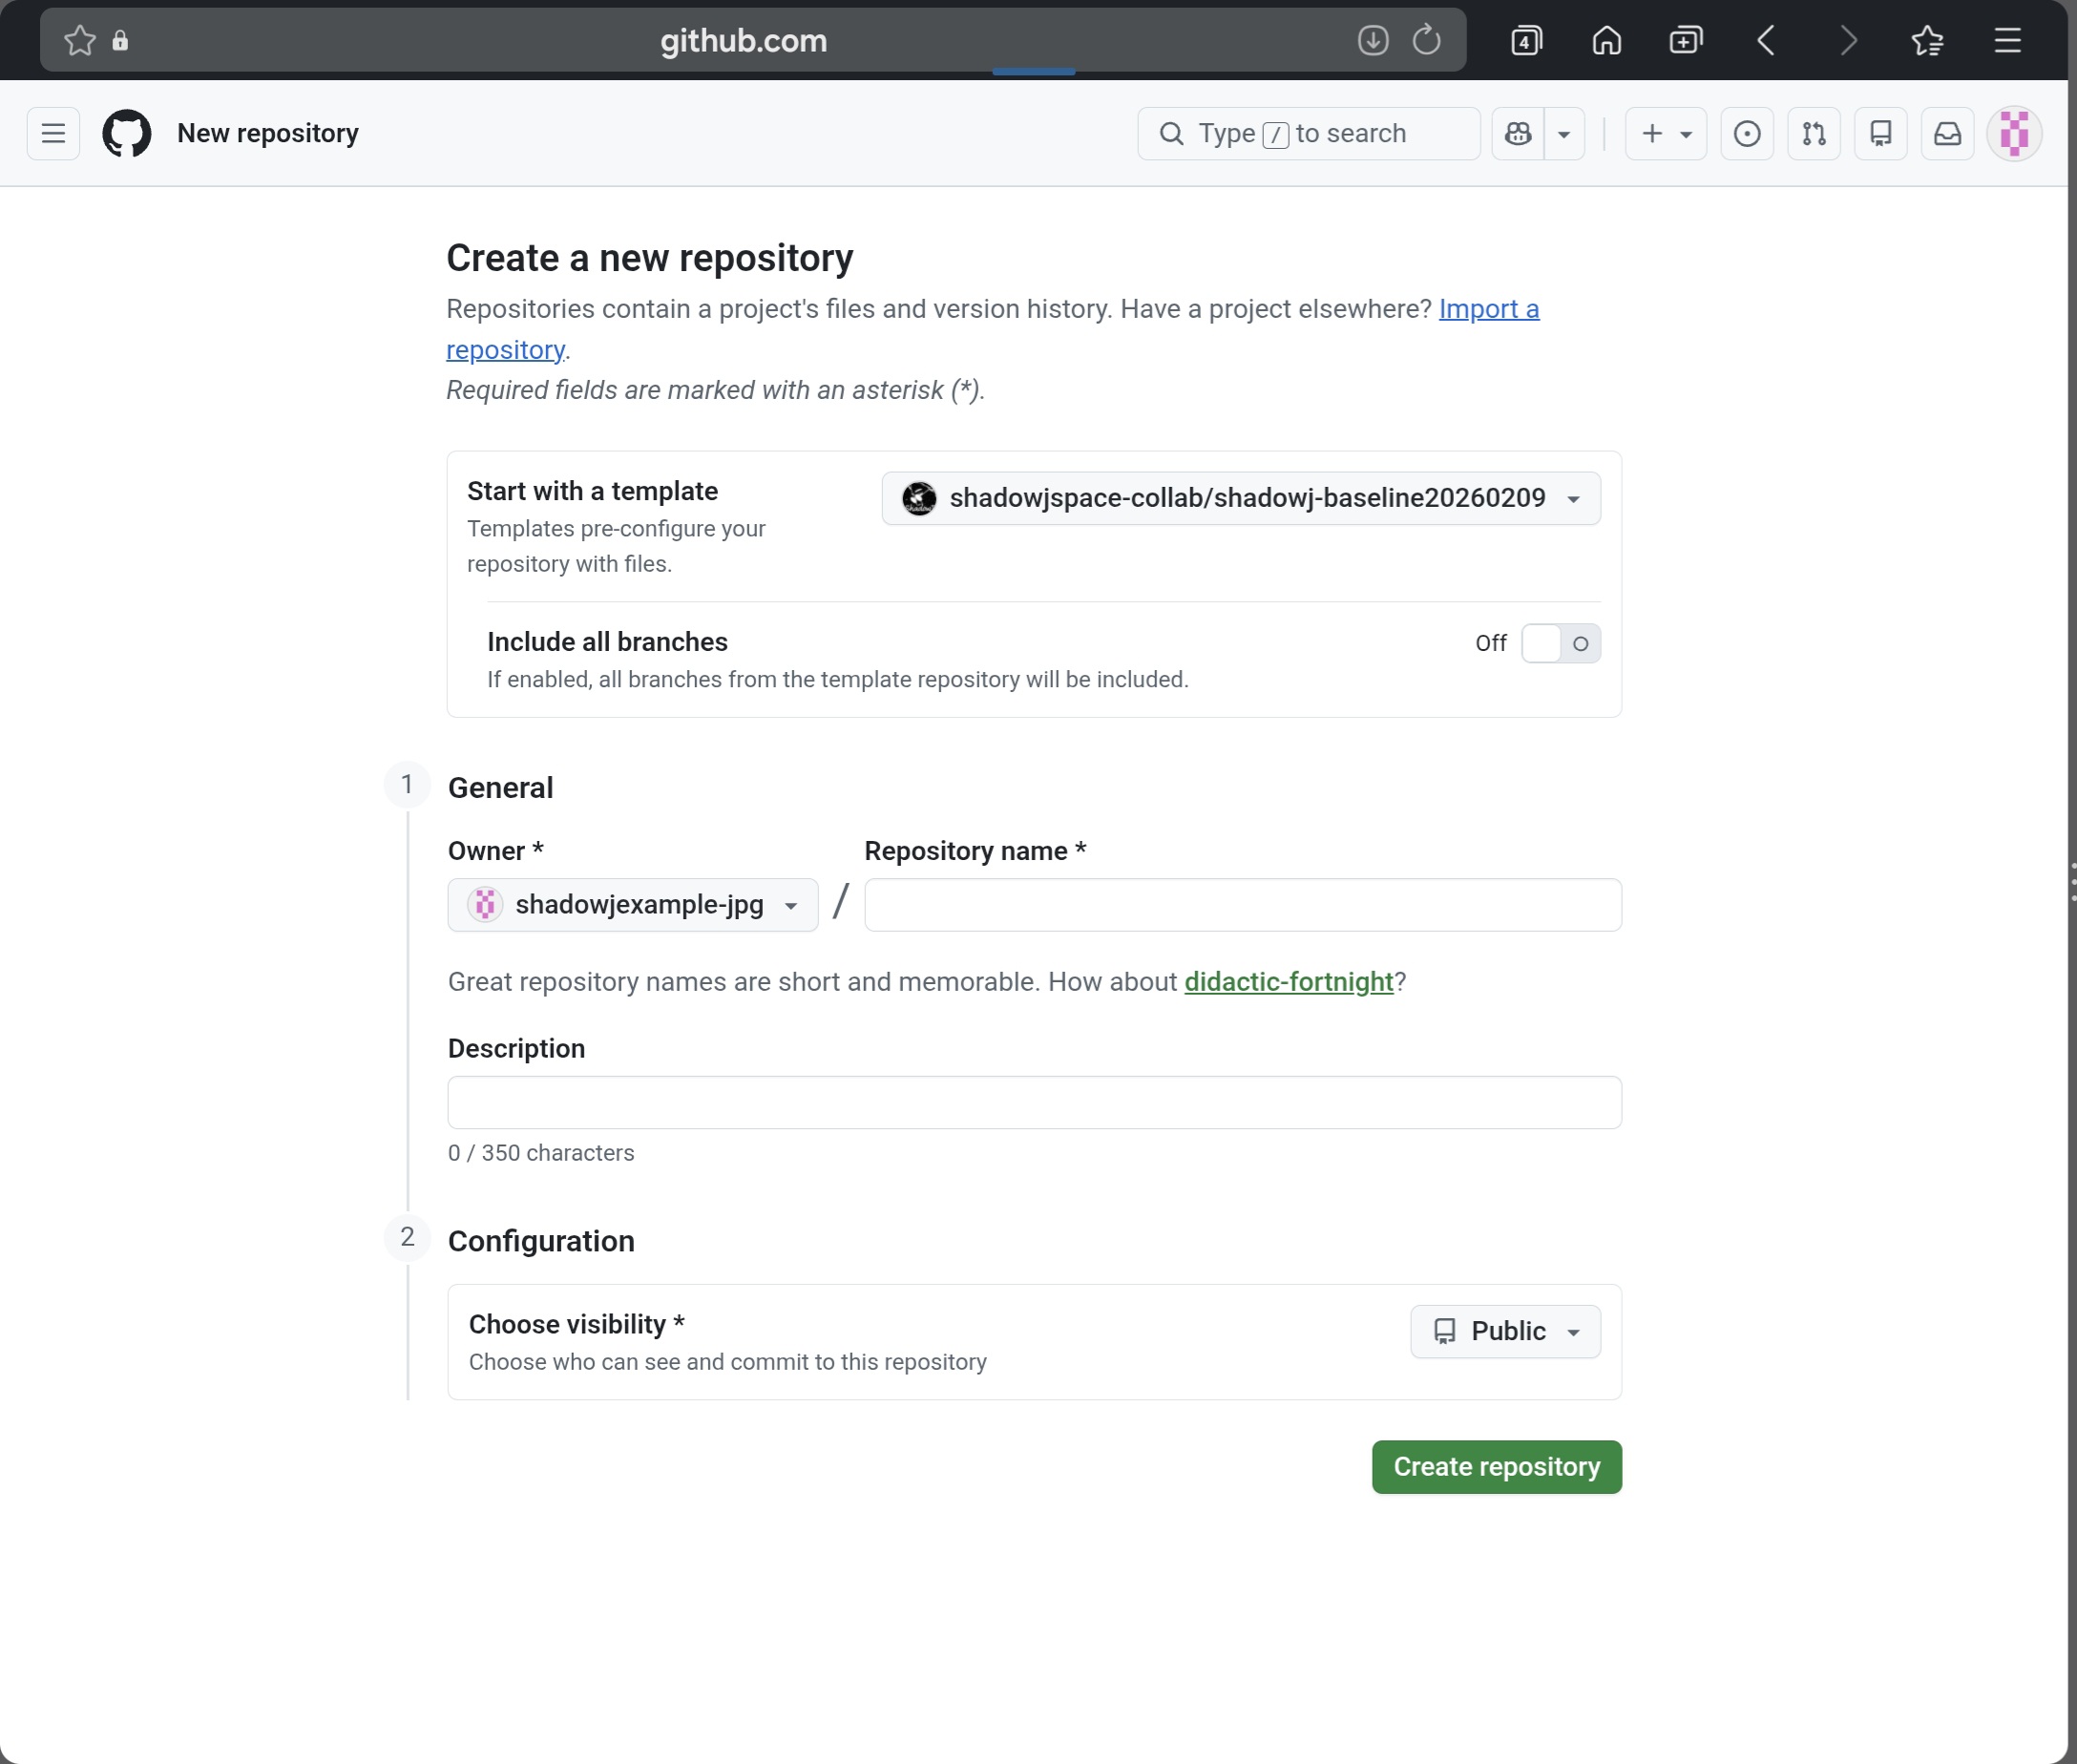
(27) EN: Set “repository name” (your website repo name). Choose “Private” under “Choose visibility”, then click “Create repository”.
(27) KR: 중간에 repository name에 앞으로 홈페이지를 운영할 레포 이름을 정합니다. 아래 Choose visibility에 private를 누르고 초록버튼 create repository를 누릅니다.
.jpg)
.jpg)
(28) EN: Your website repo is now created as your own copy. You can connect it to Cloudflare right away.
To add posts, open the “content” folder and upload your files into the correct section folder.
(28) KR: 쉐도우제이 홈페이지 보급형이 복제되었습니다. 이대로 클라우드플레어에 연결해서 바로 사용이 가능합니다. 글은 컨텐츠 폴더를 클릭하고 해당하는 폴더에 파일을 업로드 하면 홈페이지에 적용됩니다.
6. (추가) 코드 수정용 레포 복제 흐름 / Clone workflow for safe experiments
(29) EN: If you want to modify the baseline (change header images, section lists, etc.), keep the original baseline repo as a backup and do experiments only on a duplicated copy.
AI-assisted code editing is not perfect and mistakes are common.
When you ask an AI to edit code, provide the full file and agree on the allowed edit scope first. Then replace the file by pasting the full updated code.
If you touch the wrong parts, the layout can break and recovery can become hard.
So when editing code, always clone the repo and use the clone for experiments.
(29) KR: 만약 원본 레포를 그대로 사용하지 않고 수정하여 헤더 이미지나 섹션리스트들을 자기가 원하느대로 수정하고 싶다면 쉐도우제이한테서 받은 베이스라인 원본 레포를 백업한채 저장해놓고 복제본으로 수정 실험을 해야 합니다.
AI에게 코드를 주고 수정하는 작업은 완벽하지 않으므로 실수가 잦습니다.
명령어를 내릴때는 전체코드를 주고 수정가능한 범위를 논의를 한뒤에 코드를 수정하게 해서 항상 전체코드로 코드를 갈아끼우기 해야 합니다.
코드를 잘못 건들였을경우 전체적인 레이아웃이 박살나고 복구가 힘들게 될수도 있습니다.
그러니 코드 수정할때는 항상 레포 복제를 해서 복제본을 사용합니다.
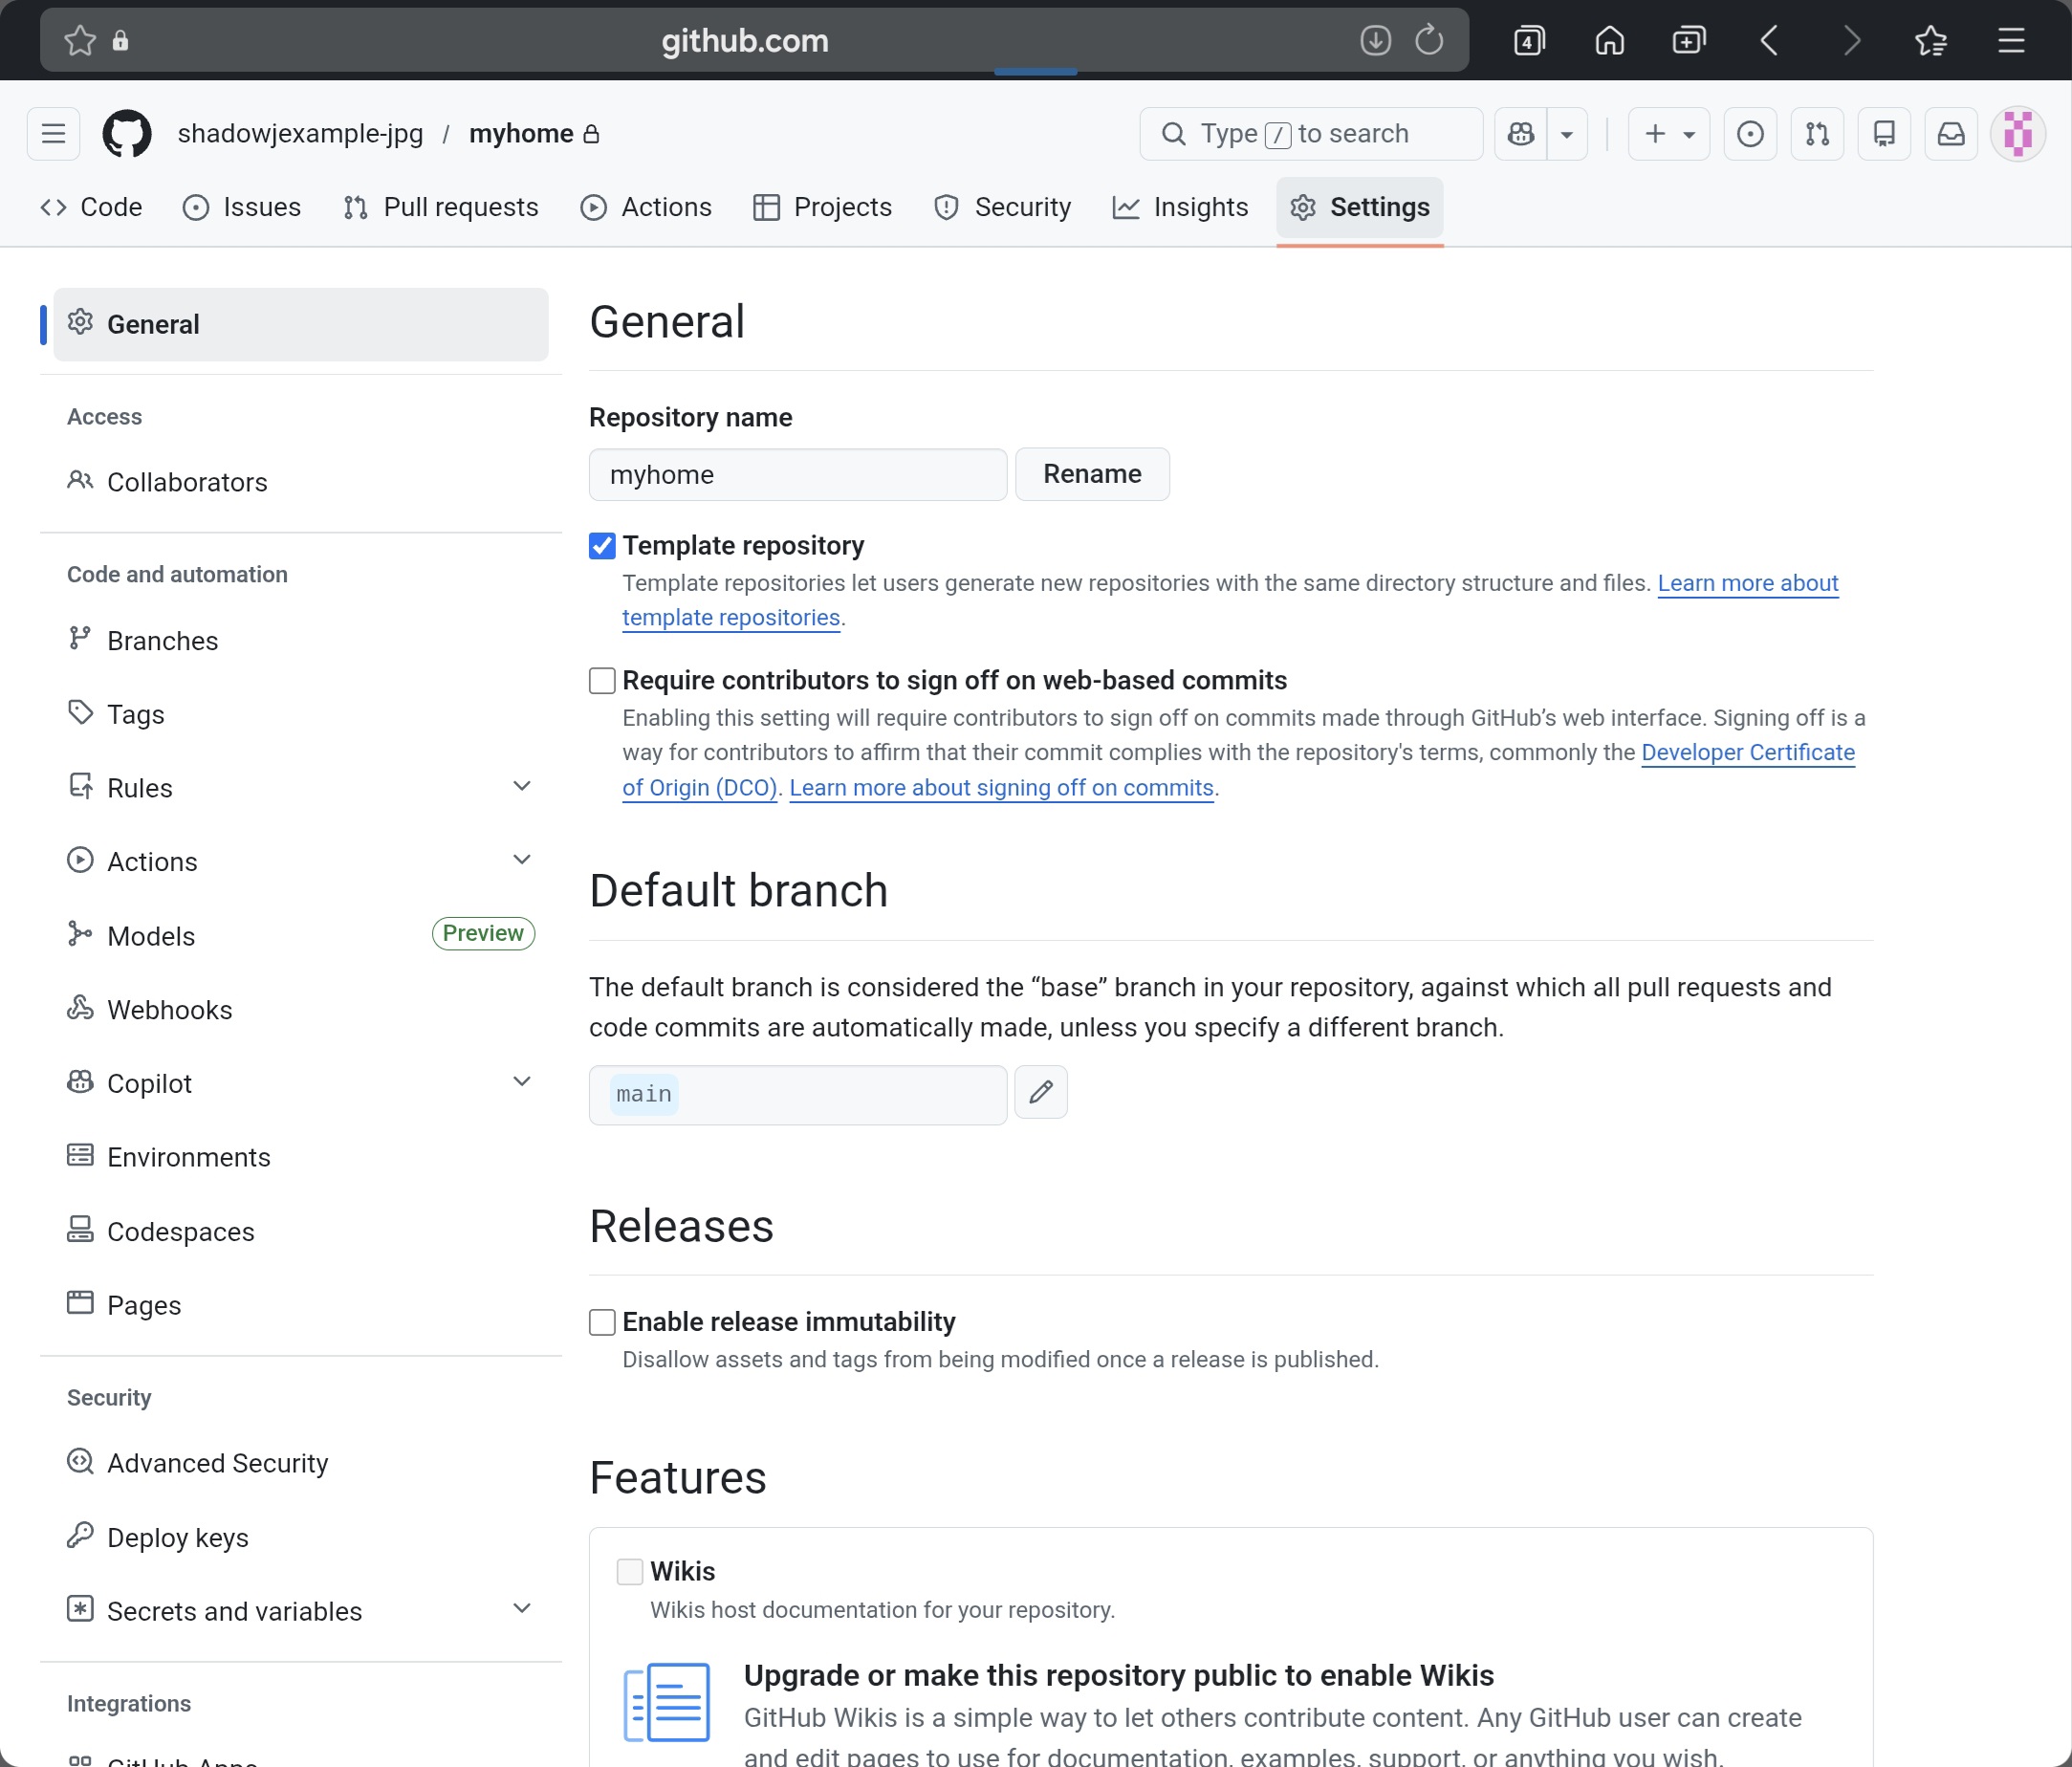
(30) EN: To enable repeated cloning, go to the repo Settings and check Template repository at the top. This makes “Use this template” available.
(30) KR: 레포 복제를 할 경우에는 상단 메뉴 setting에 들어가서 맨 위 Template repository 를 체크합니다. 이 기능은 복제가 계속 가능하게 만들어 줍니다.
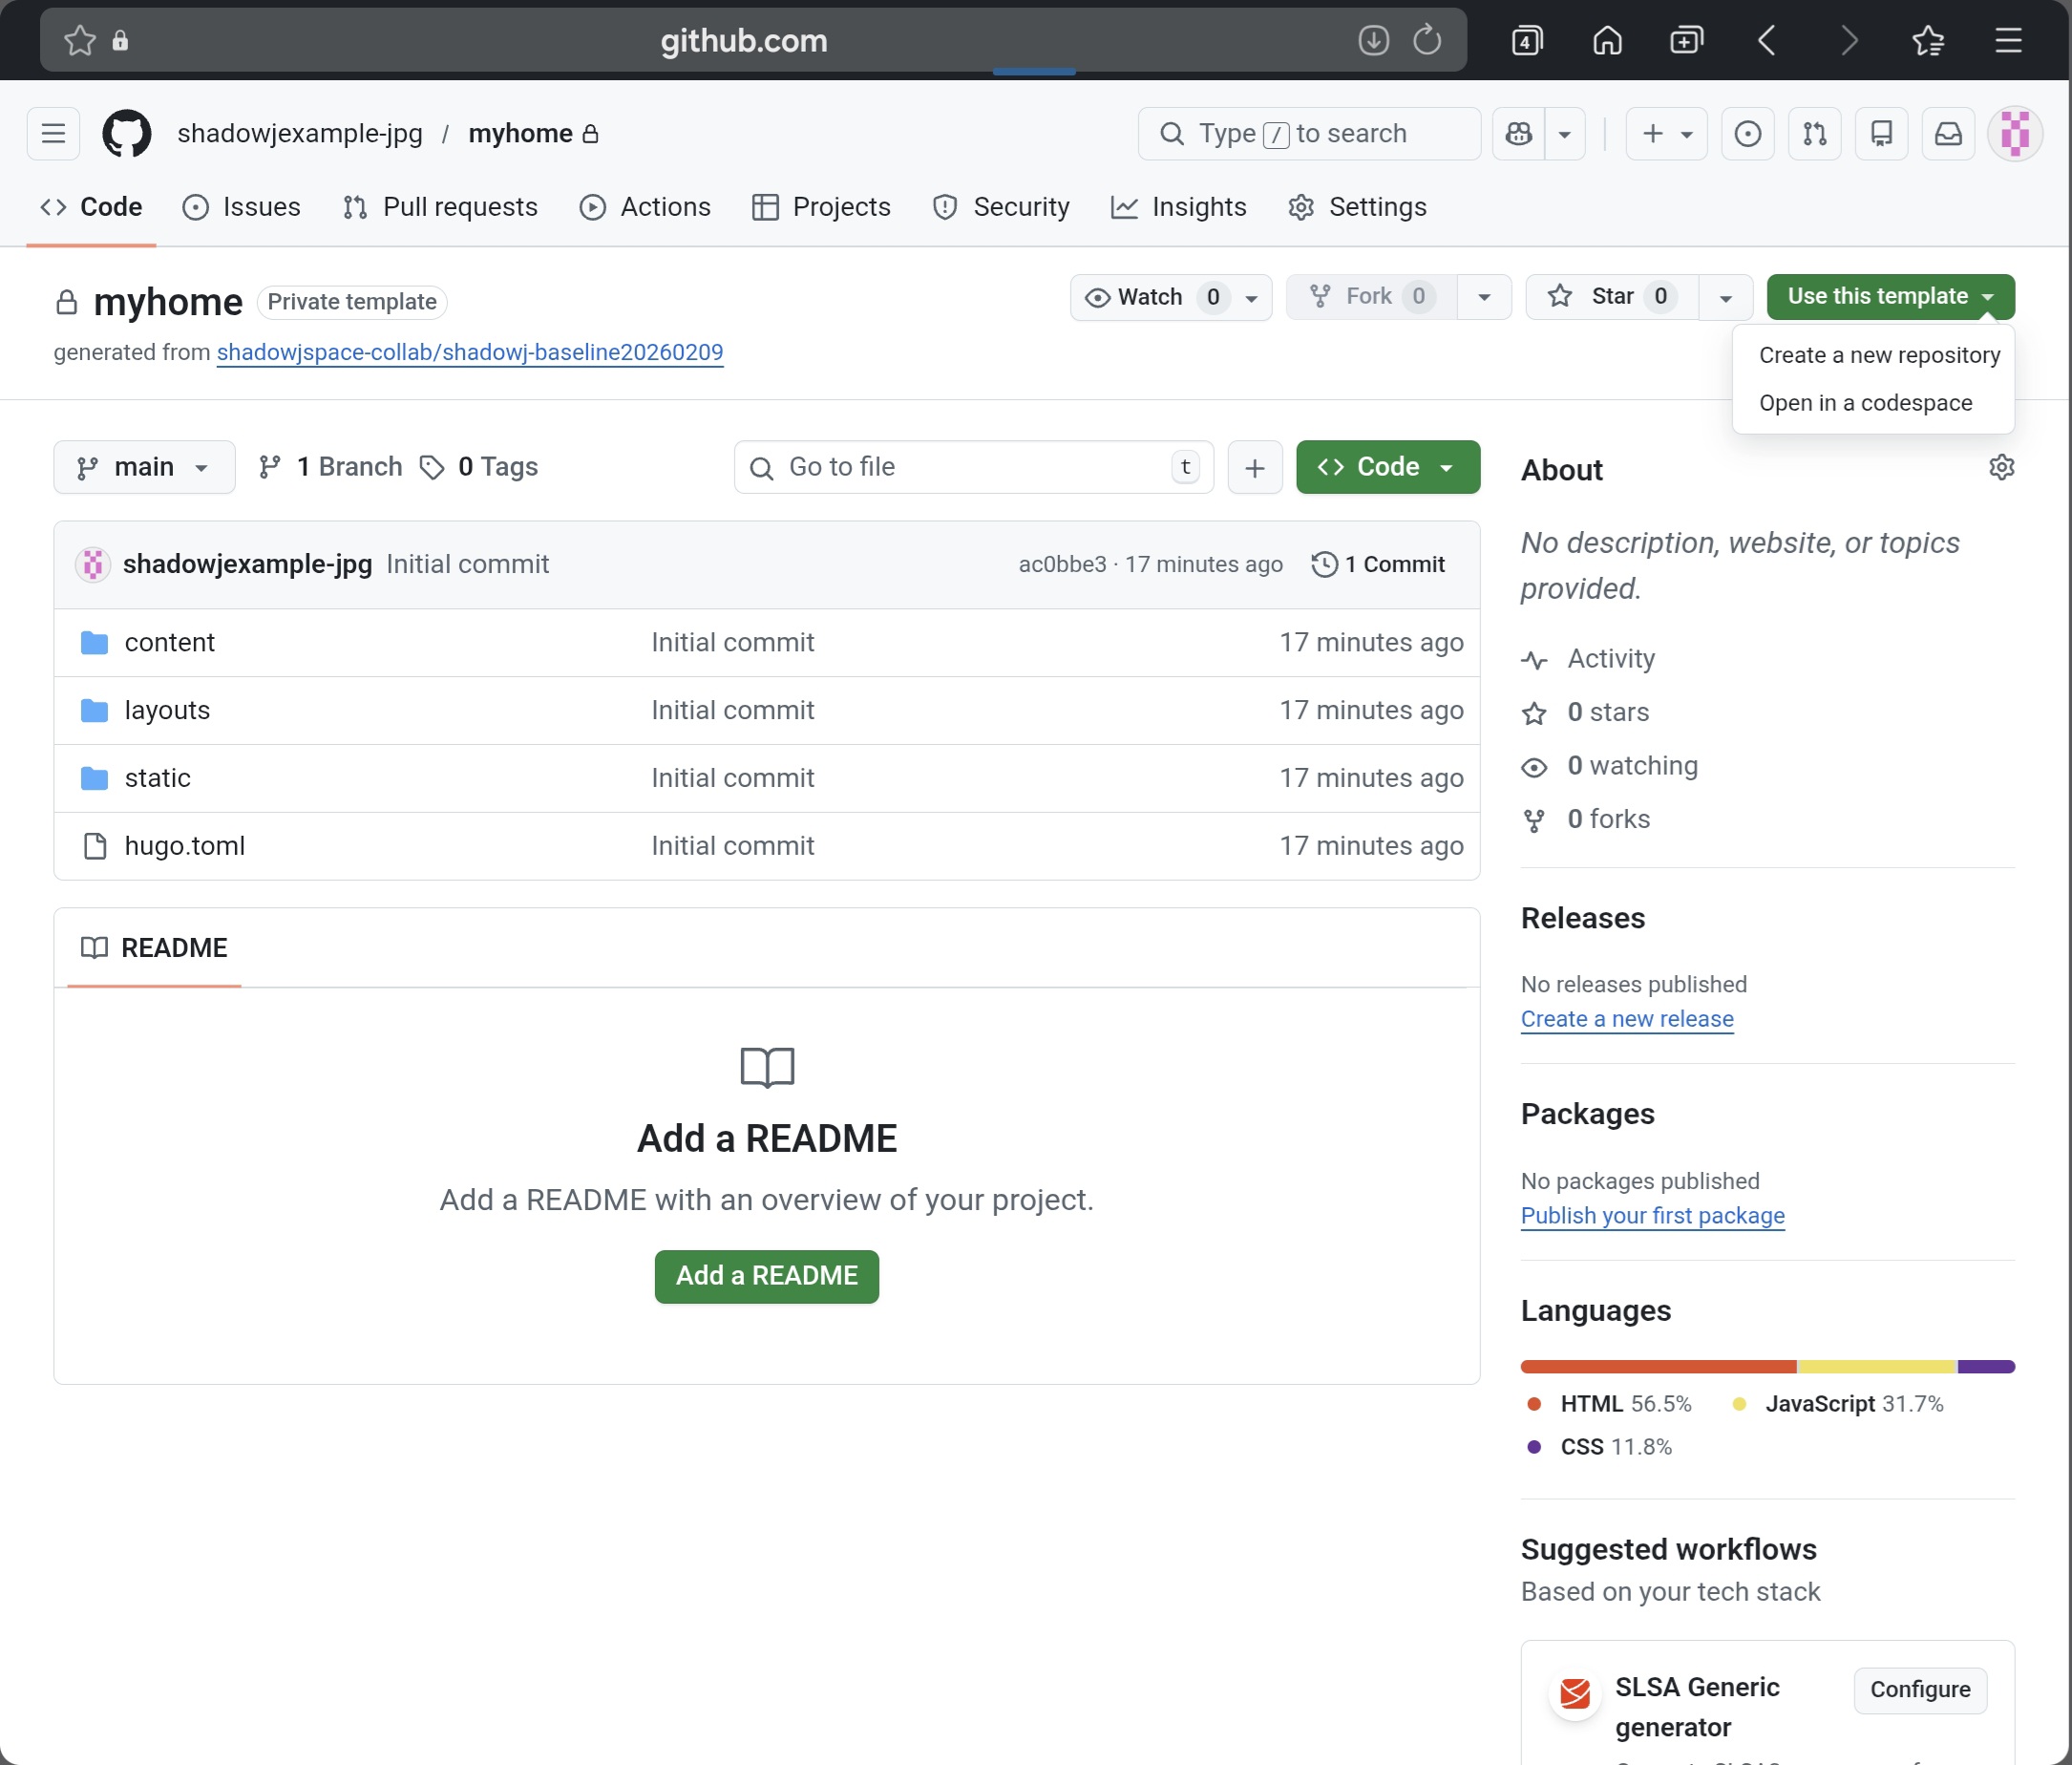
(31) EN: Go back to the repo main page (click the repo name). Then click Use this template and choose Create a new repository.
(31) KR: 그리고 다시 상단의 레포이름을 클릭하면 다시 레포메인 화면으로 돌아오는데 우측 상단 Use this Template을 누르고 create a new repository를 누릅니다.
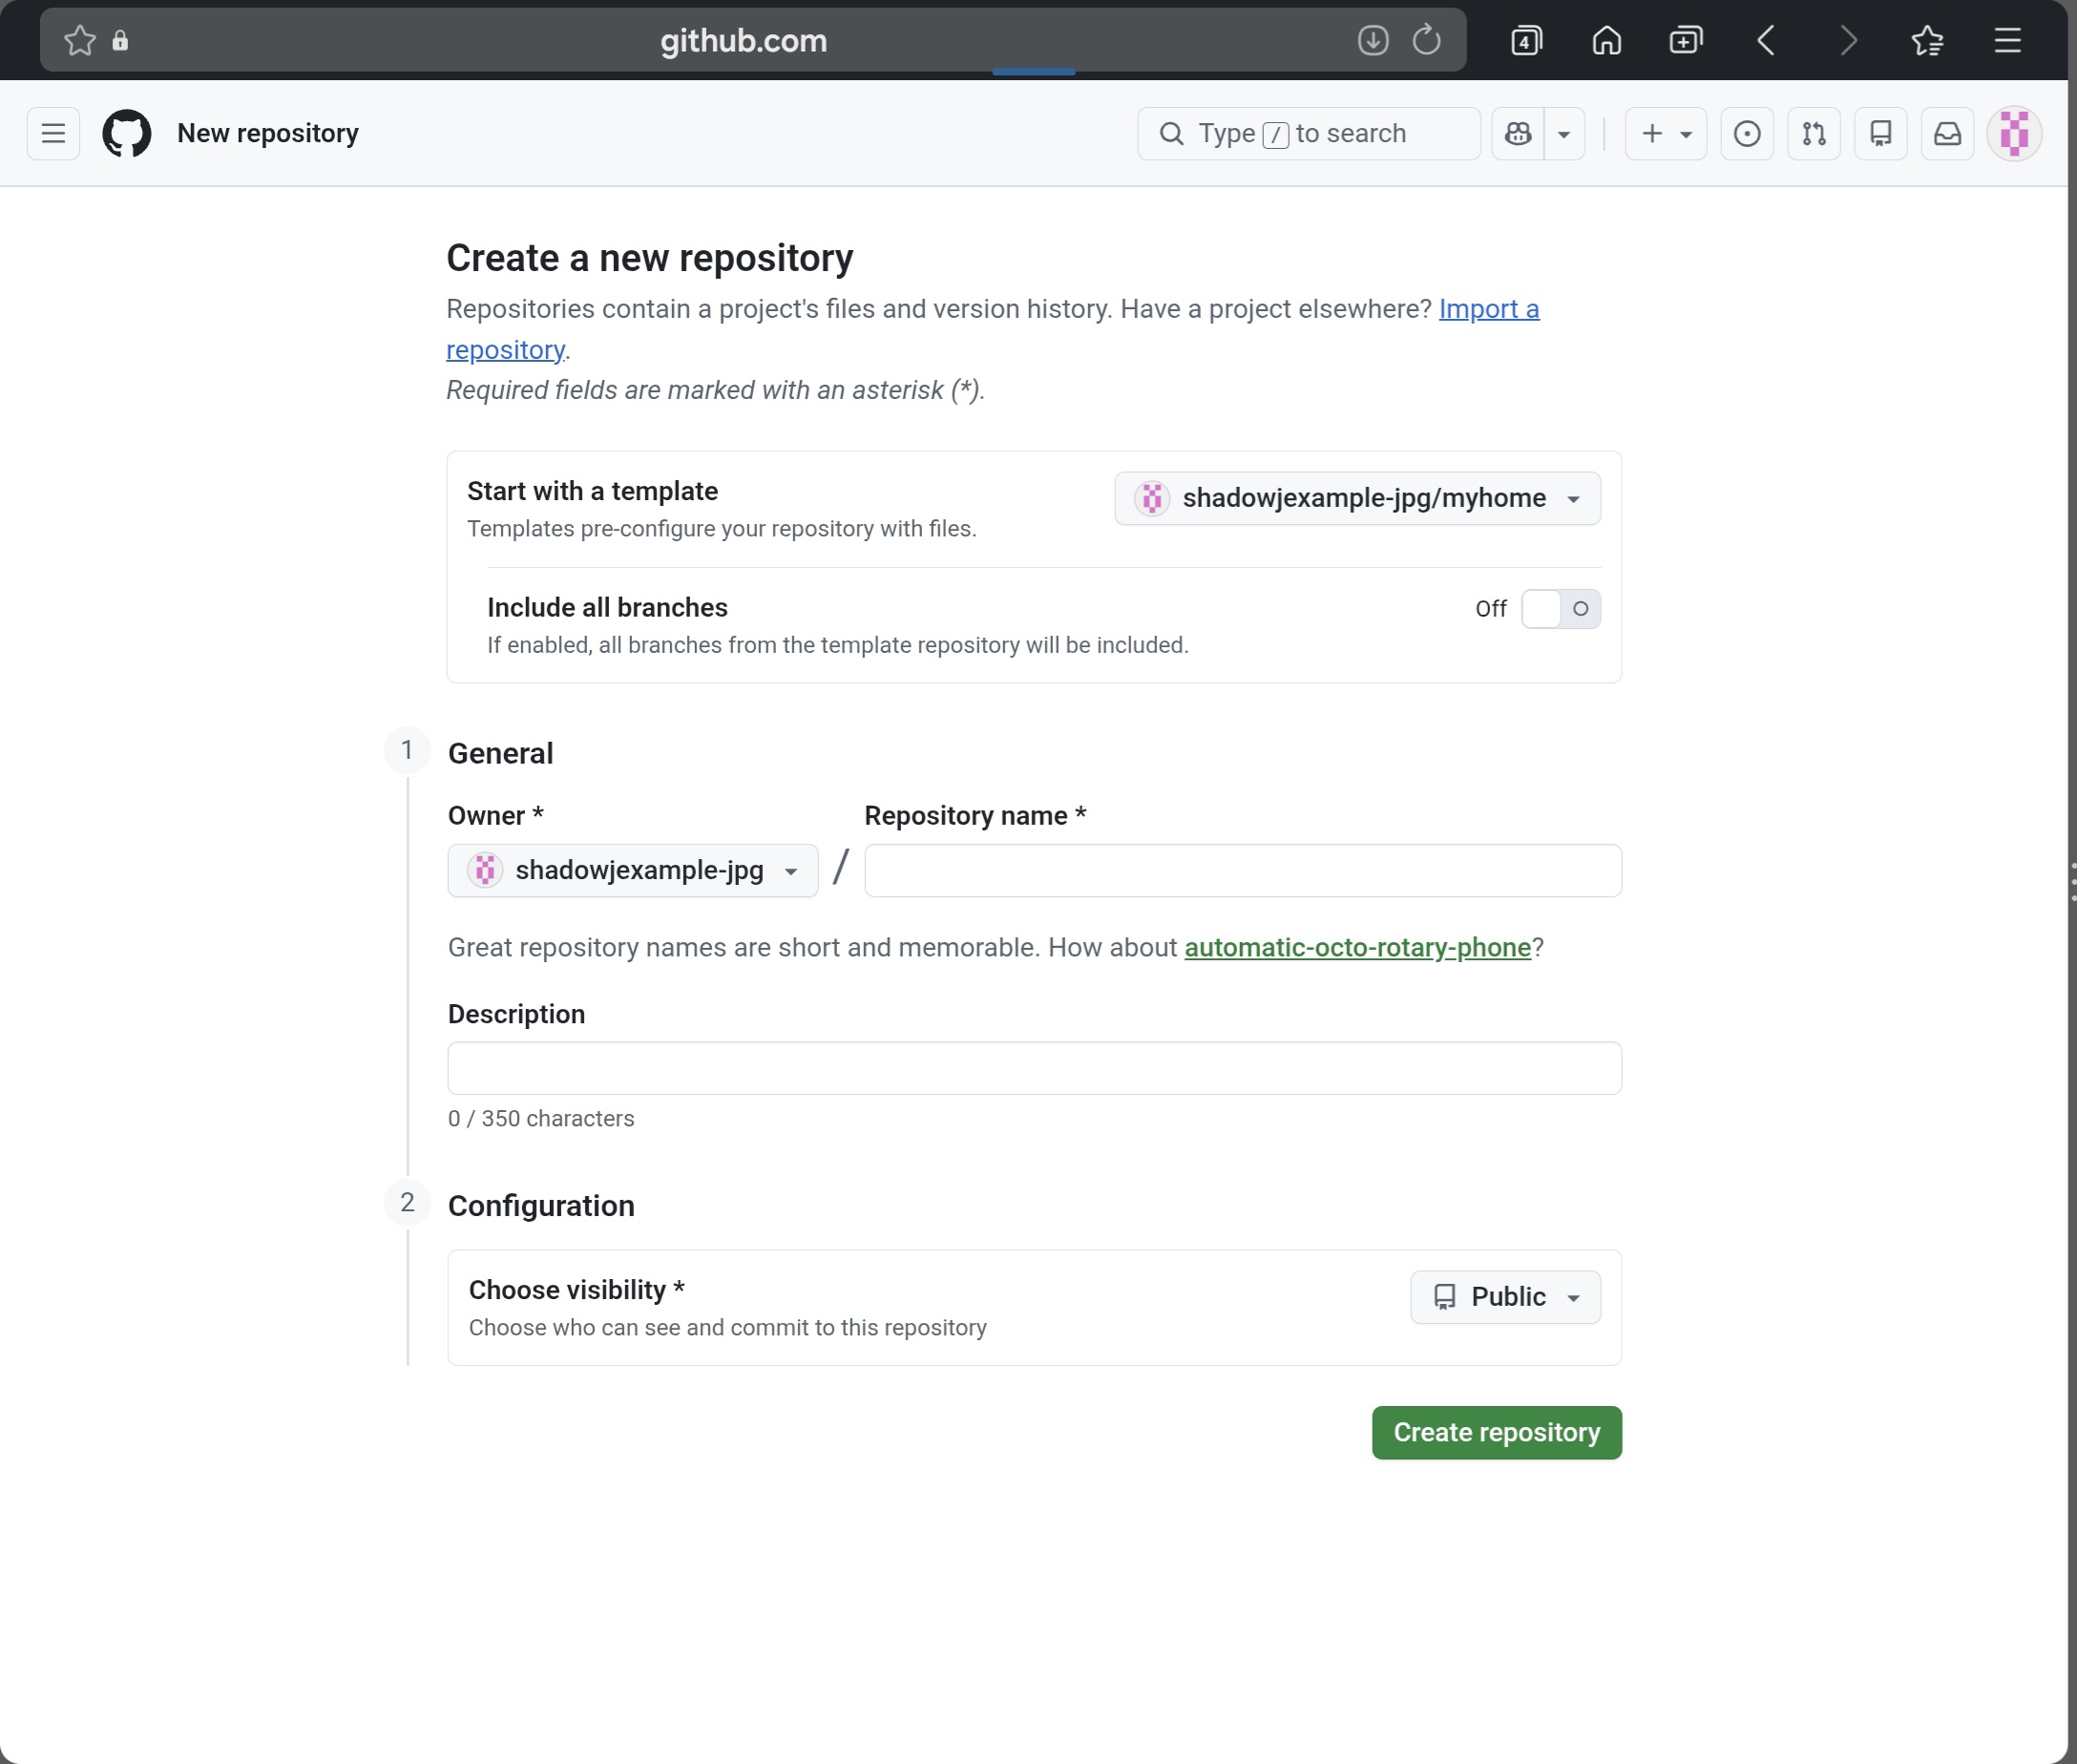
(32) EN: The copy screen appears again. Create a new repo with a new name. Use that cloned repo as your experiment repo for code edits.
Now that you have your repo, you must connect it to Cloudflare and then connect your domain to publish your independent site online.
Go back to Cloudflare now.
(32) KR: 그럼 다시 레포 복사하는 화면이 나오고 새이름의 레포를 만들어 복제한뒤 코드 수정용 실험 레포로 맘껏 사용할 수 있습니다.
자 이제 레포를 만들었으면 클라우드플레어와 연결해서 도메인으로 연결해야 온라인에 나의 독립 홈페이지가 배포 됩니다.
다시 클라우드플레어로 돌아갑니다.
7. Cloudflare 배포 / Deploy on Cloudflare Pages

(33) EN: Go to https://dash.cloudflare.com and log in. Use the left quick search and type “workers”, then click “Workers & Pages”.
(33) KR: https://dash.cloudflare.com 여기로 들어가고 로그인을 한다음 좌측 빠른 검색에 workers를 누르고 나오는것중 workers & Pages를 누릅니다.
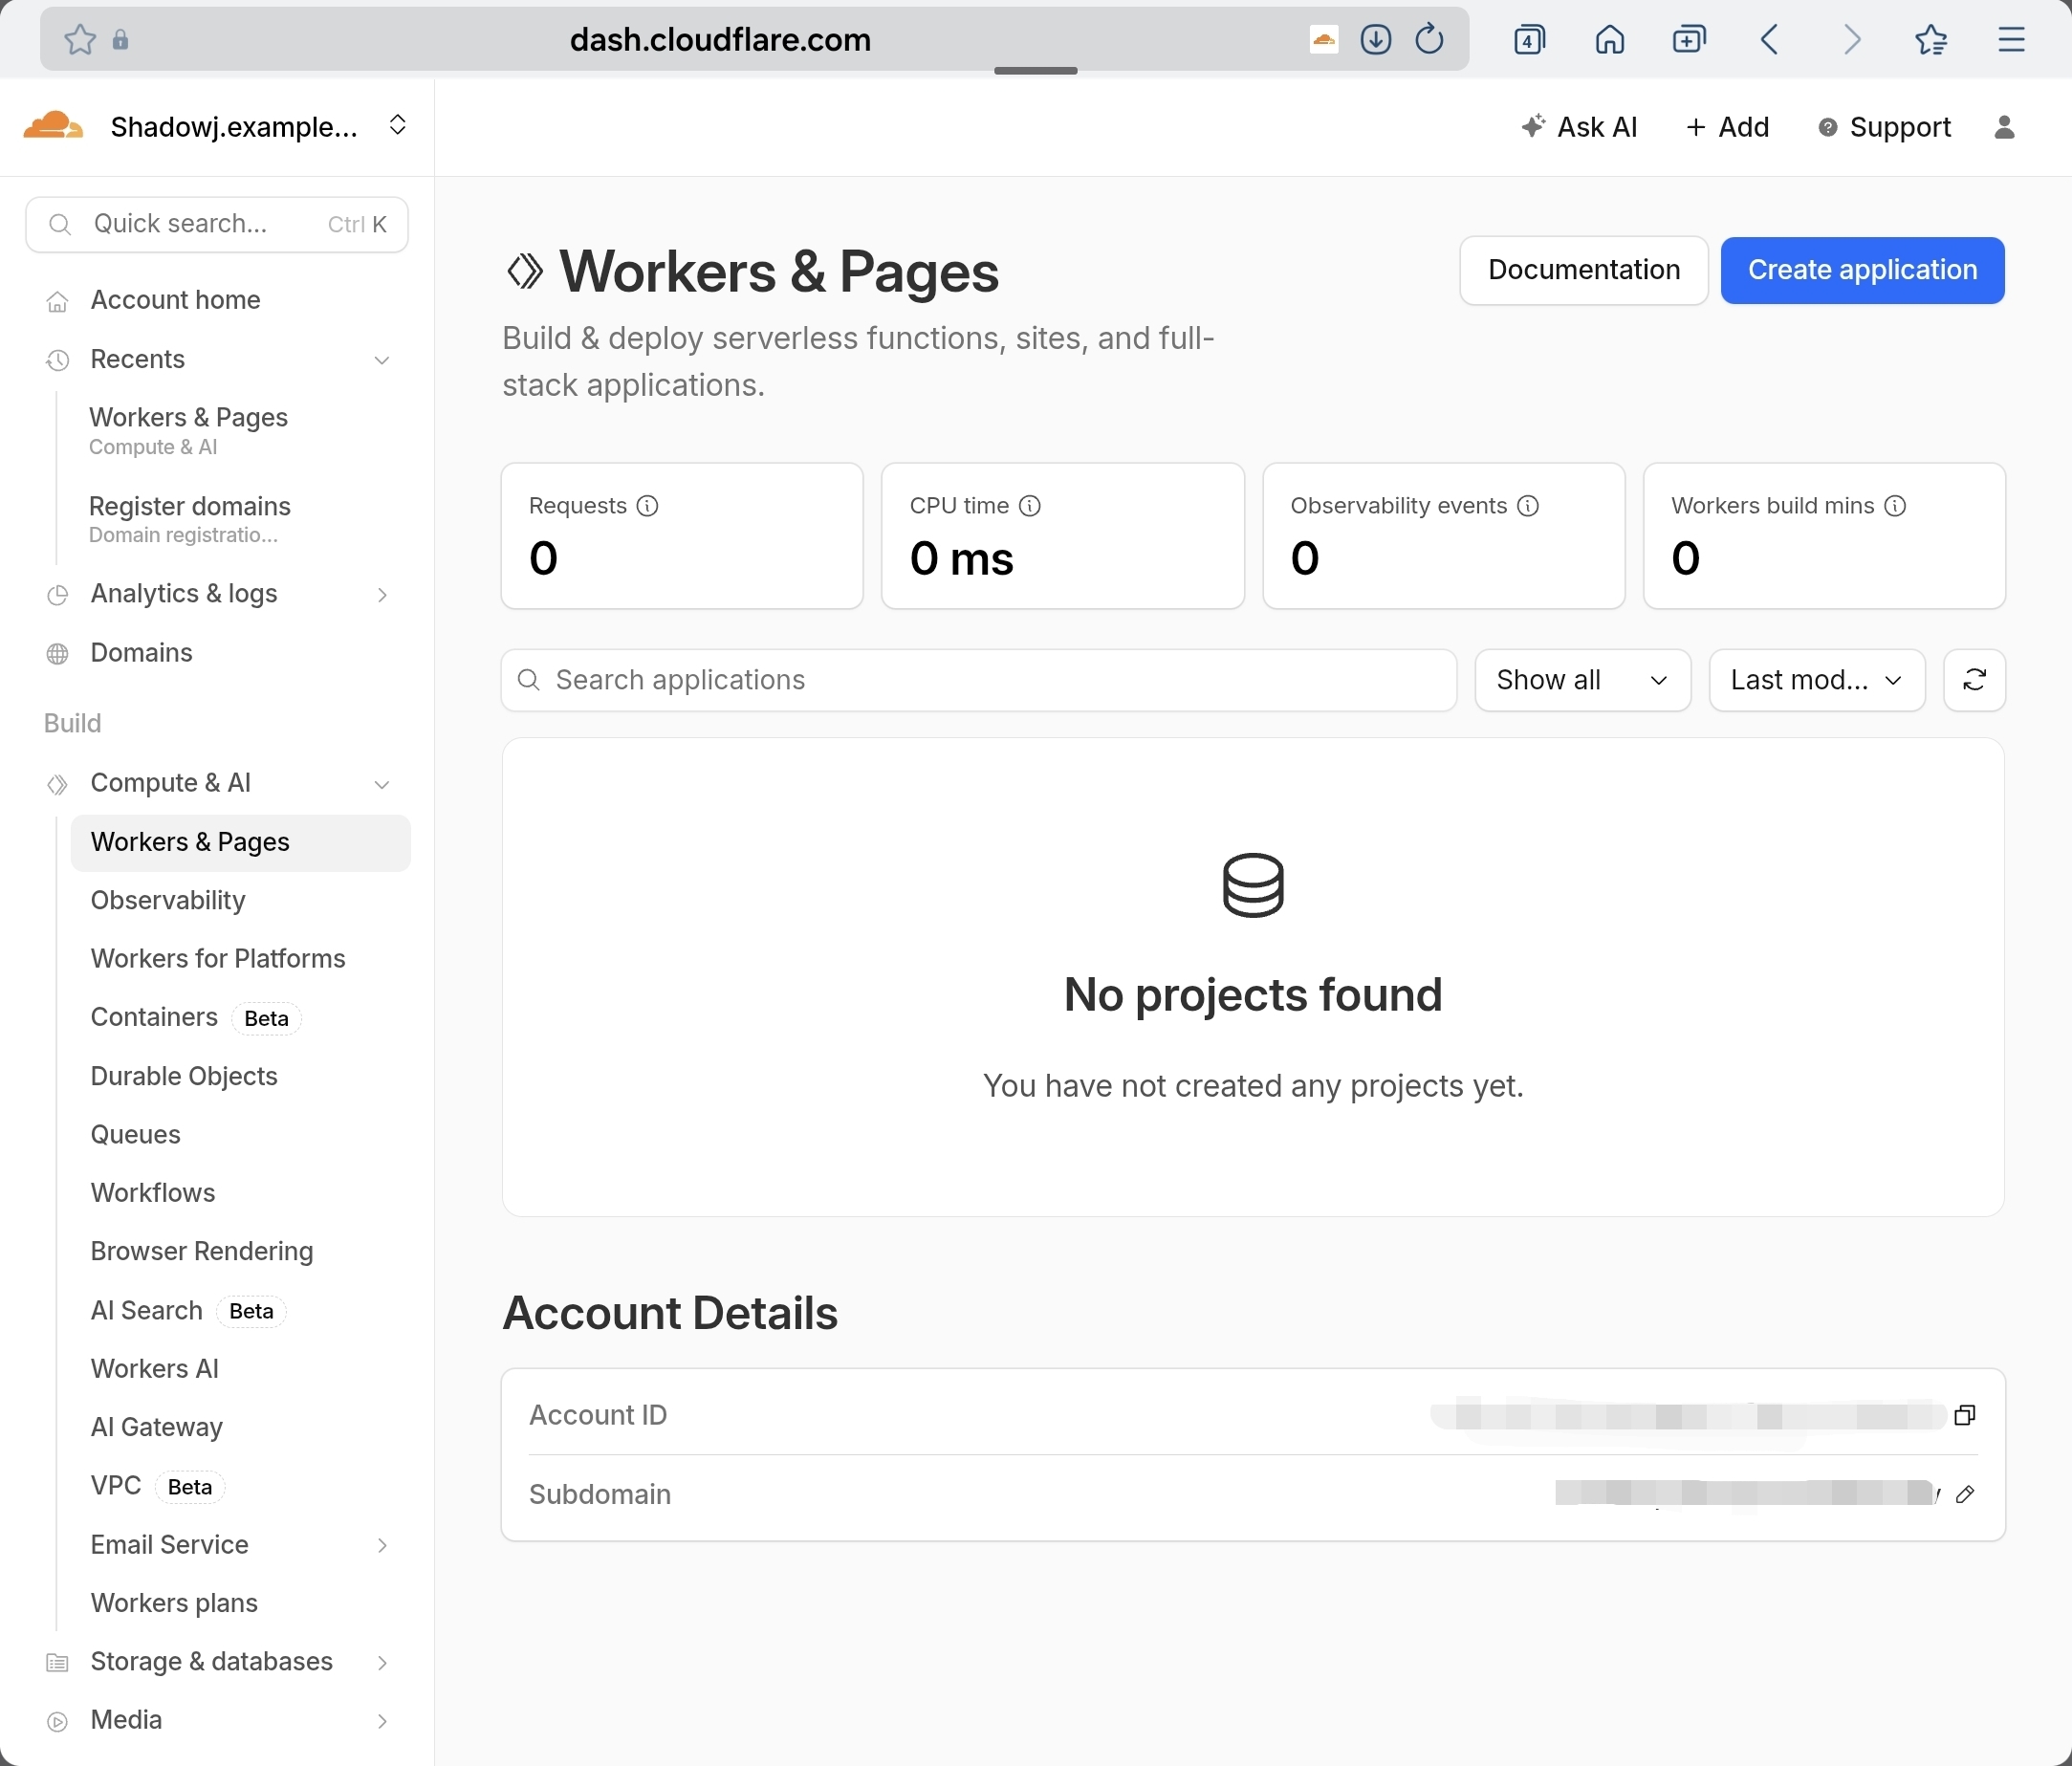
(34) EN: On Workers & Pages, click “Create application”.
(34) KR: Workers & Pages 페이지에 우측 상단에 Creat application을 누릅니다.
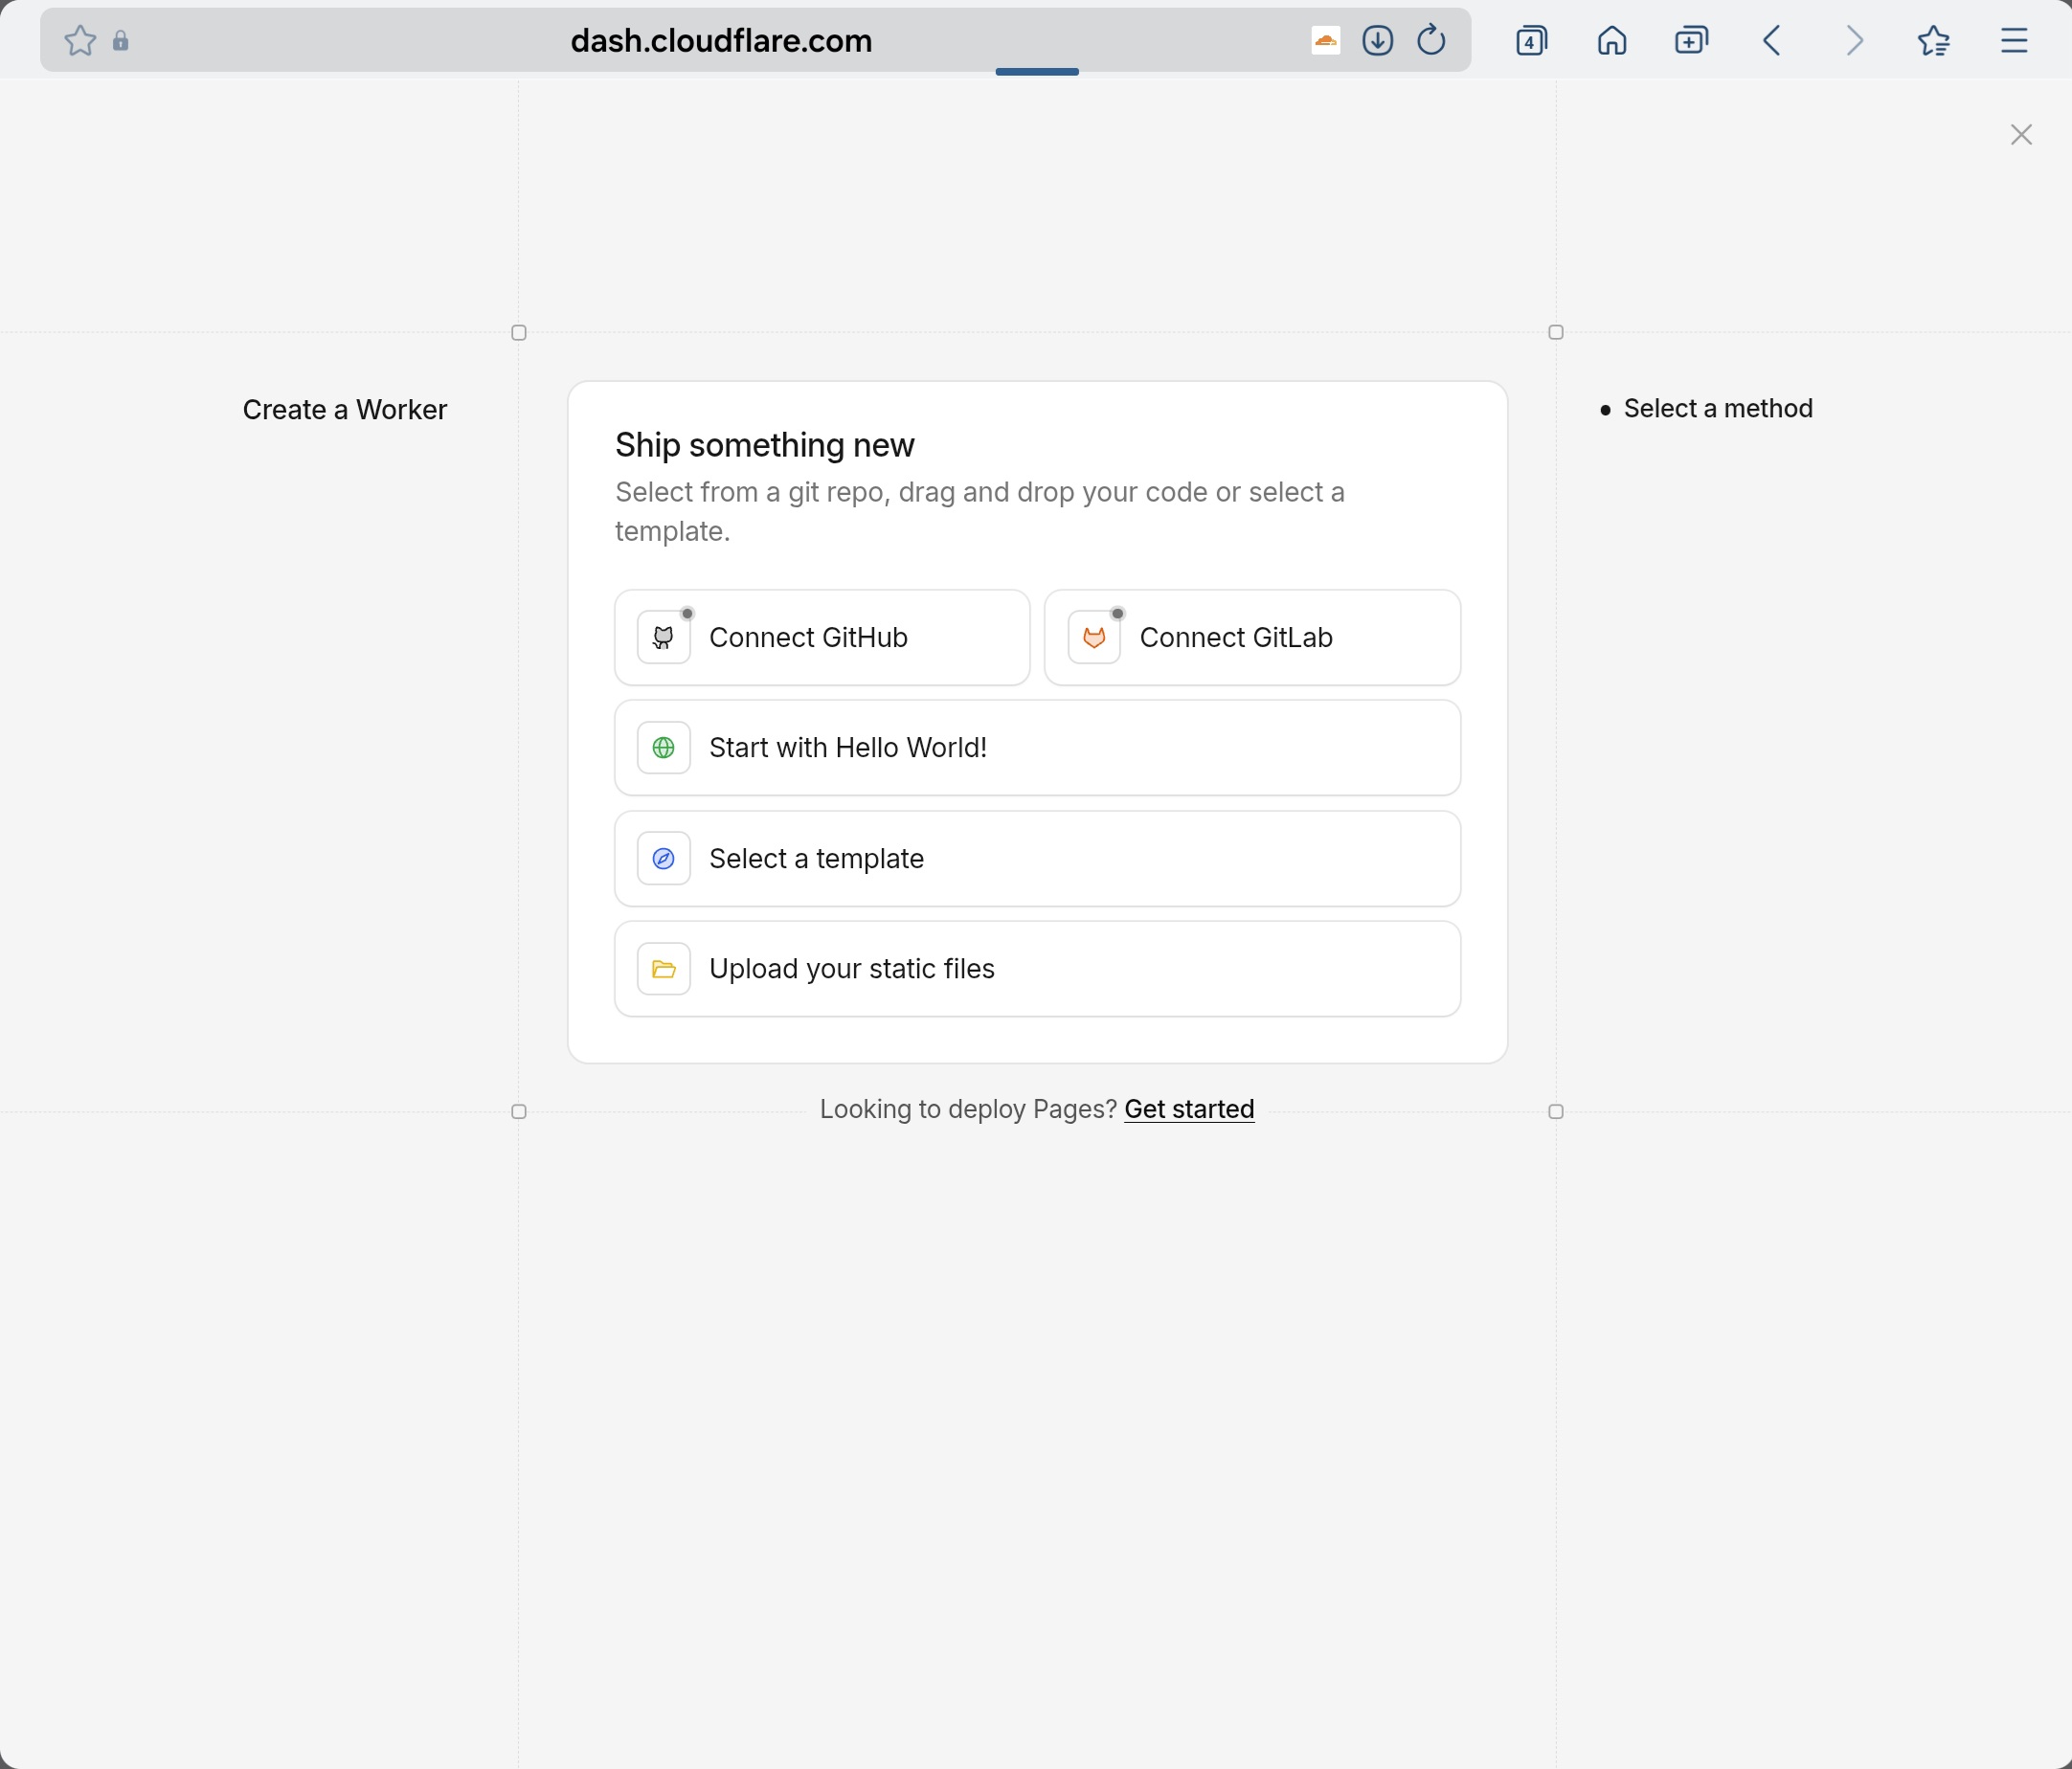
(35) EN: Under the white box, click “Looking to deploy Pages? Get started”.
(35) KR: 흰 사각박스 아래 작은글씨로 된 Looking to deploy Pages? Get started 이것을 누릅니다.
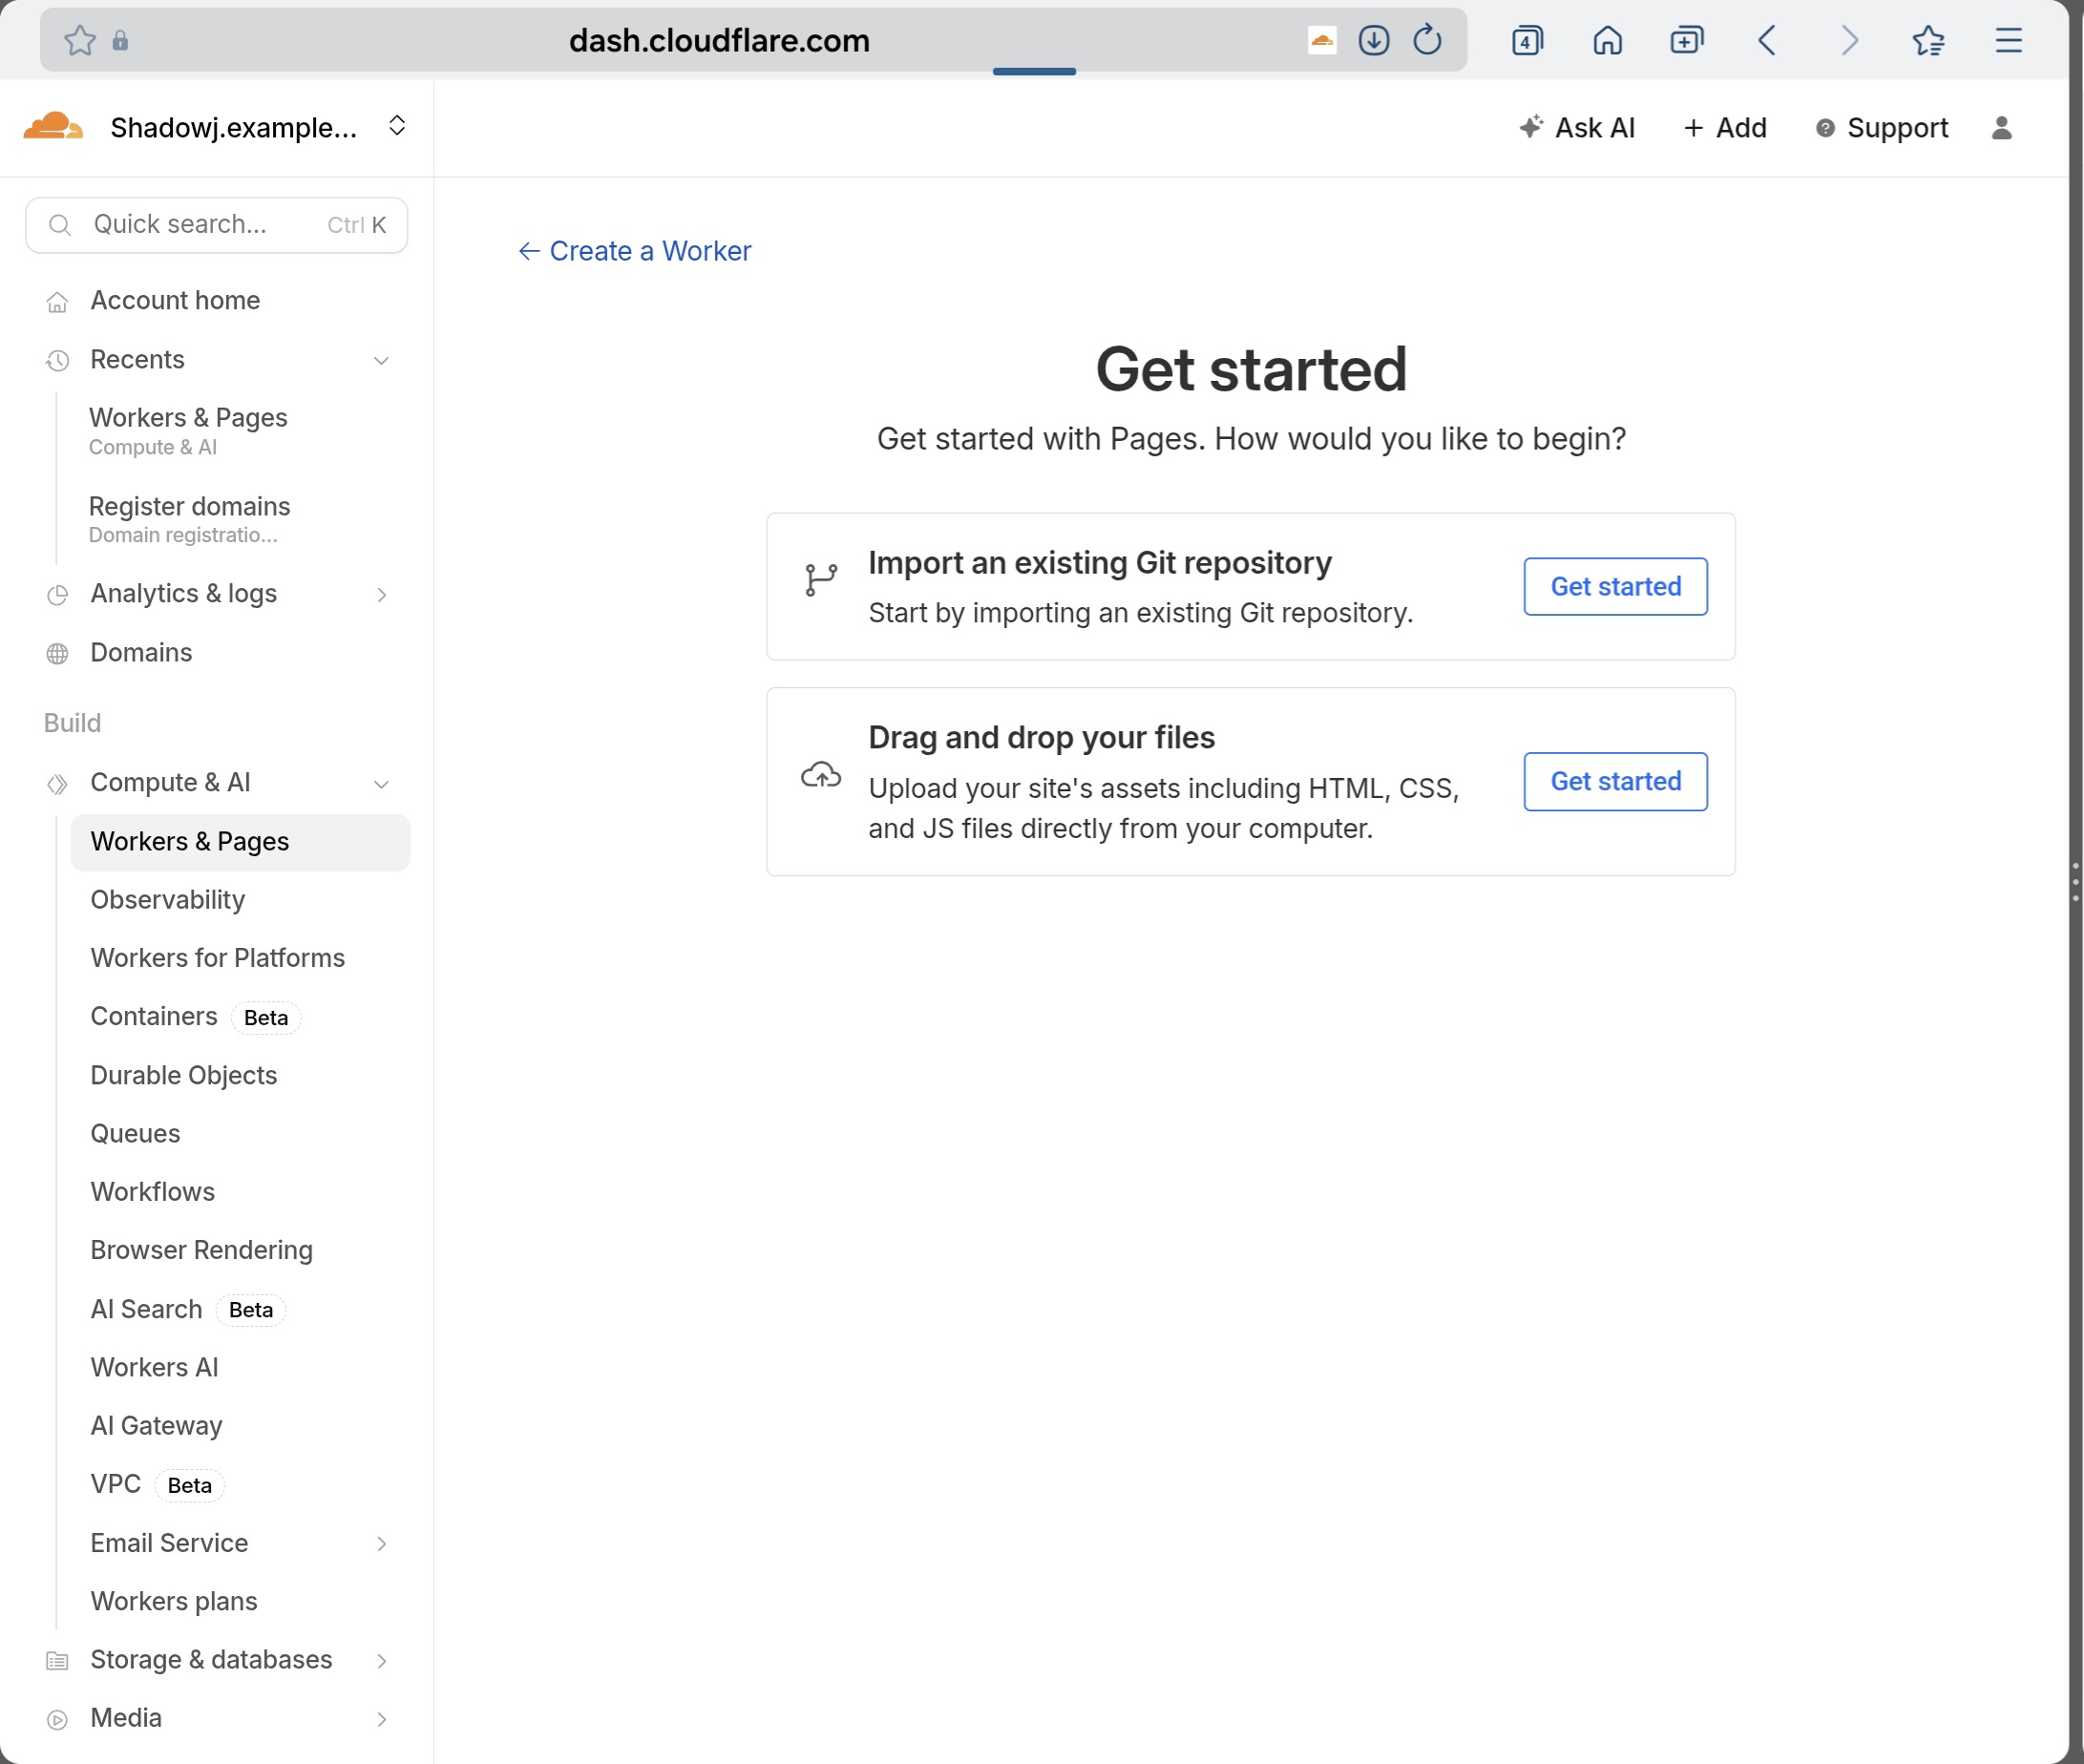
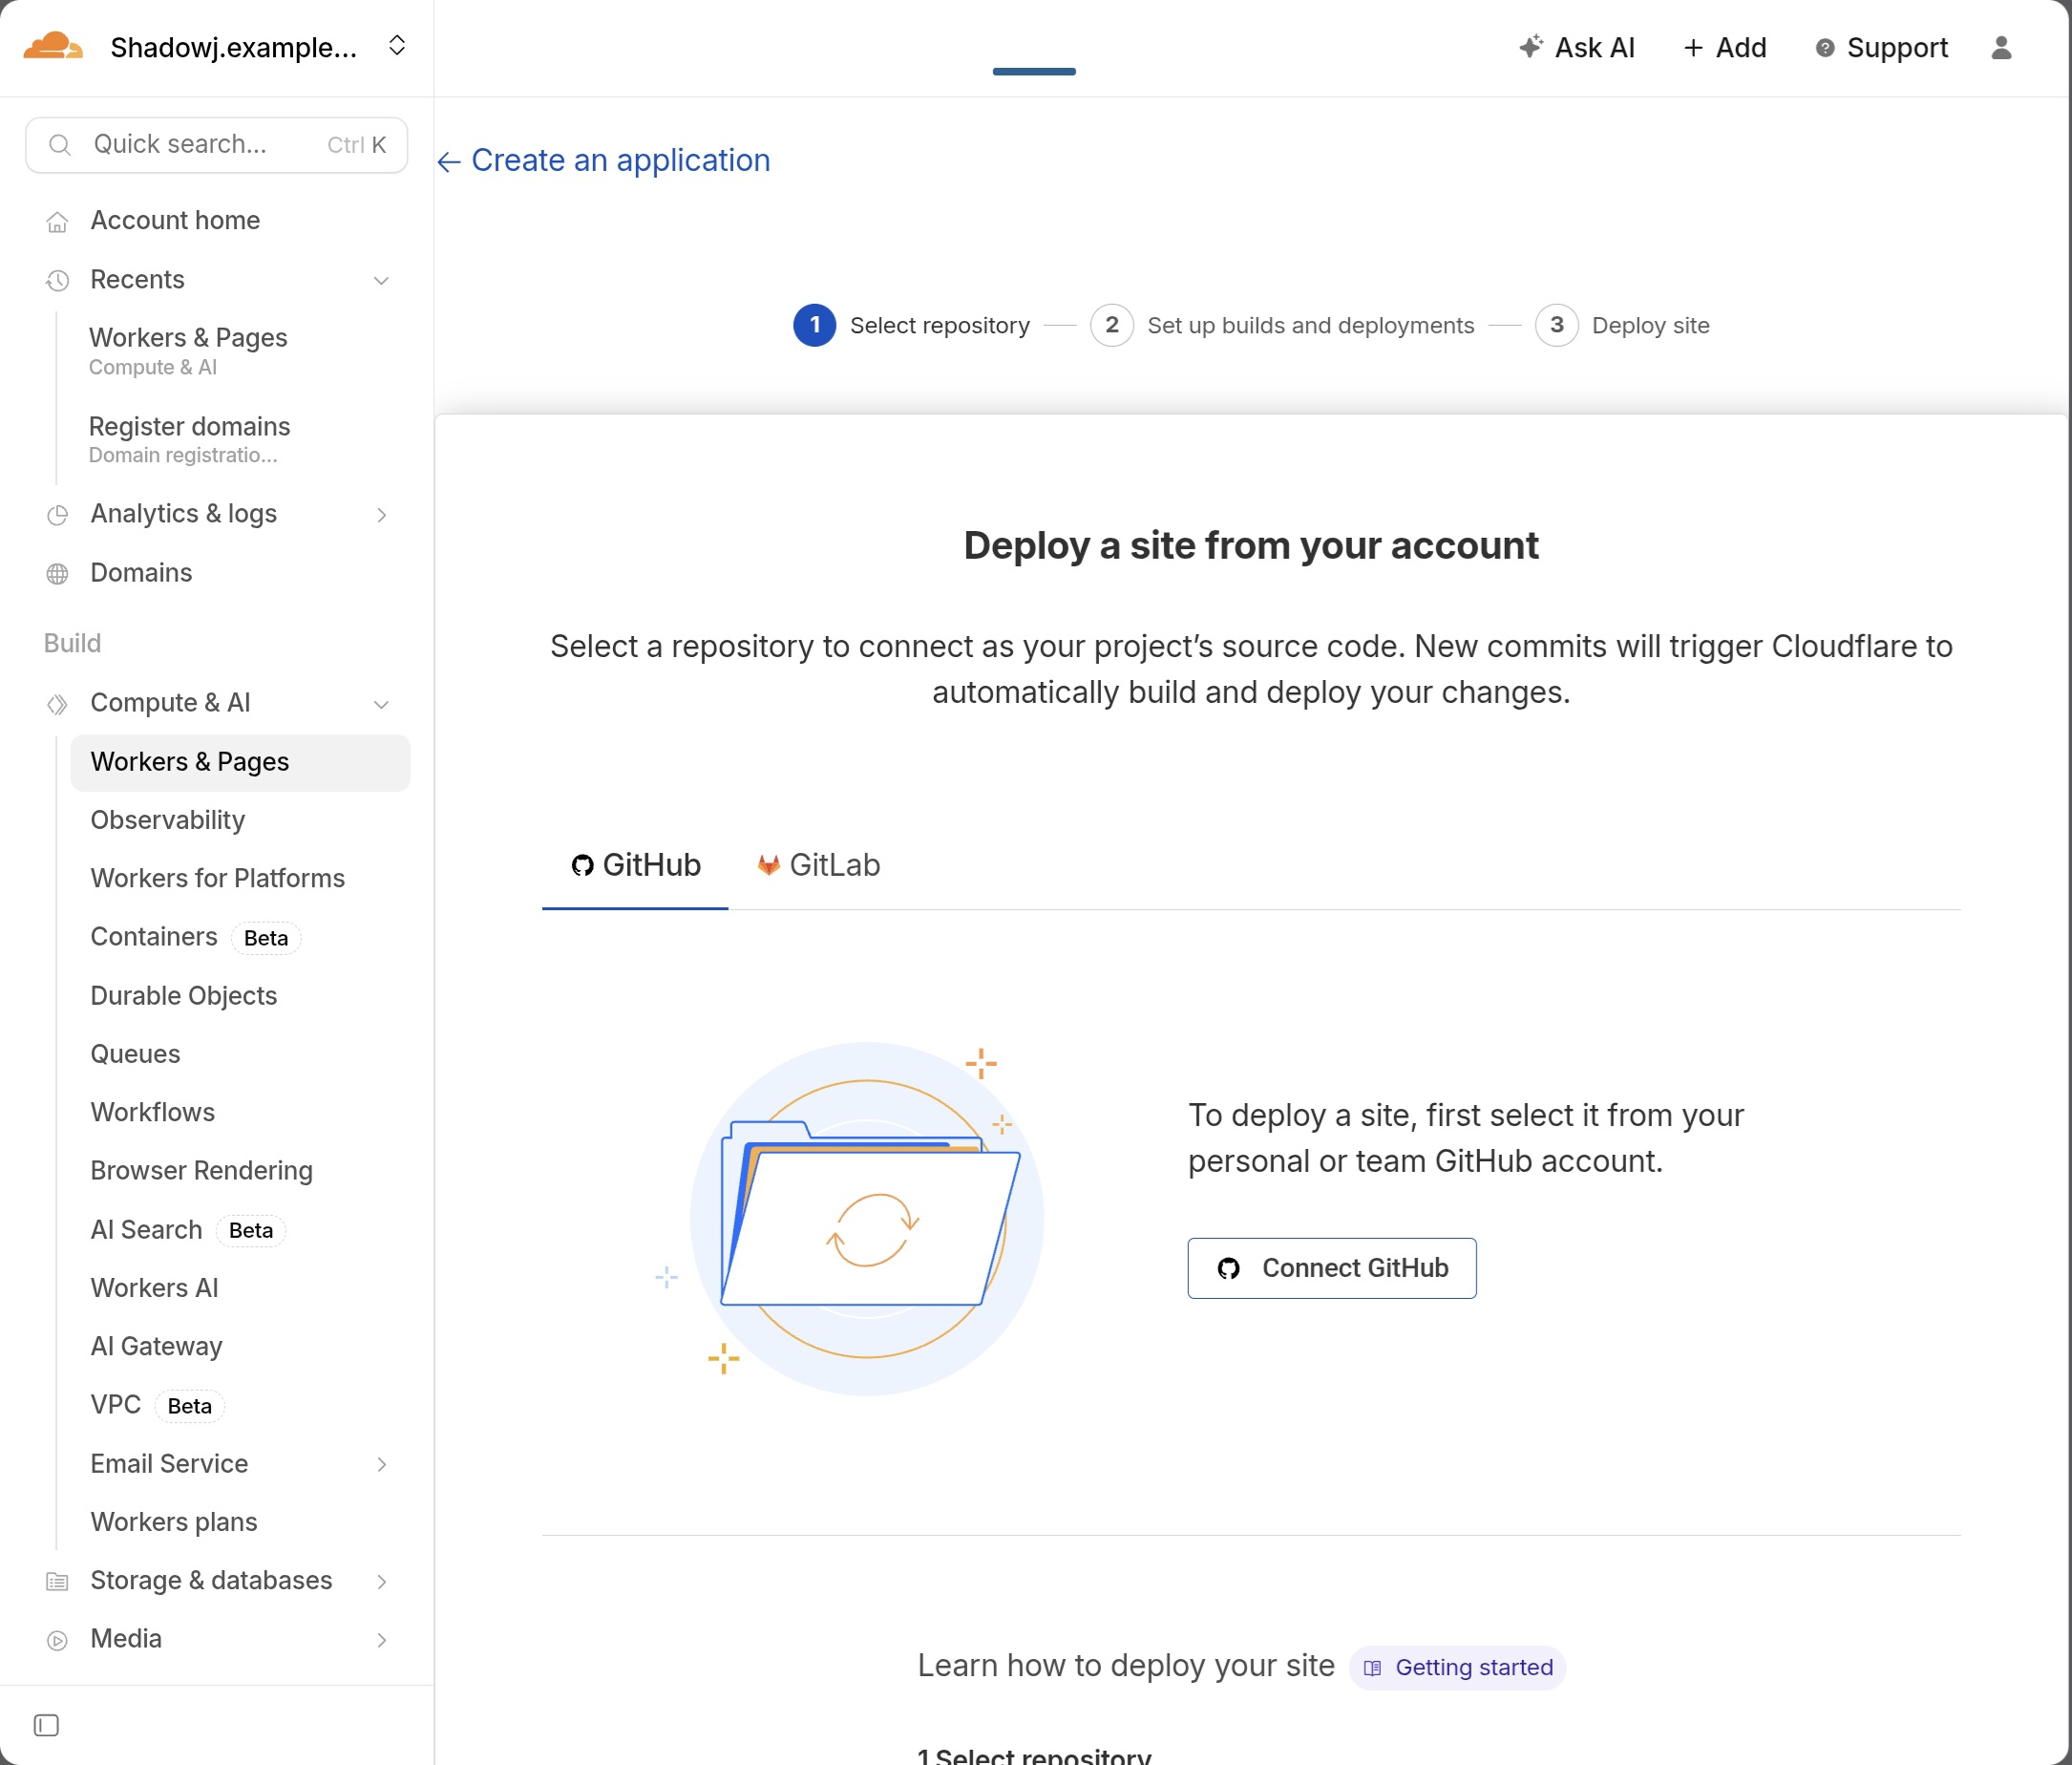
(36) EN: Click “Import an existing Git repository”.
(36) KR: Import an existing Git repository 이것을 누릅니다.
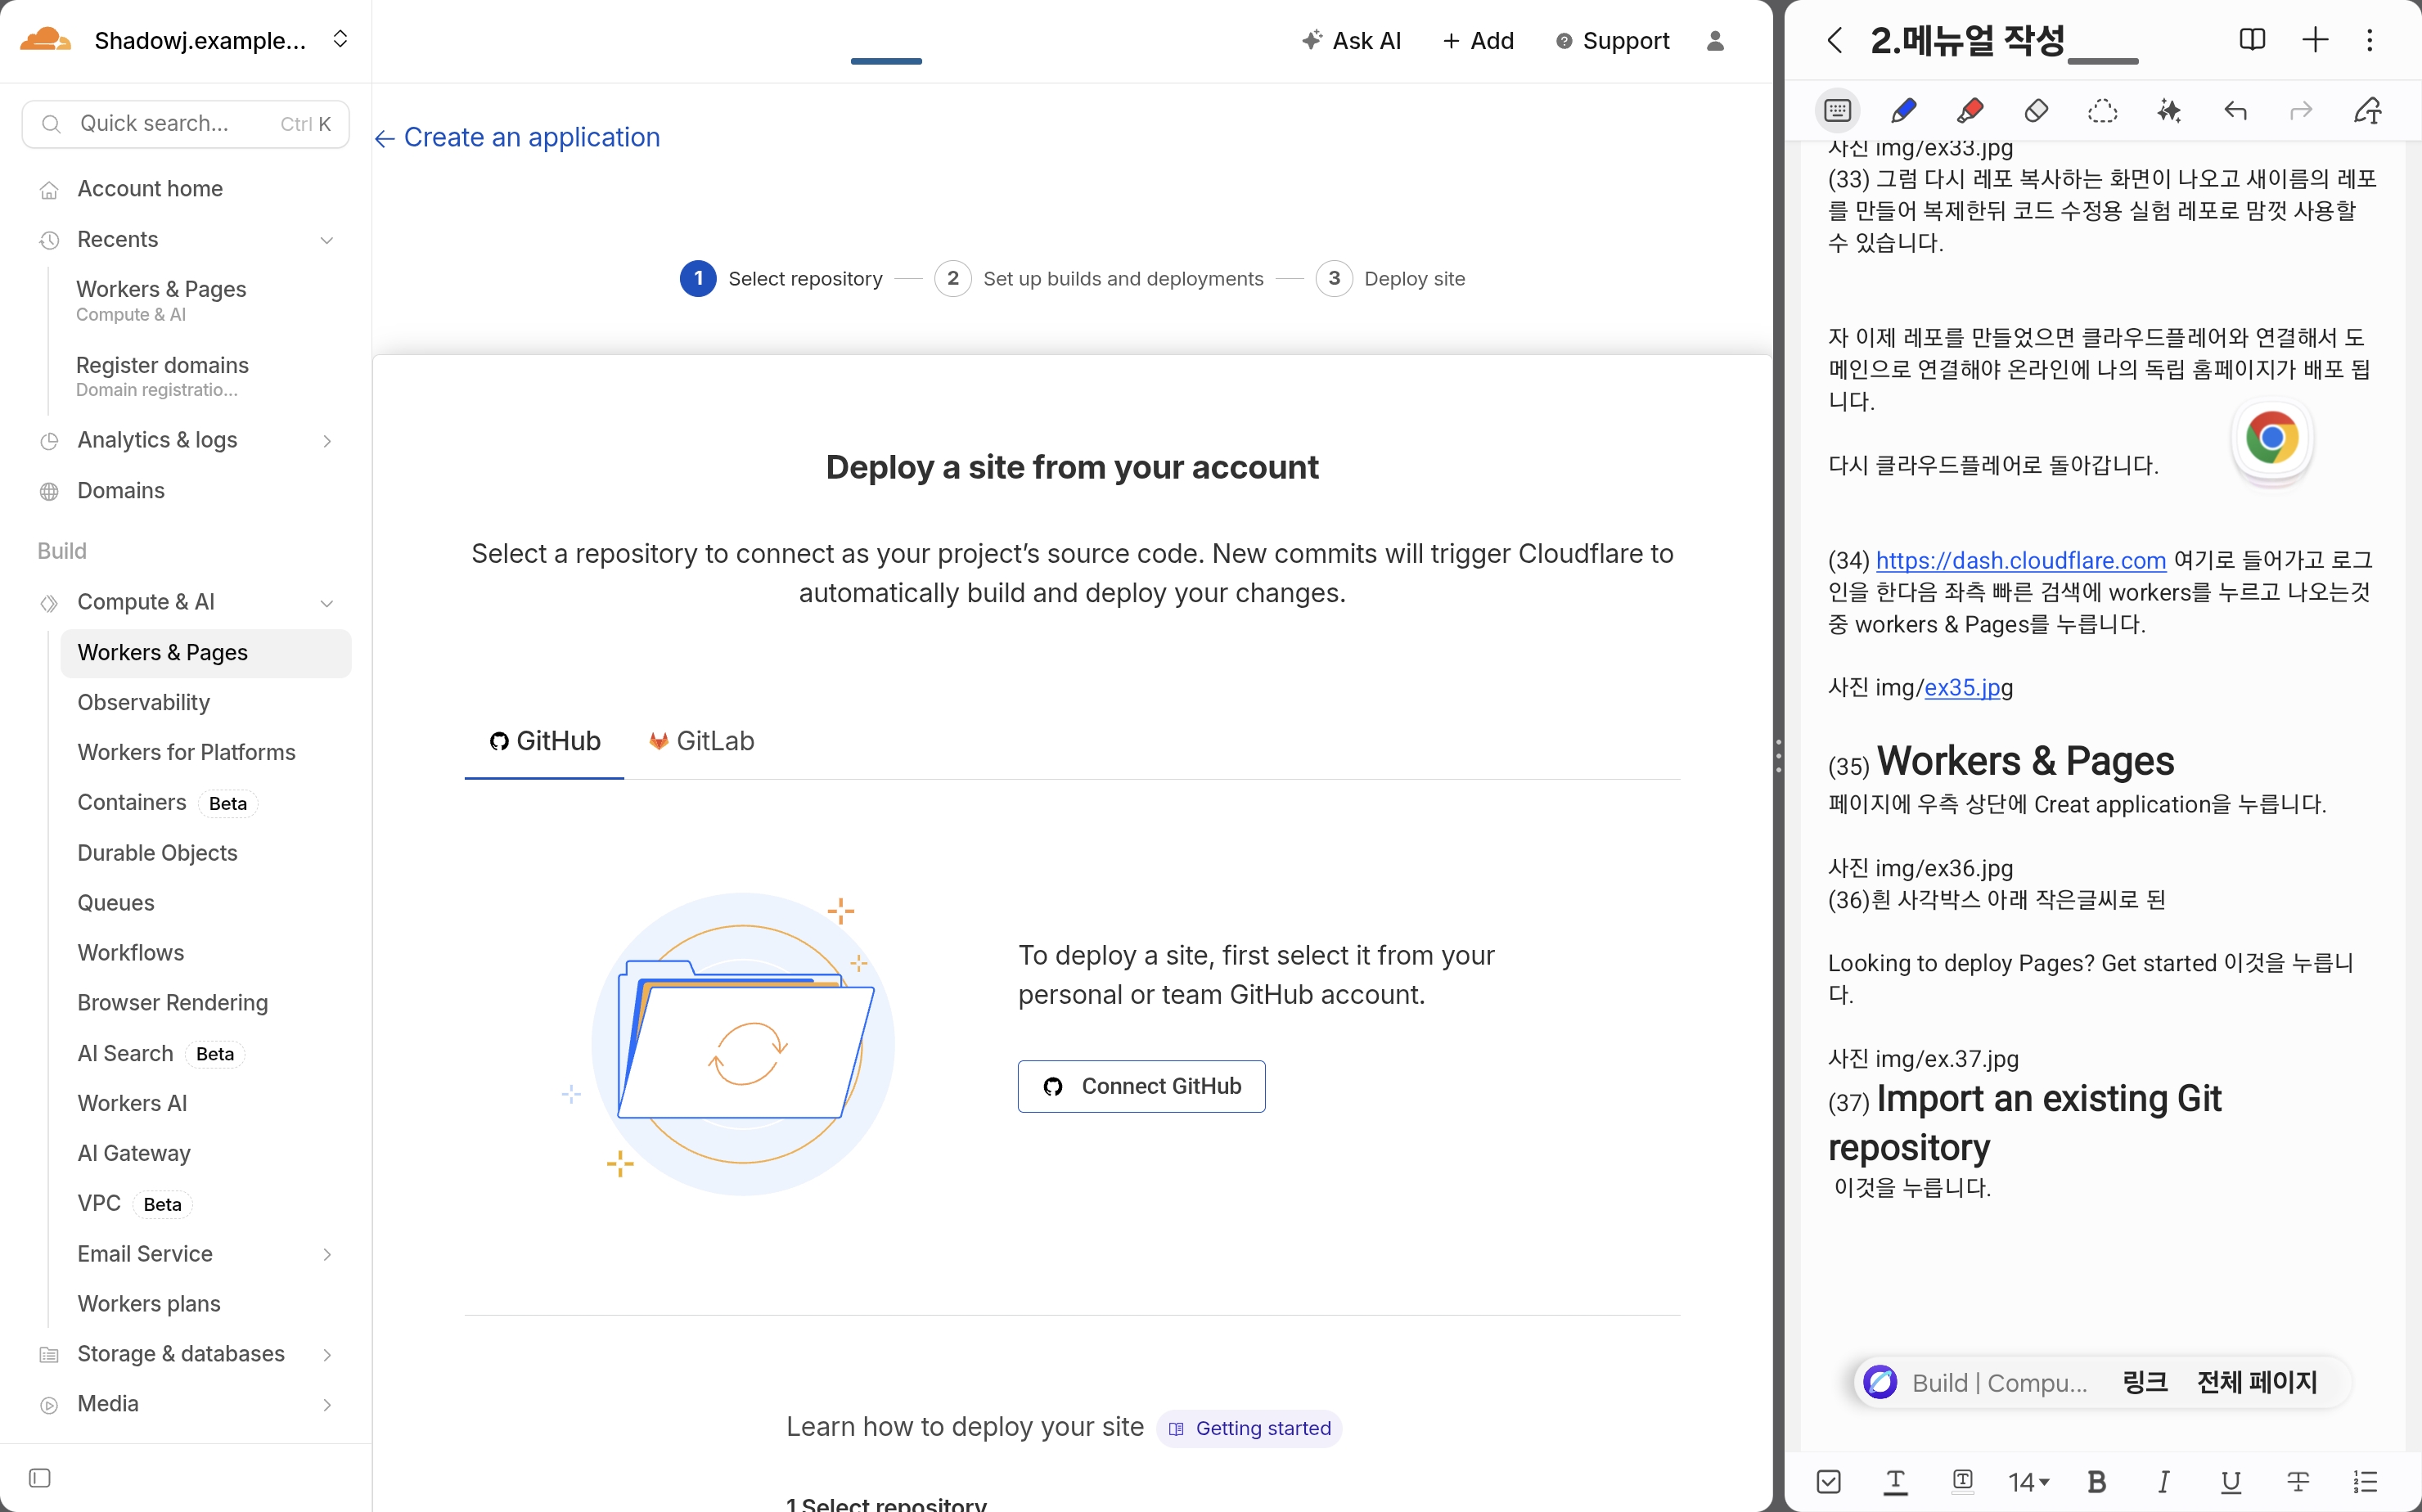
(37) EN: Click “Connect GitHub”.
(37) KR: connect Github를 누릅니다
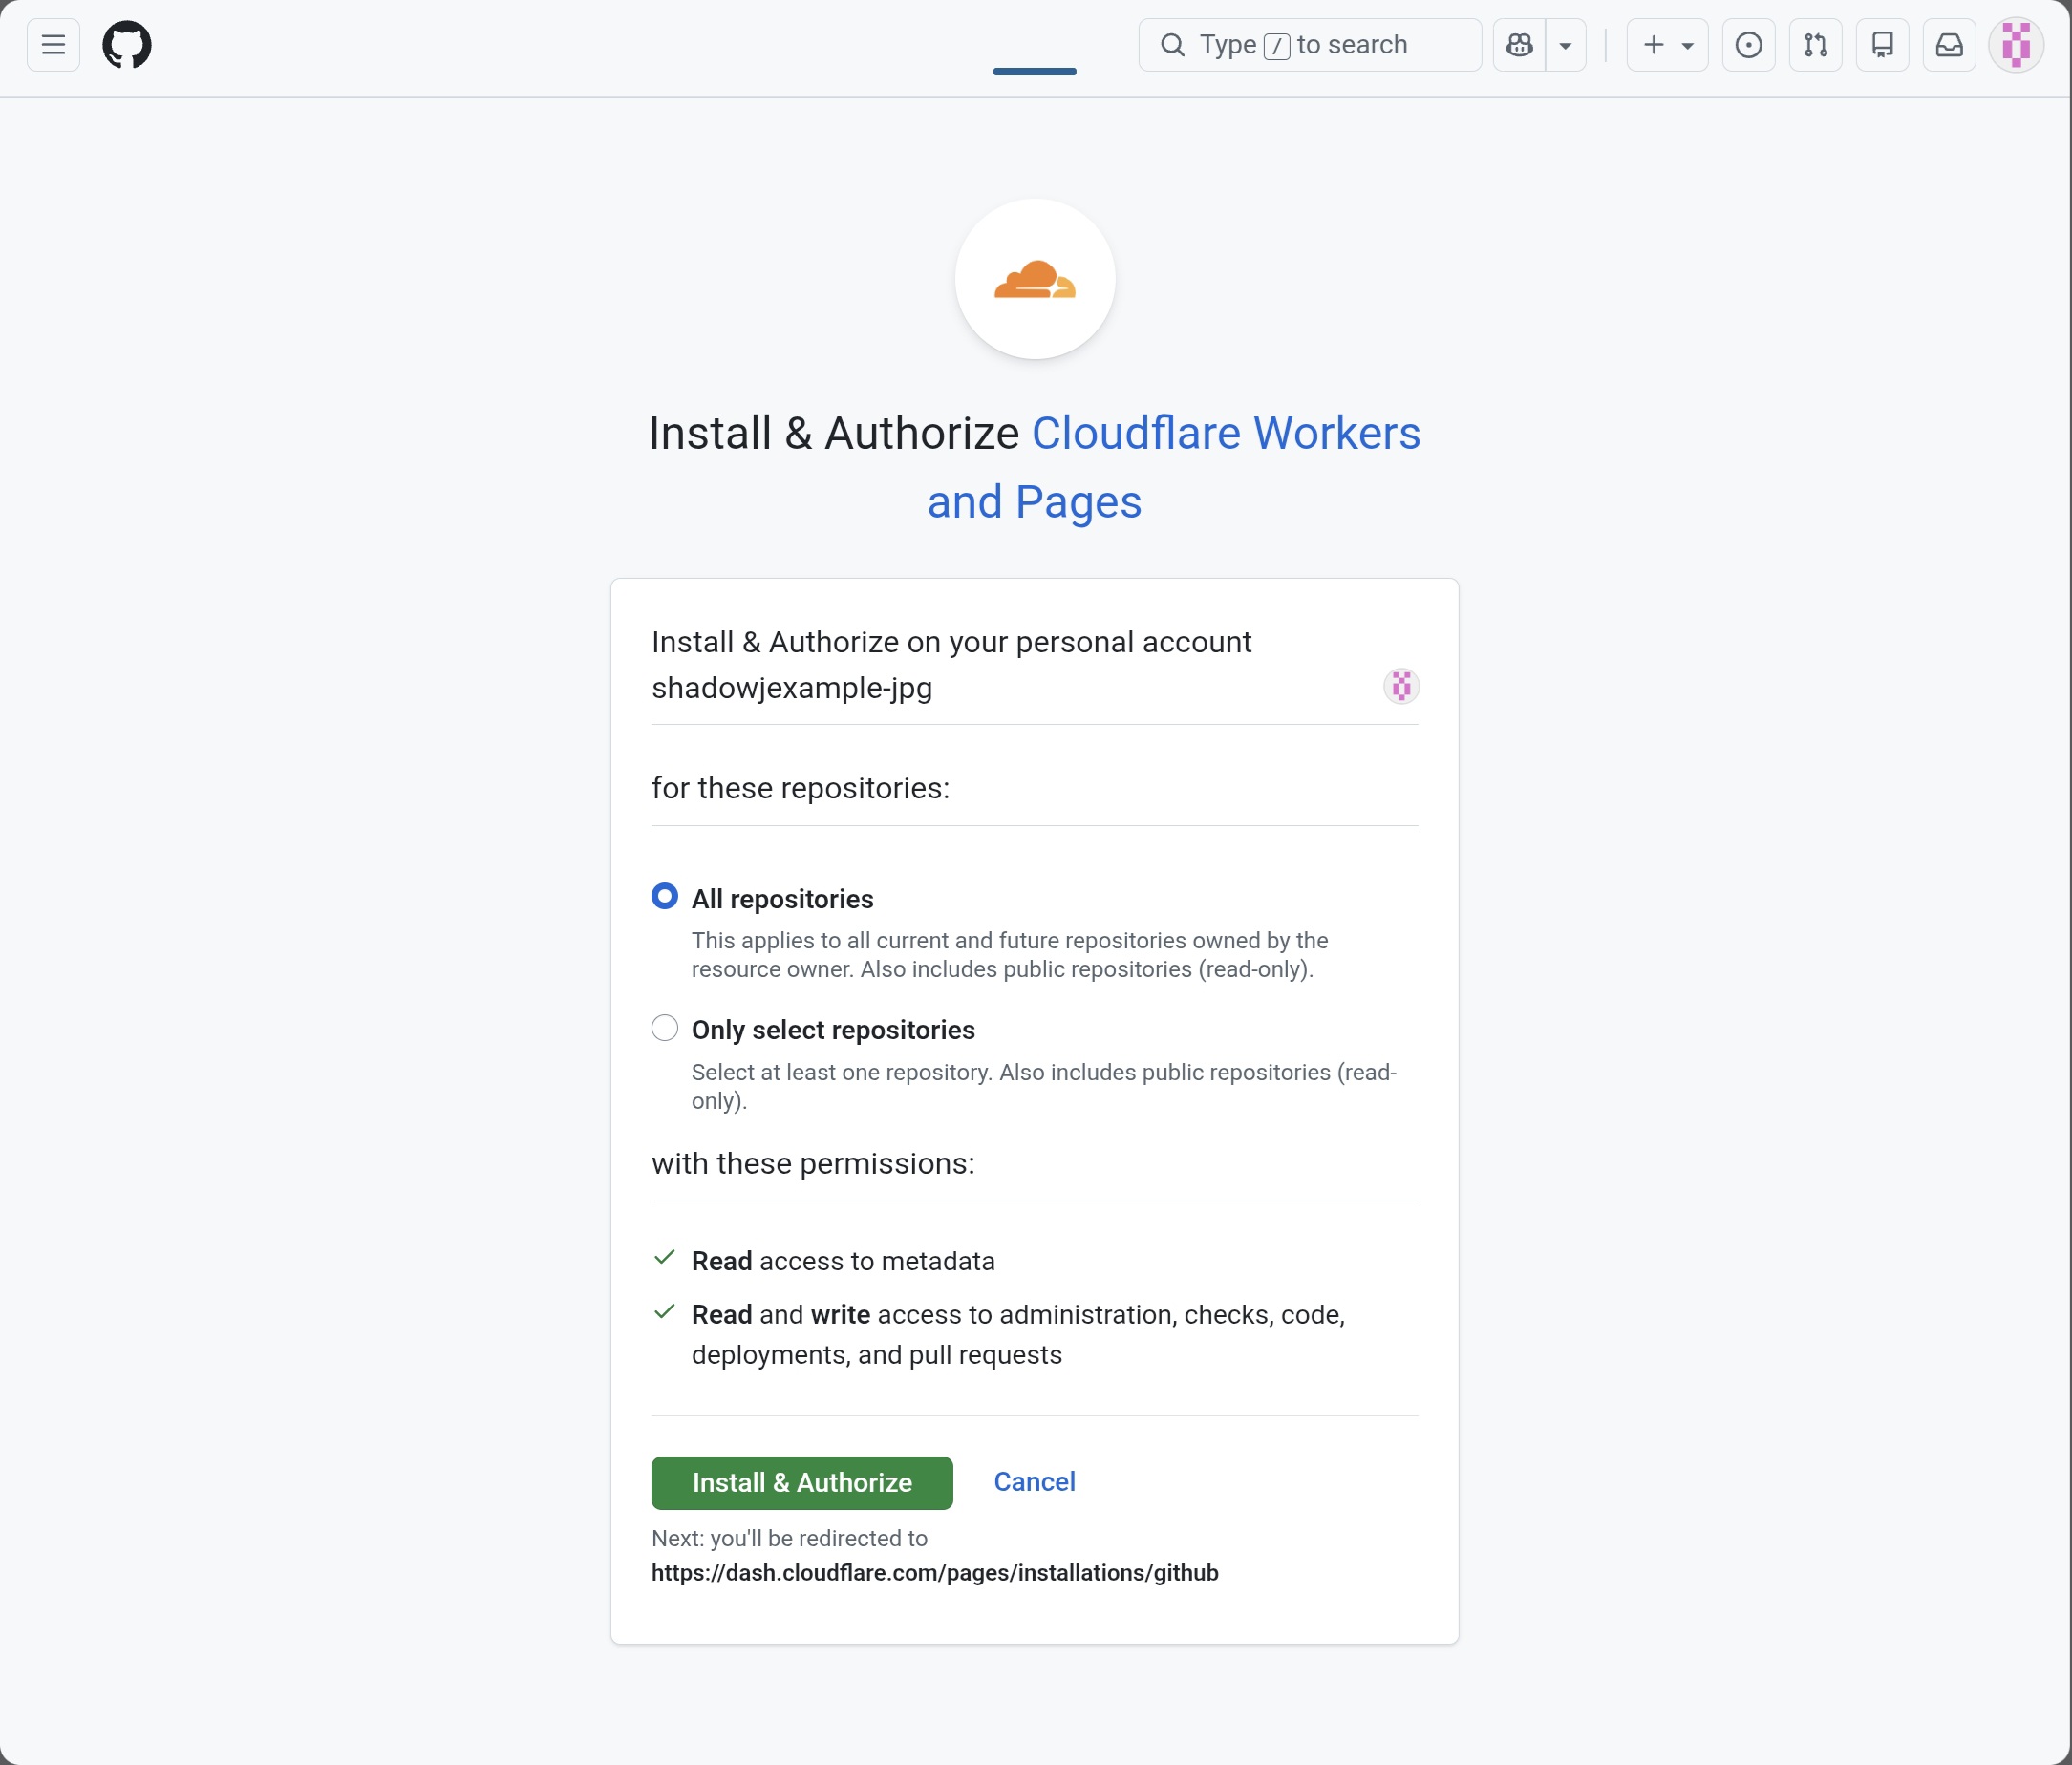
(38) EN: Click “Install & Authorize”.
(38) KR: 초록버튼 install&Authorize누릅니다.
(39) EN: If you see the same connection screen again, continue to “Repository access” and check permissions carefully.
(39) KR: 같은 화면이 반복되어 보이더라도 당황하지 말고 다음 단계로 넘어가서 “Repository access” 설정을 정확히 확인합니다.
.jpg)
.jpg)
.jpg)
.jpg)
(40) EN: Scroll down to “Repository access”.
If your repo is private, select “Only select repositories”, then choose your repo under “Select at least one repository”. Click Save.
(40) KR: 페이지를 내리면 Repository access 화면이 나옵니다.
퍼블릭 레포면 all로 해도 되지만, 프라이빗 레포는 자동 연결이 안 될 수 있으니
Only select repositories 선택 → Select at least one repository에서 연결할 레포 직접 선택 → save 누릅니다.

(41) EN: Return to Workers & Pages and click Create application again if needed.
(41) KR: 다시 workers&Pages로 들어가서 우측 상단에 Create application 파란버튼을 누릅니다.
.jpg)
(42) EN: If GitHub connection screens keep repeating, use the fix below.
(42) KR: 깃허브 연결 화면이 계속 반복된다면 아래 해결법을 사용하세요.
혹시 배포과정에서 GitHub 레포가 안 보이고 같은 화면만 반복되나요? / If GitHub repo list doesn’t show and the same screen repeats
EN (Fix):
Open a NEW browser tab/window, type https://dash.cloudflare.com directly, then restart:
Workers & Pages → Create application → Get started → Import an existing Git repository
After re-entering from the dashboard, your repo list usually appears normally.
KR (해결법):
새 브라우저 창(또는 새 탭)을 열고 주소창에 https://dash.cloudflare.com 를 직접 입력해서 대쉬보드로 다시 들어갑니다.
그 다음
Workers & Pages → Create application → Looking to deploy Pages? Get started → Import an existing Git repository
이 루트로 다시 처음부터 진행하면, 반복 문제(루프)가 대부분 해결됩니다.
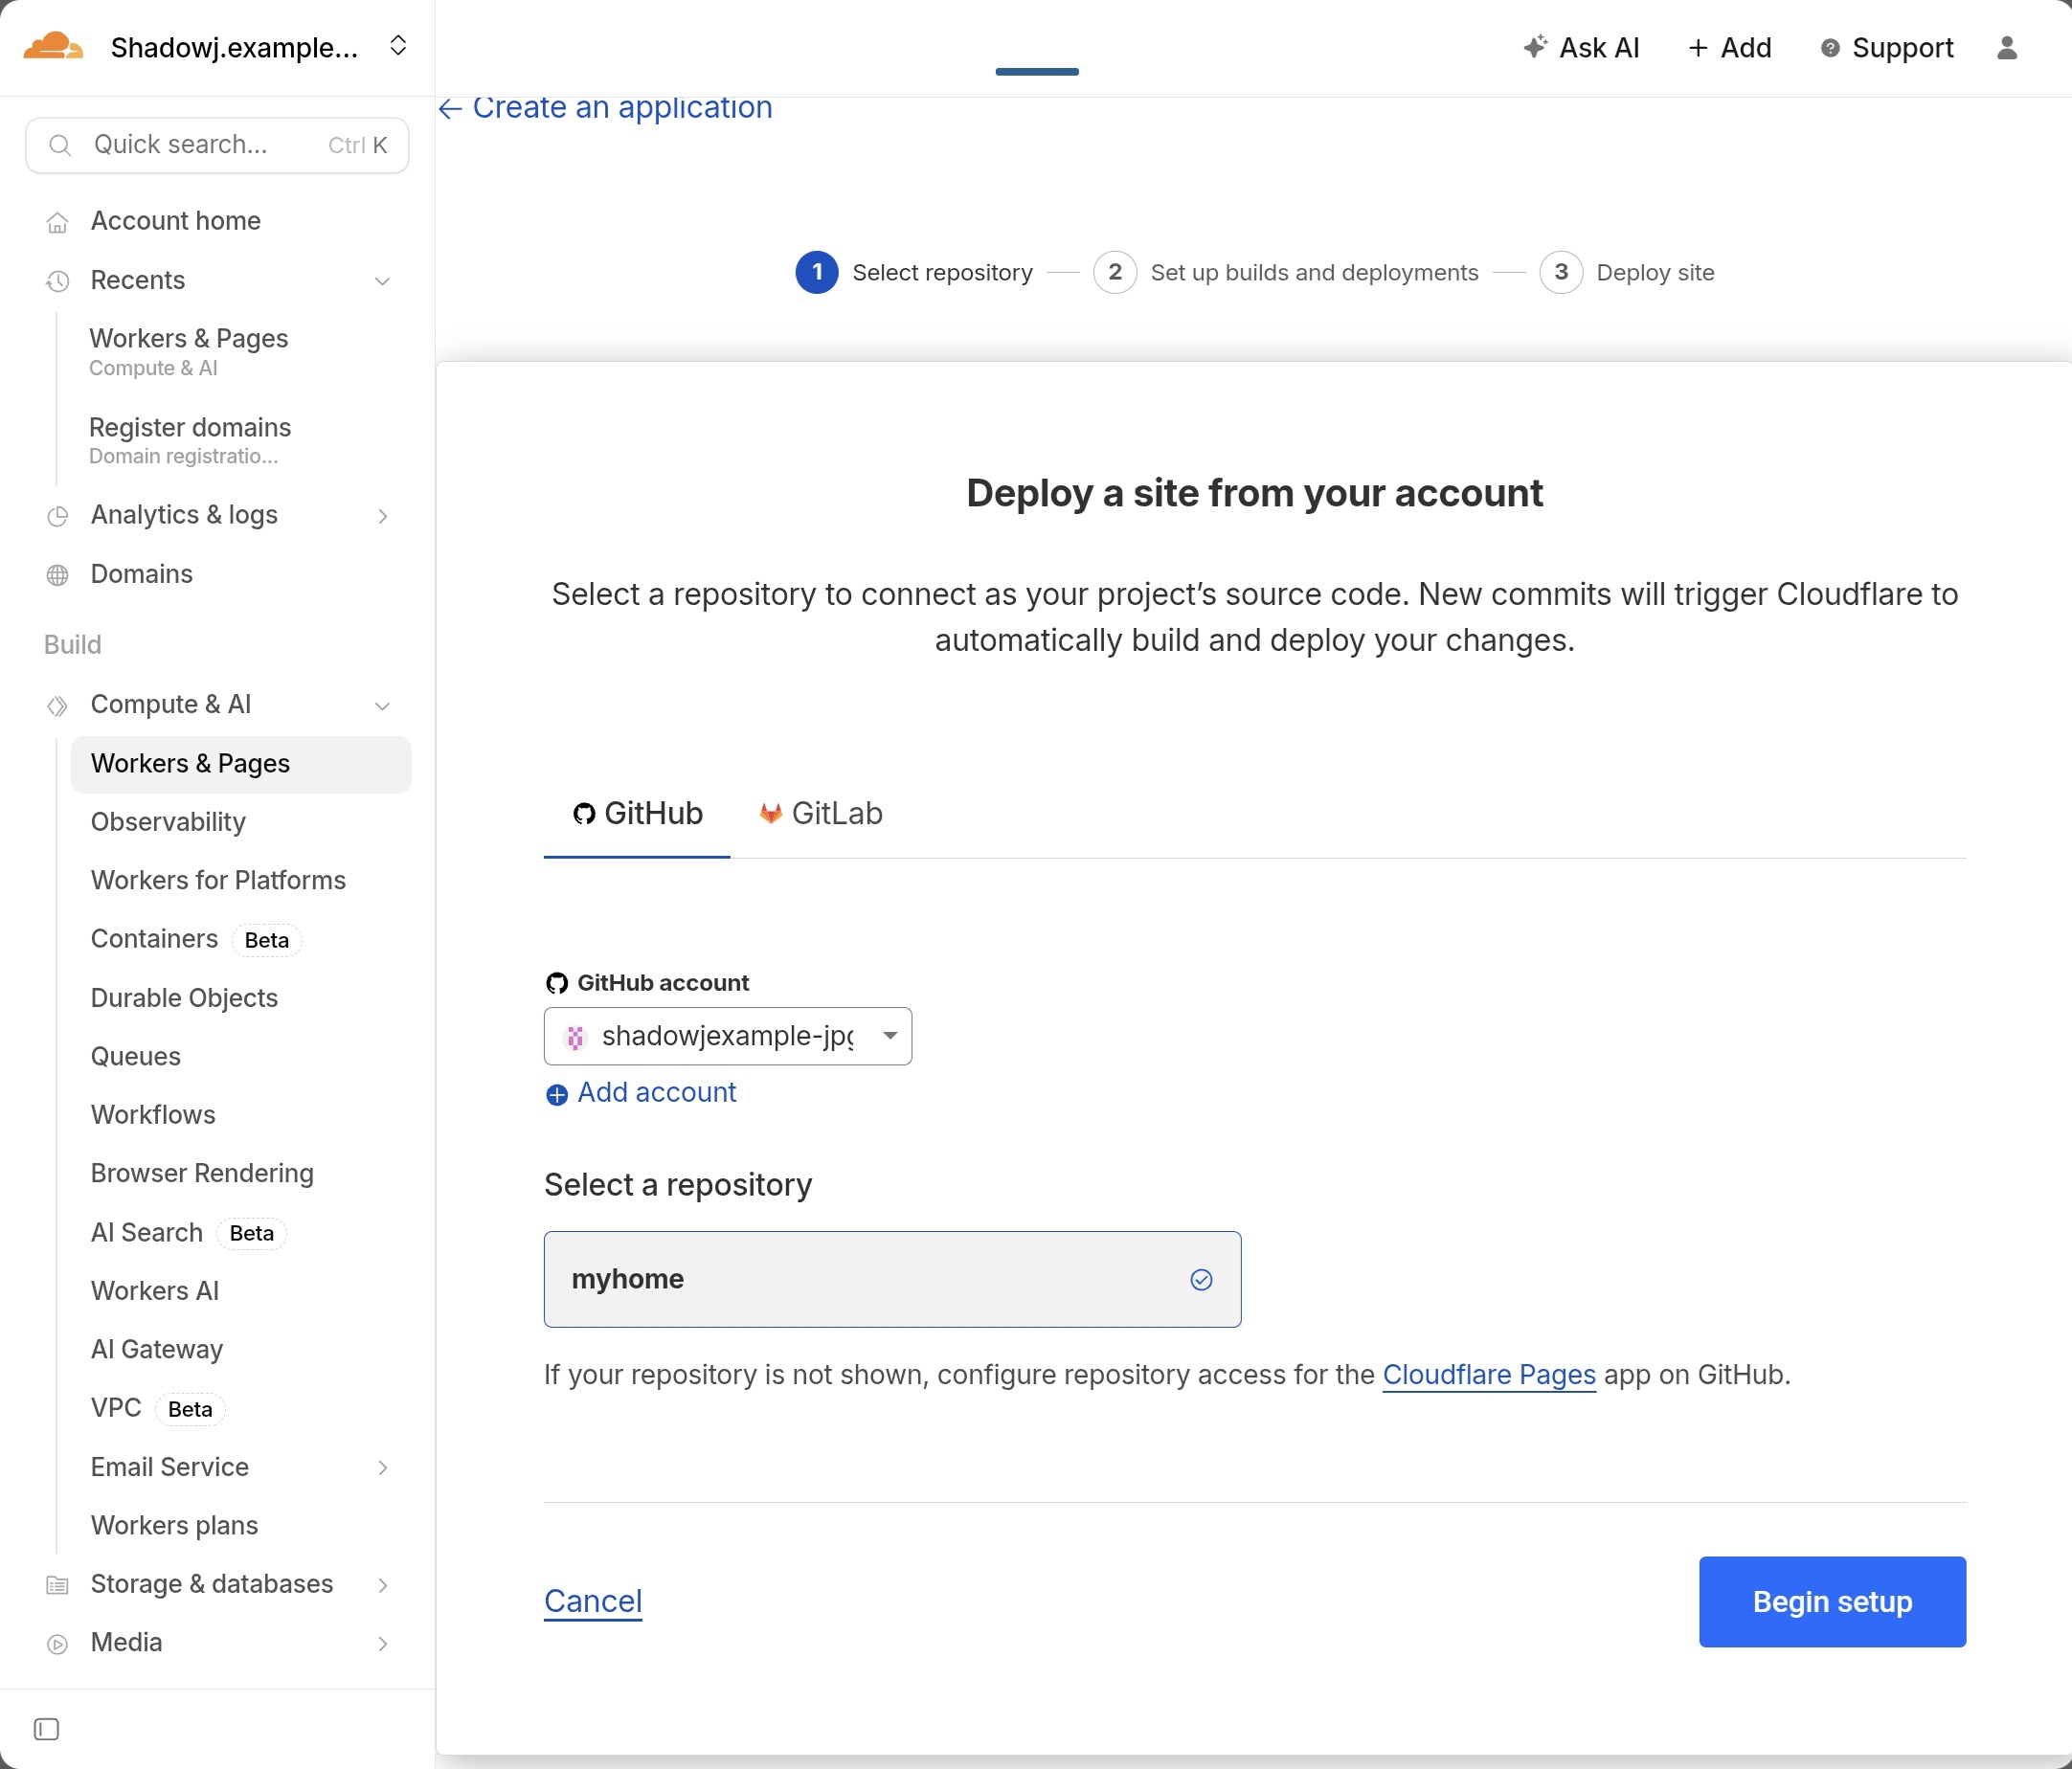
(43) EN: When you can finally see your repositories, select your repo (check mark) and click “Begin setup”.
(43) KR: 이제 레포가 보이면 레포를 클릭해서 체크 표시가 나오게 하고 Begin setup을 누릅니다.
빌드값 설정 Build settings
(44) EN: This is the last screen before deployment.
(44) KR: 드디어 배포 직전의 마지막 화면입니다.
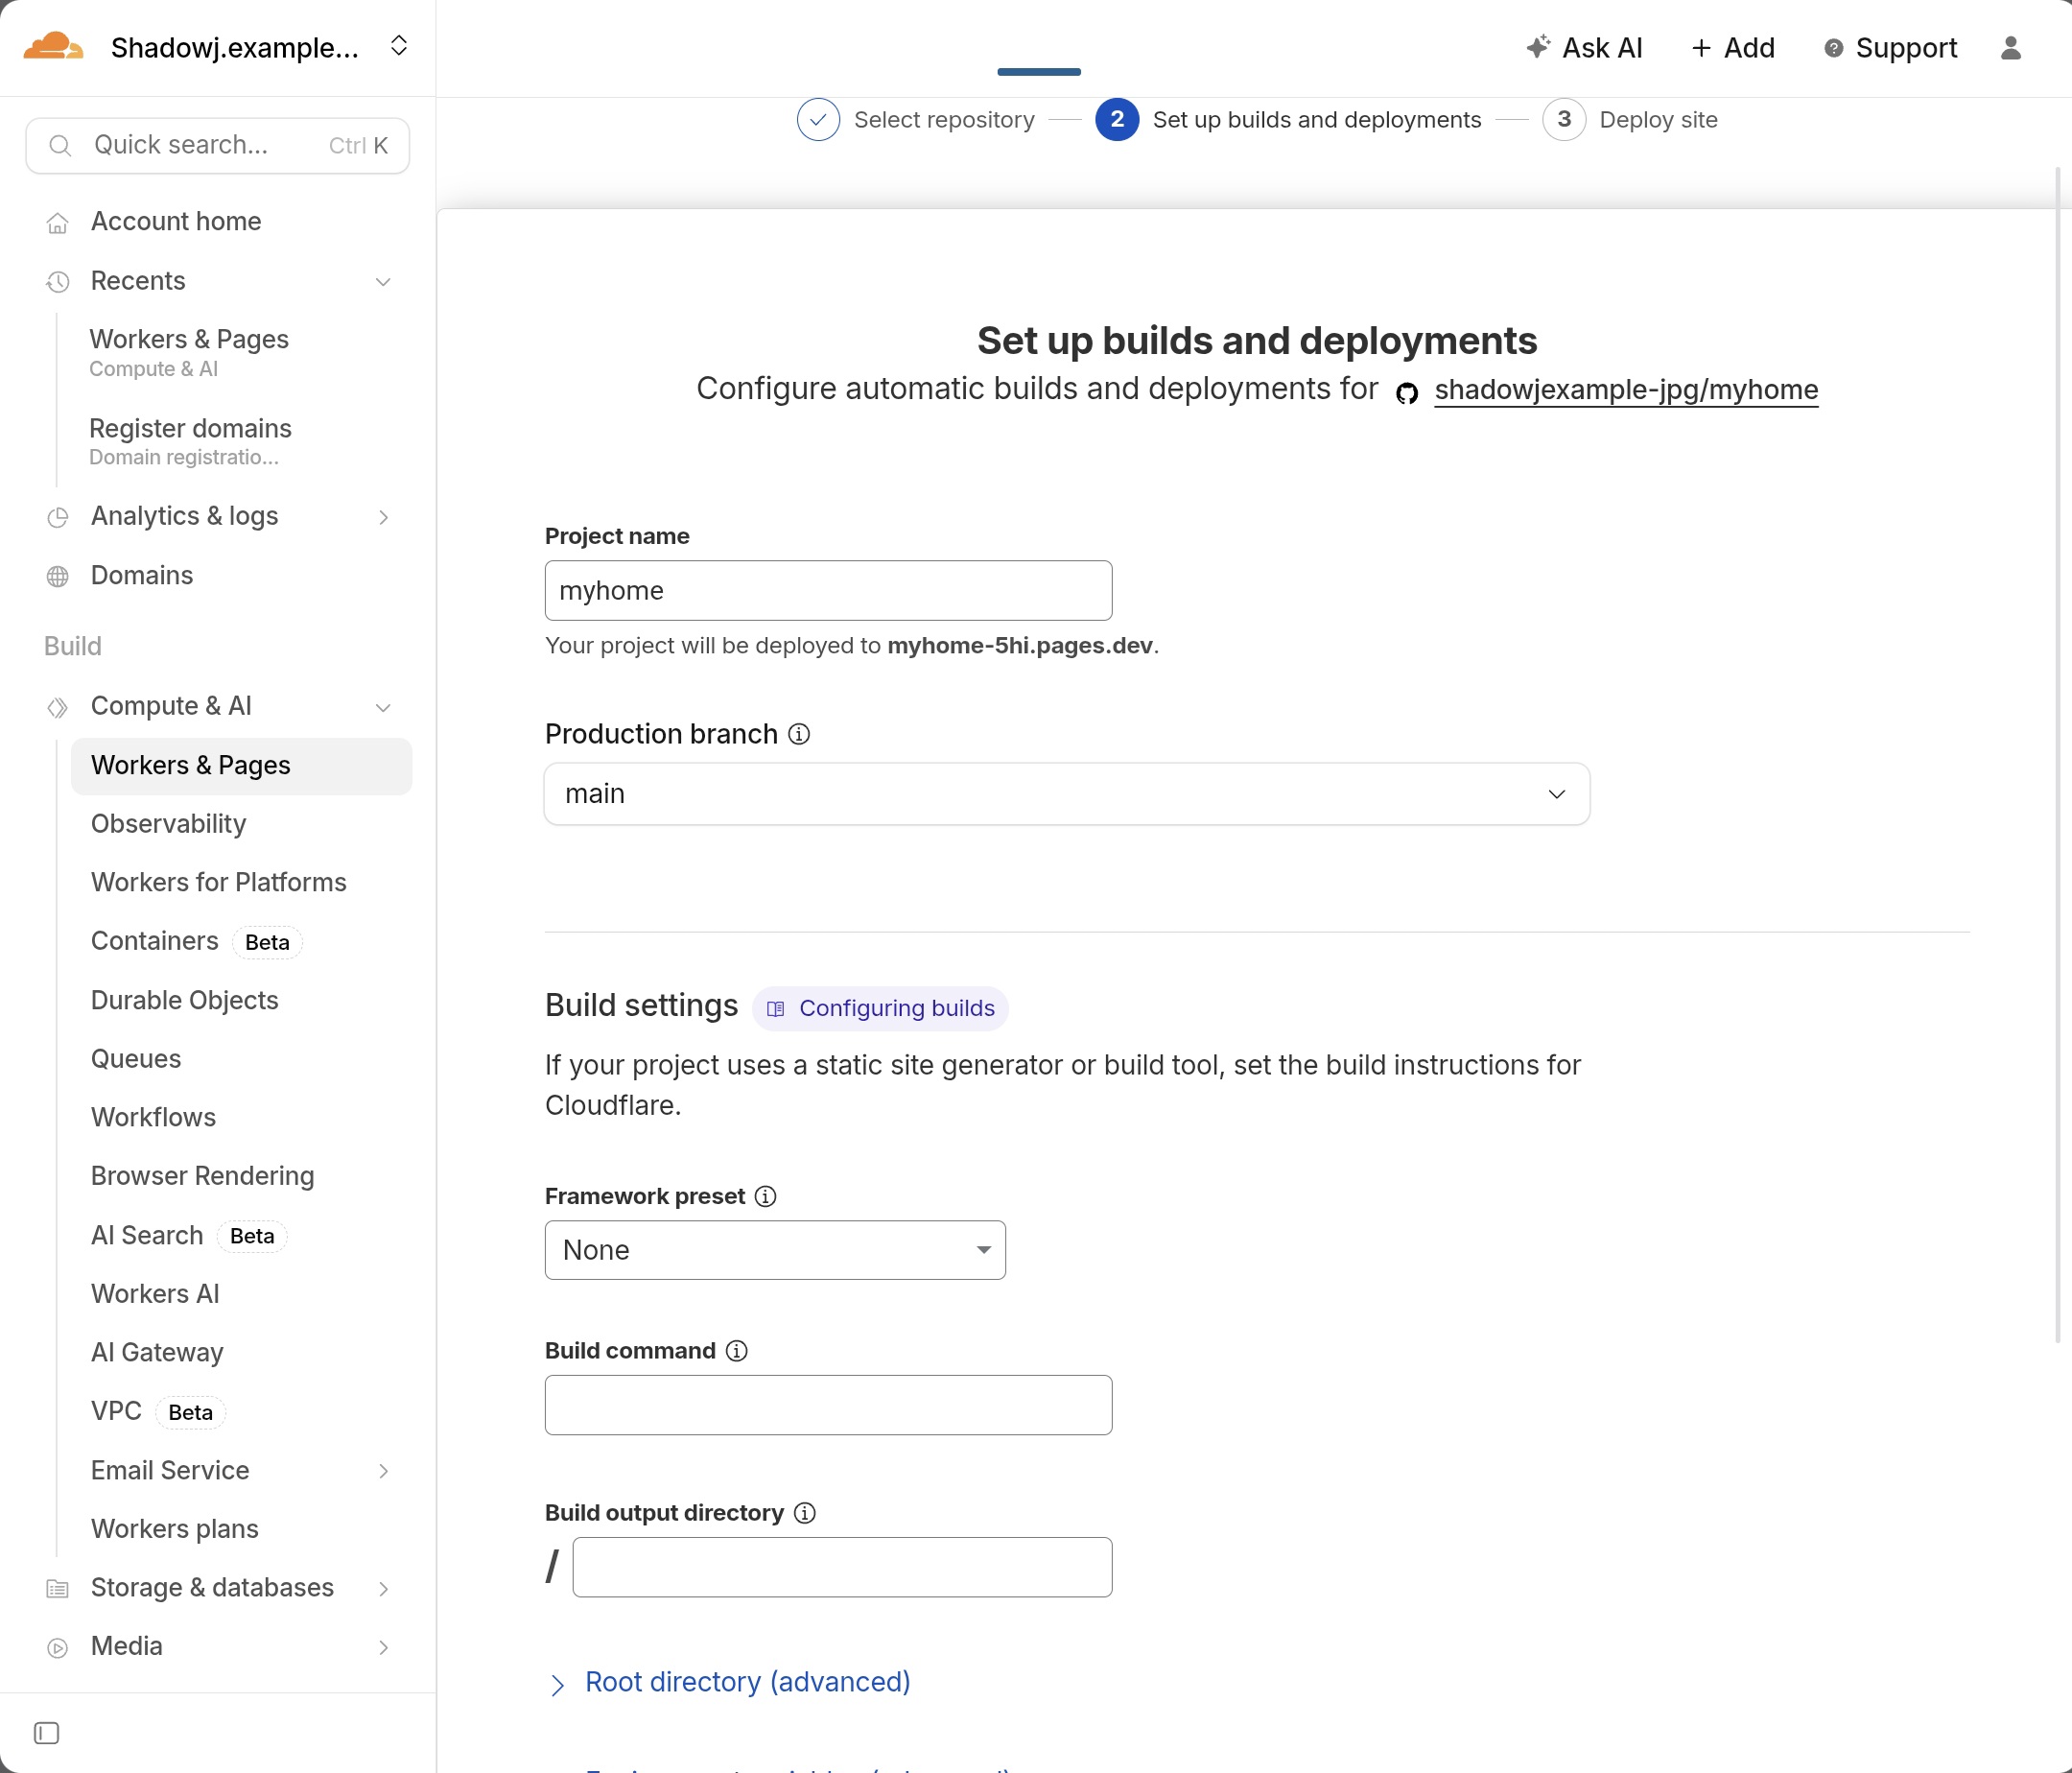
(45) EN: Set build settings exactly like this:
Production branch: main
Framework preset: None
Build command: hugo
Build output directory: public
Root directory (advanced): leave empty
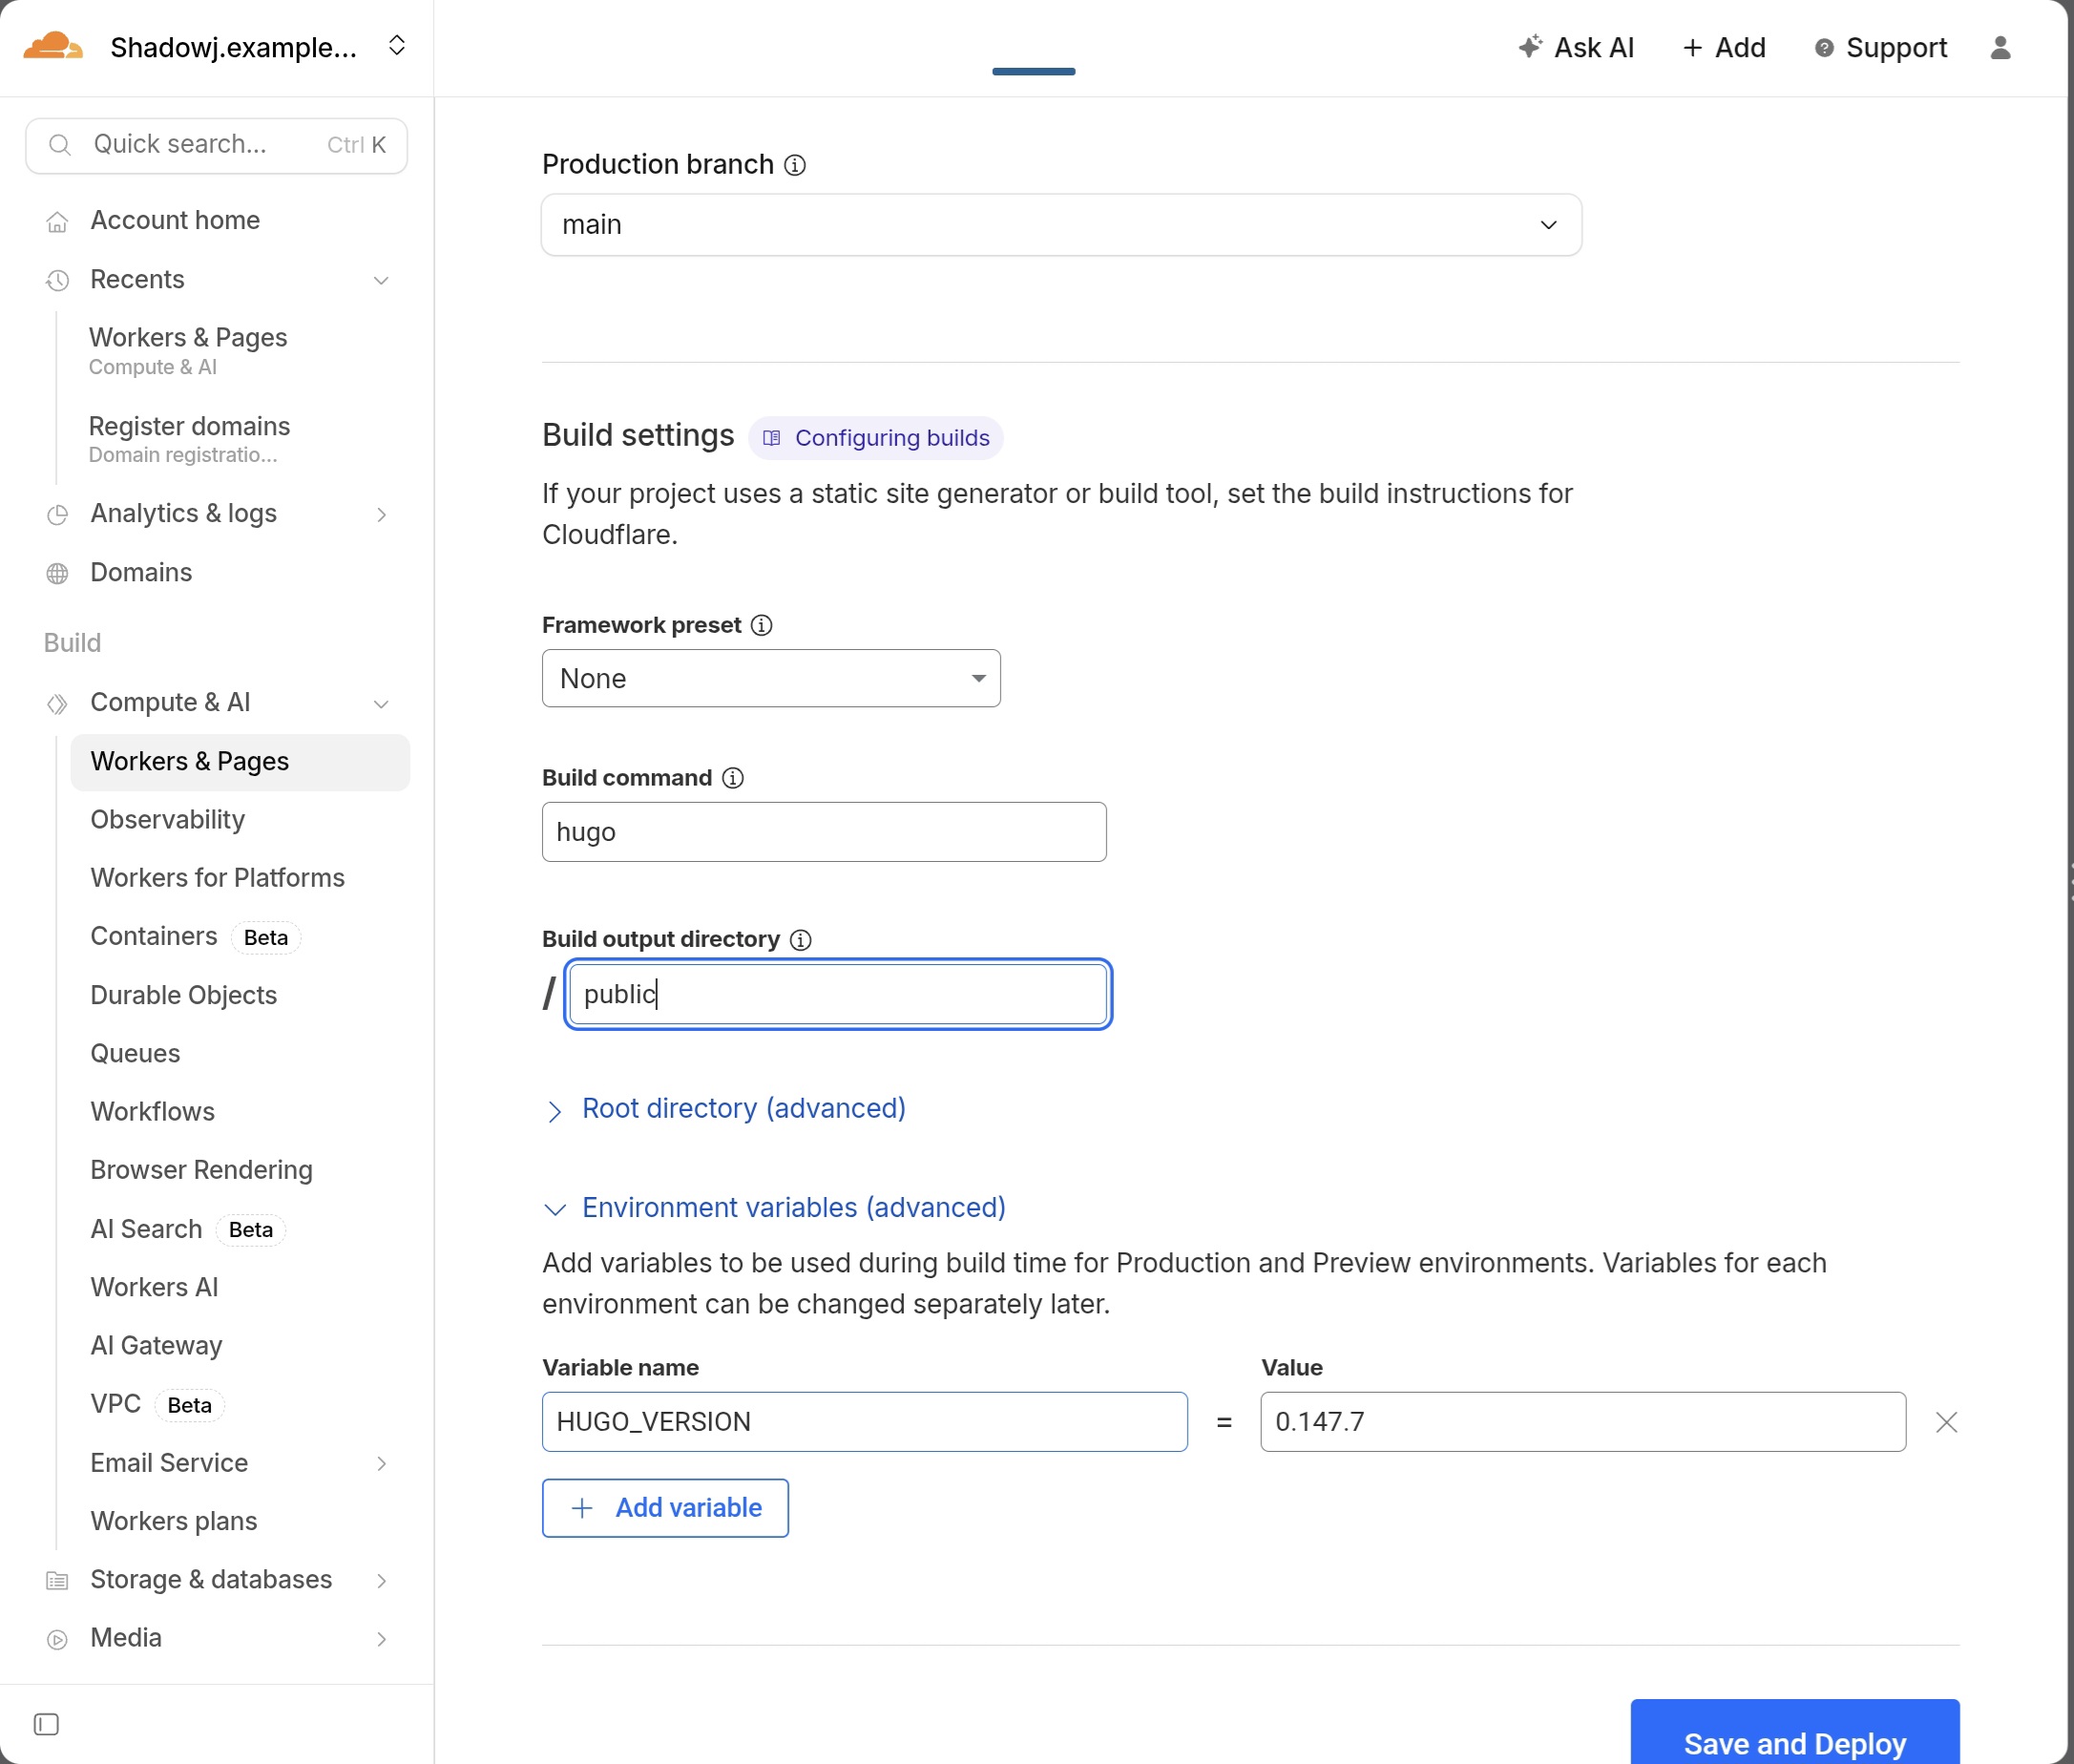
Then add environment variable:
Variable name: HUGO_VERSION
Value: 0.147.7
Why must the framework be set to Hugo?
This project is built using Hugo. Setting the framework to Hugo ensures Cloudflare builds the site correctly.
Why is Hugo version fixed to 0.147.7?
Different Hugo versions may produce different rendering results. To maintain identical output with the Shadow J Baseline, version 0.147.7 is fixed.
(45) KR: 아래 설정을 그대로 입력하세요. (하나라도 다르면 배포가 되지 않습니다)
프로덕션 분기: main
프레임워크 미리설정: 없음
빌드 명령: hugo
빌드 출력 디렉토리: public
루트 디렉터리(고급): 입력안함
환경 변수(고급)에서 +변수추가 선택
변수 이름: HUGO_VERSION
값: 0.147.7
왜 Framework를 Hugo로 설정해야 하나?
이 프로젝트는 Hugo 기반 정적 사이트입니다. Cloudflare가 올바른 방식으로 빌드하도록 하기 위해 Hugo 환경으로 설정해야 합니다.
왜 Hugo 버전을 0.147.7로 고정해야 하나?
Hugo 버전이 달라지면 렌더링 방식과 빌드 결과가 달라질 수 있습니다. Shadow J Baseline과 동일한 출력 결과를 유지하기 위해 0.147.7로 고정합니다.
(46) EN: Click Save and Deploy.
(46) KR: 자이제 Save and Deploy버튼을 누릅니다.
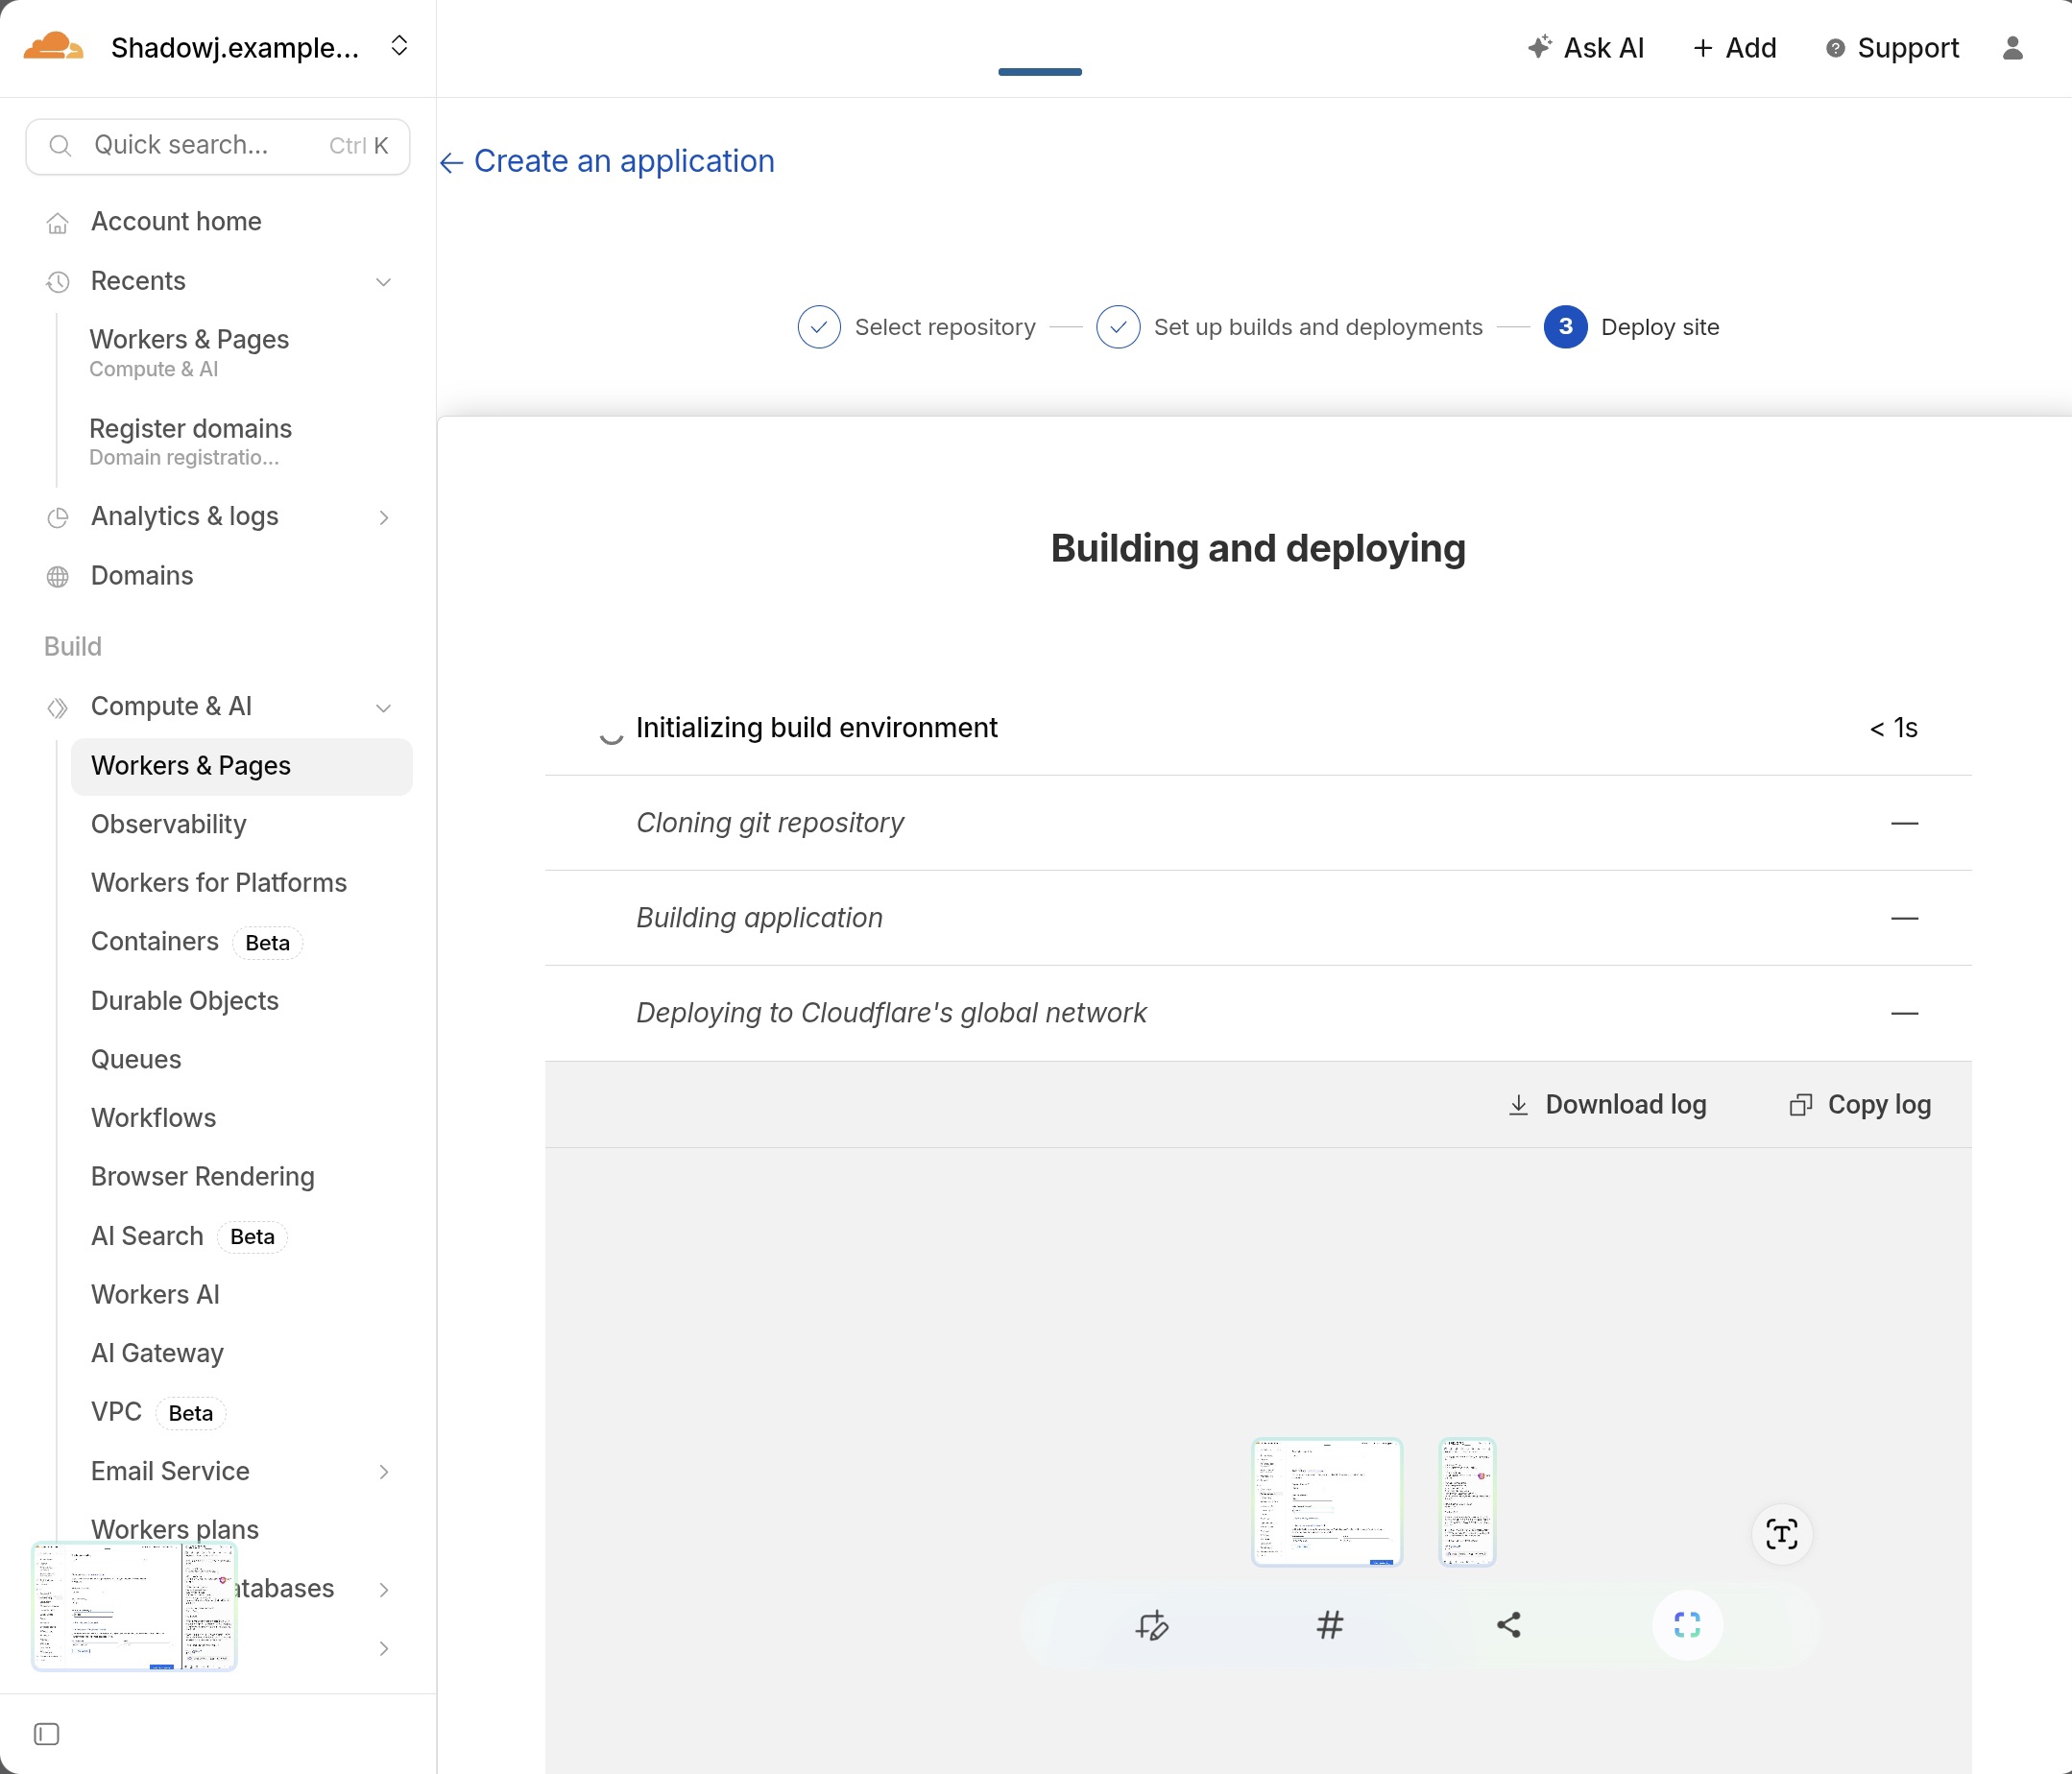
(47) EN: Deploying screen.
(47) KR: 배포중 화면.
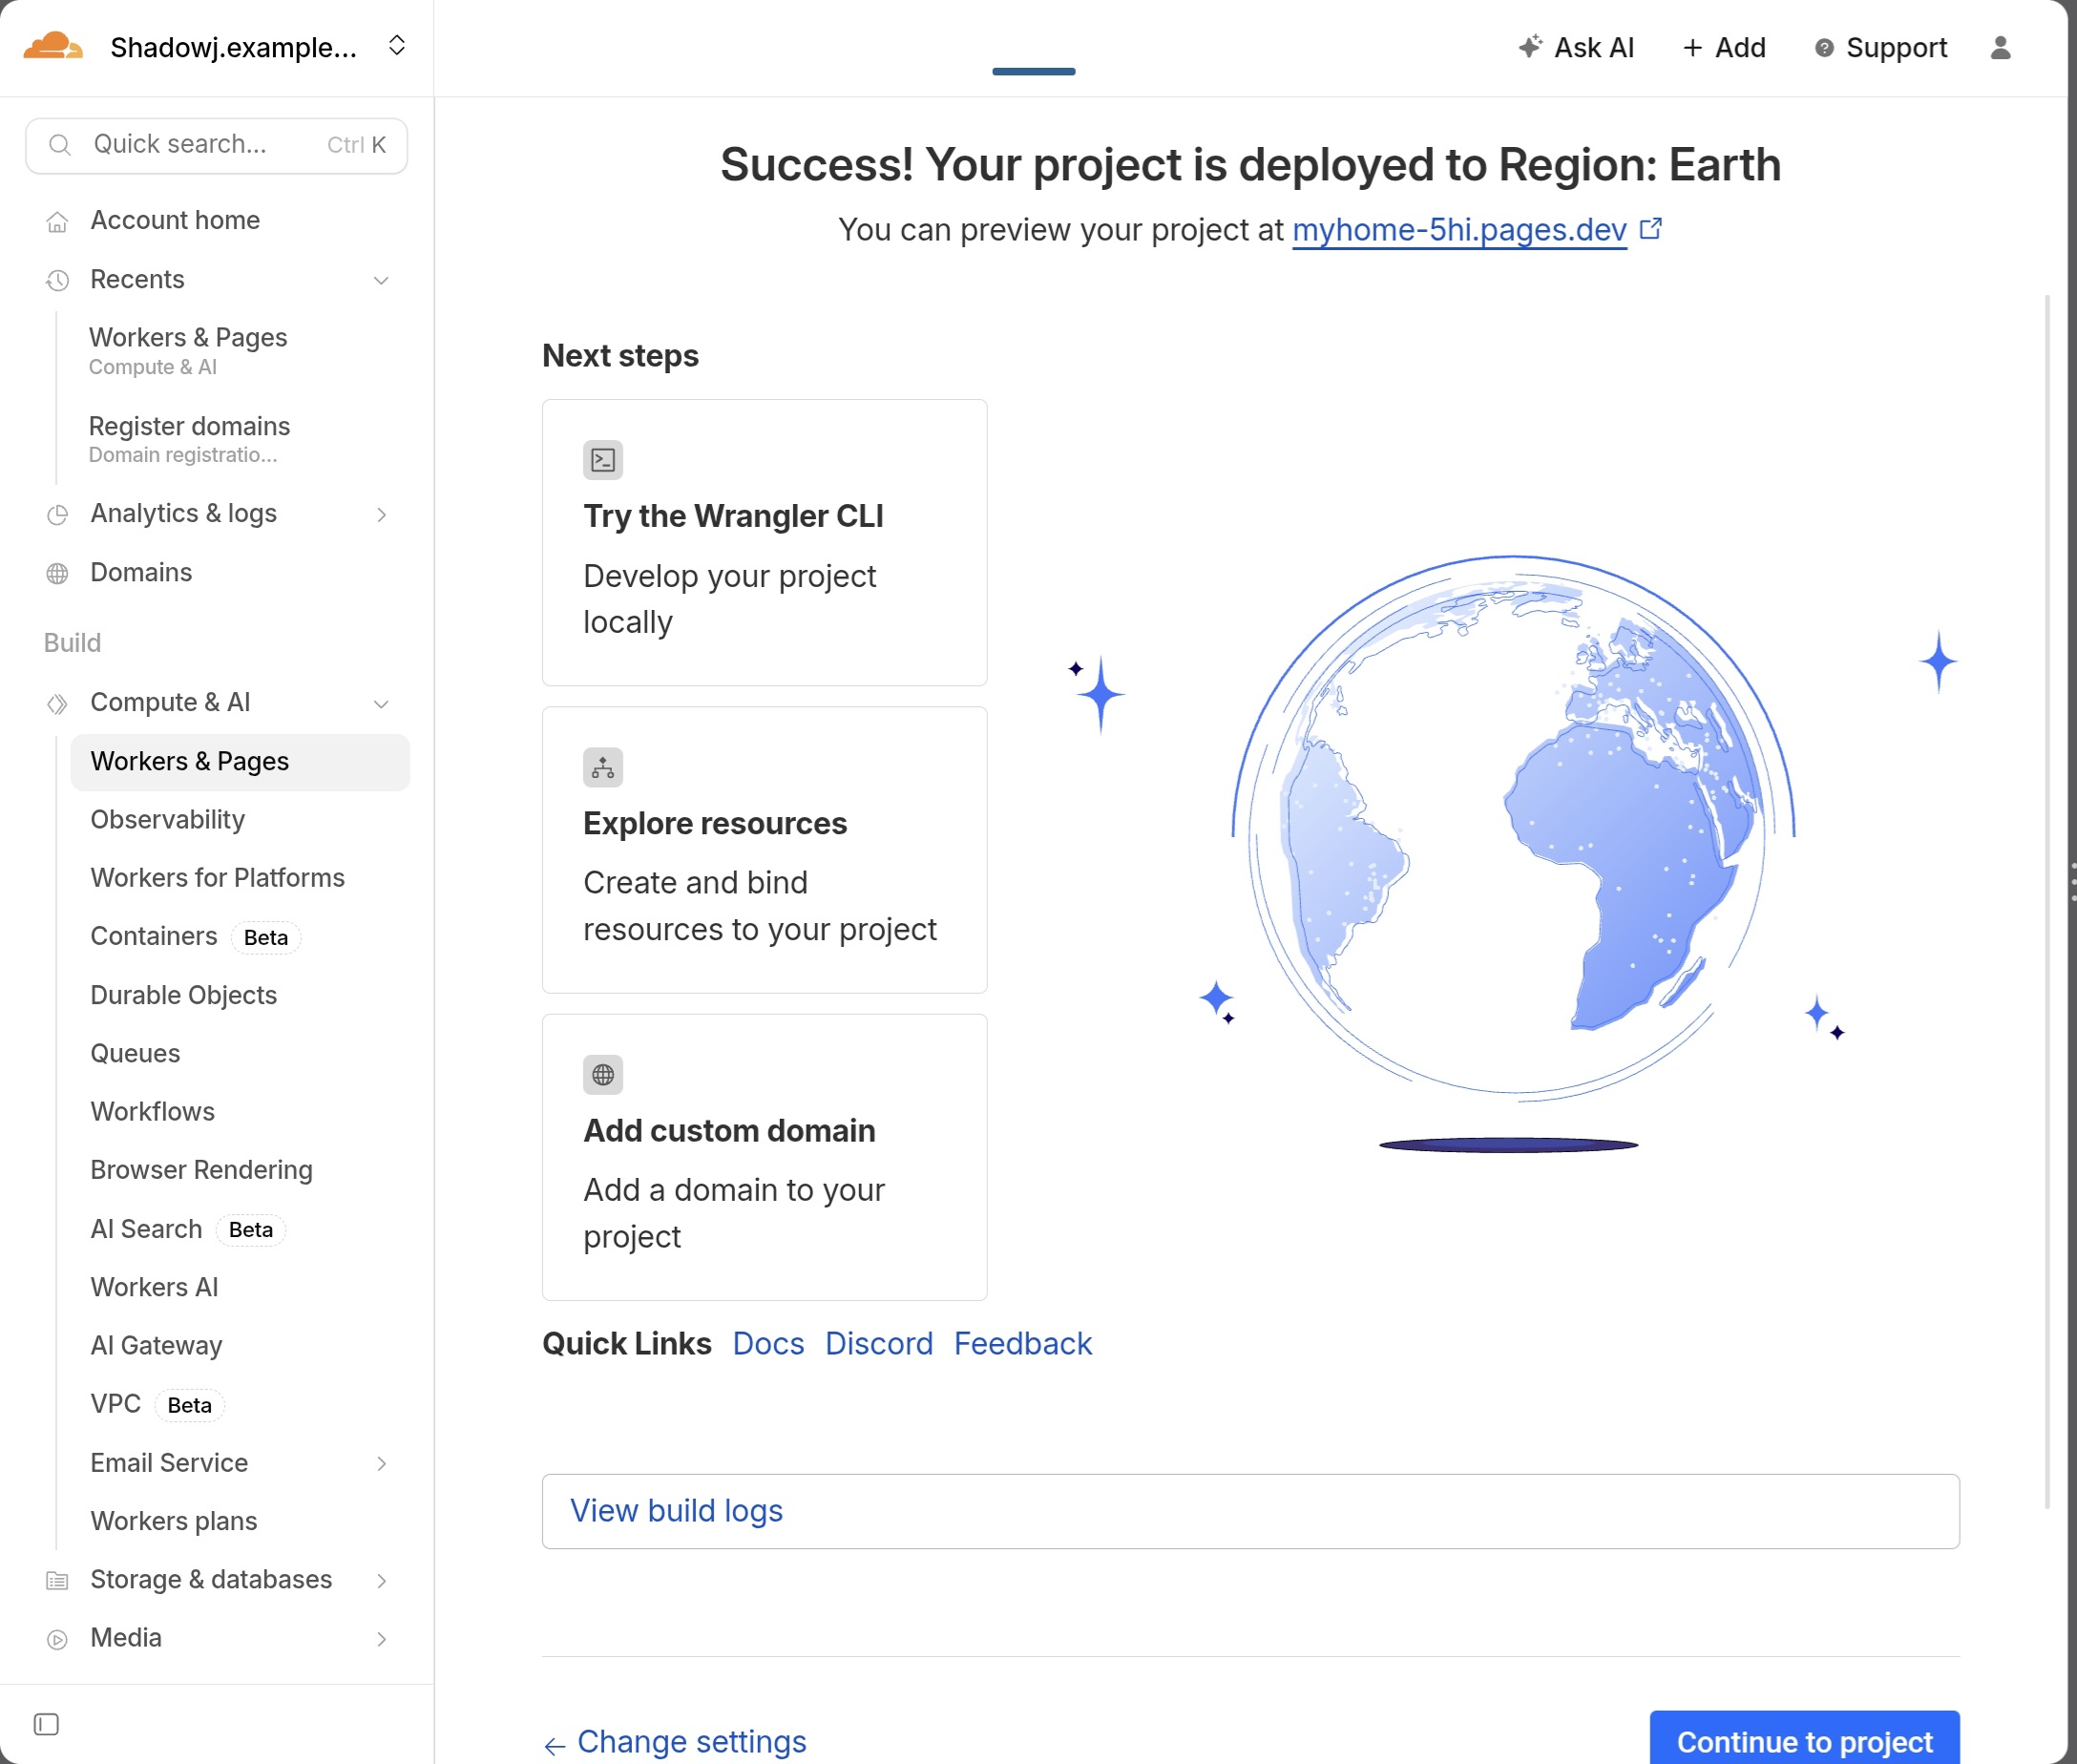
(48) EN: Deploy success.
(48) KR: 배포완료.
(49) EN: If deployment fails, click “Change settings” and re-check the build values. If it still fails, copy the build log and ask an AI for the cause and fix, then redeploy.
(49) KR: 만약 배포완료화면이 안나올경우 빌드값을 잘못 기입한것이 있으니 change setting으로 수정하시고,
그래도 중단되면 로그기록을 복사해서 AI에게 물어봐서 해결한 뒤 재배포 하시면 됩니다.
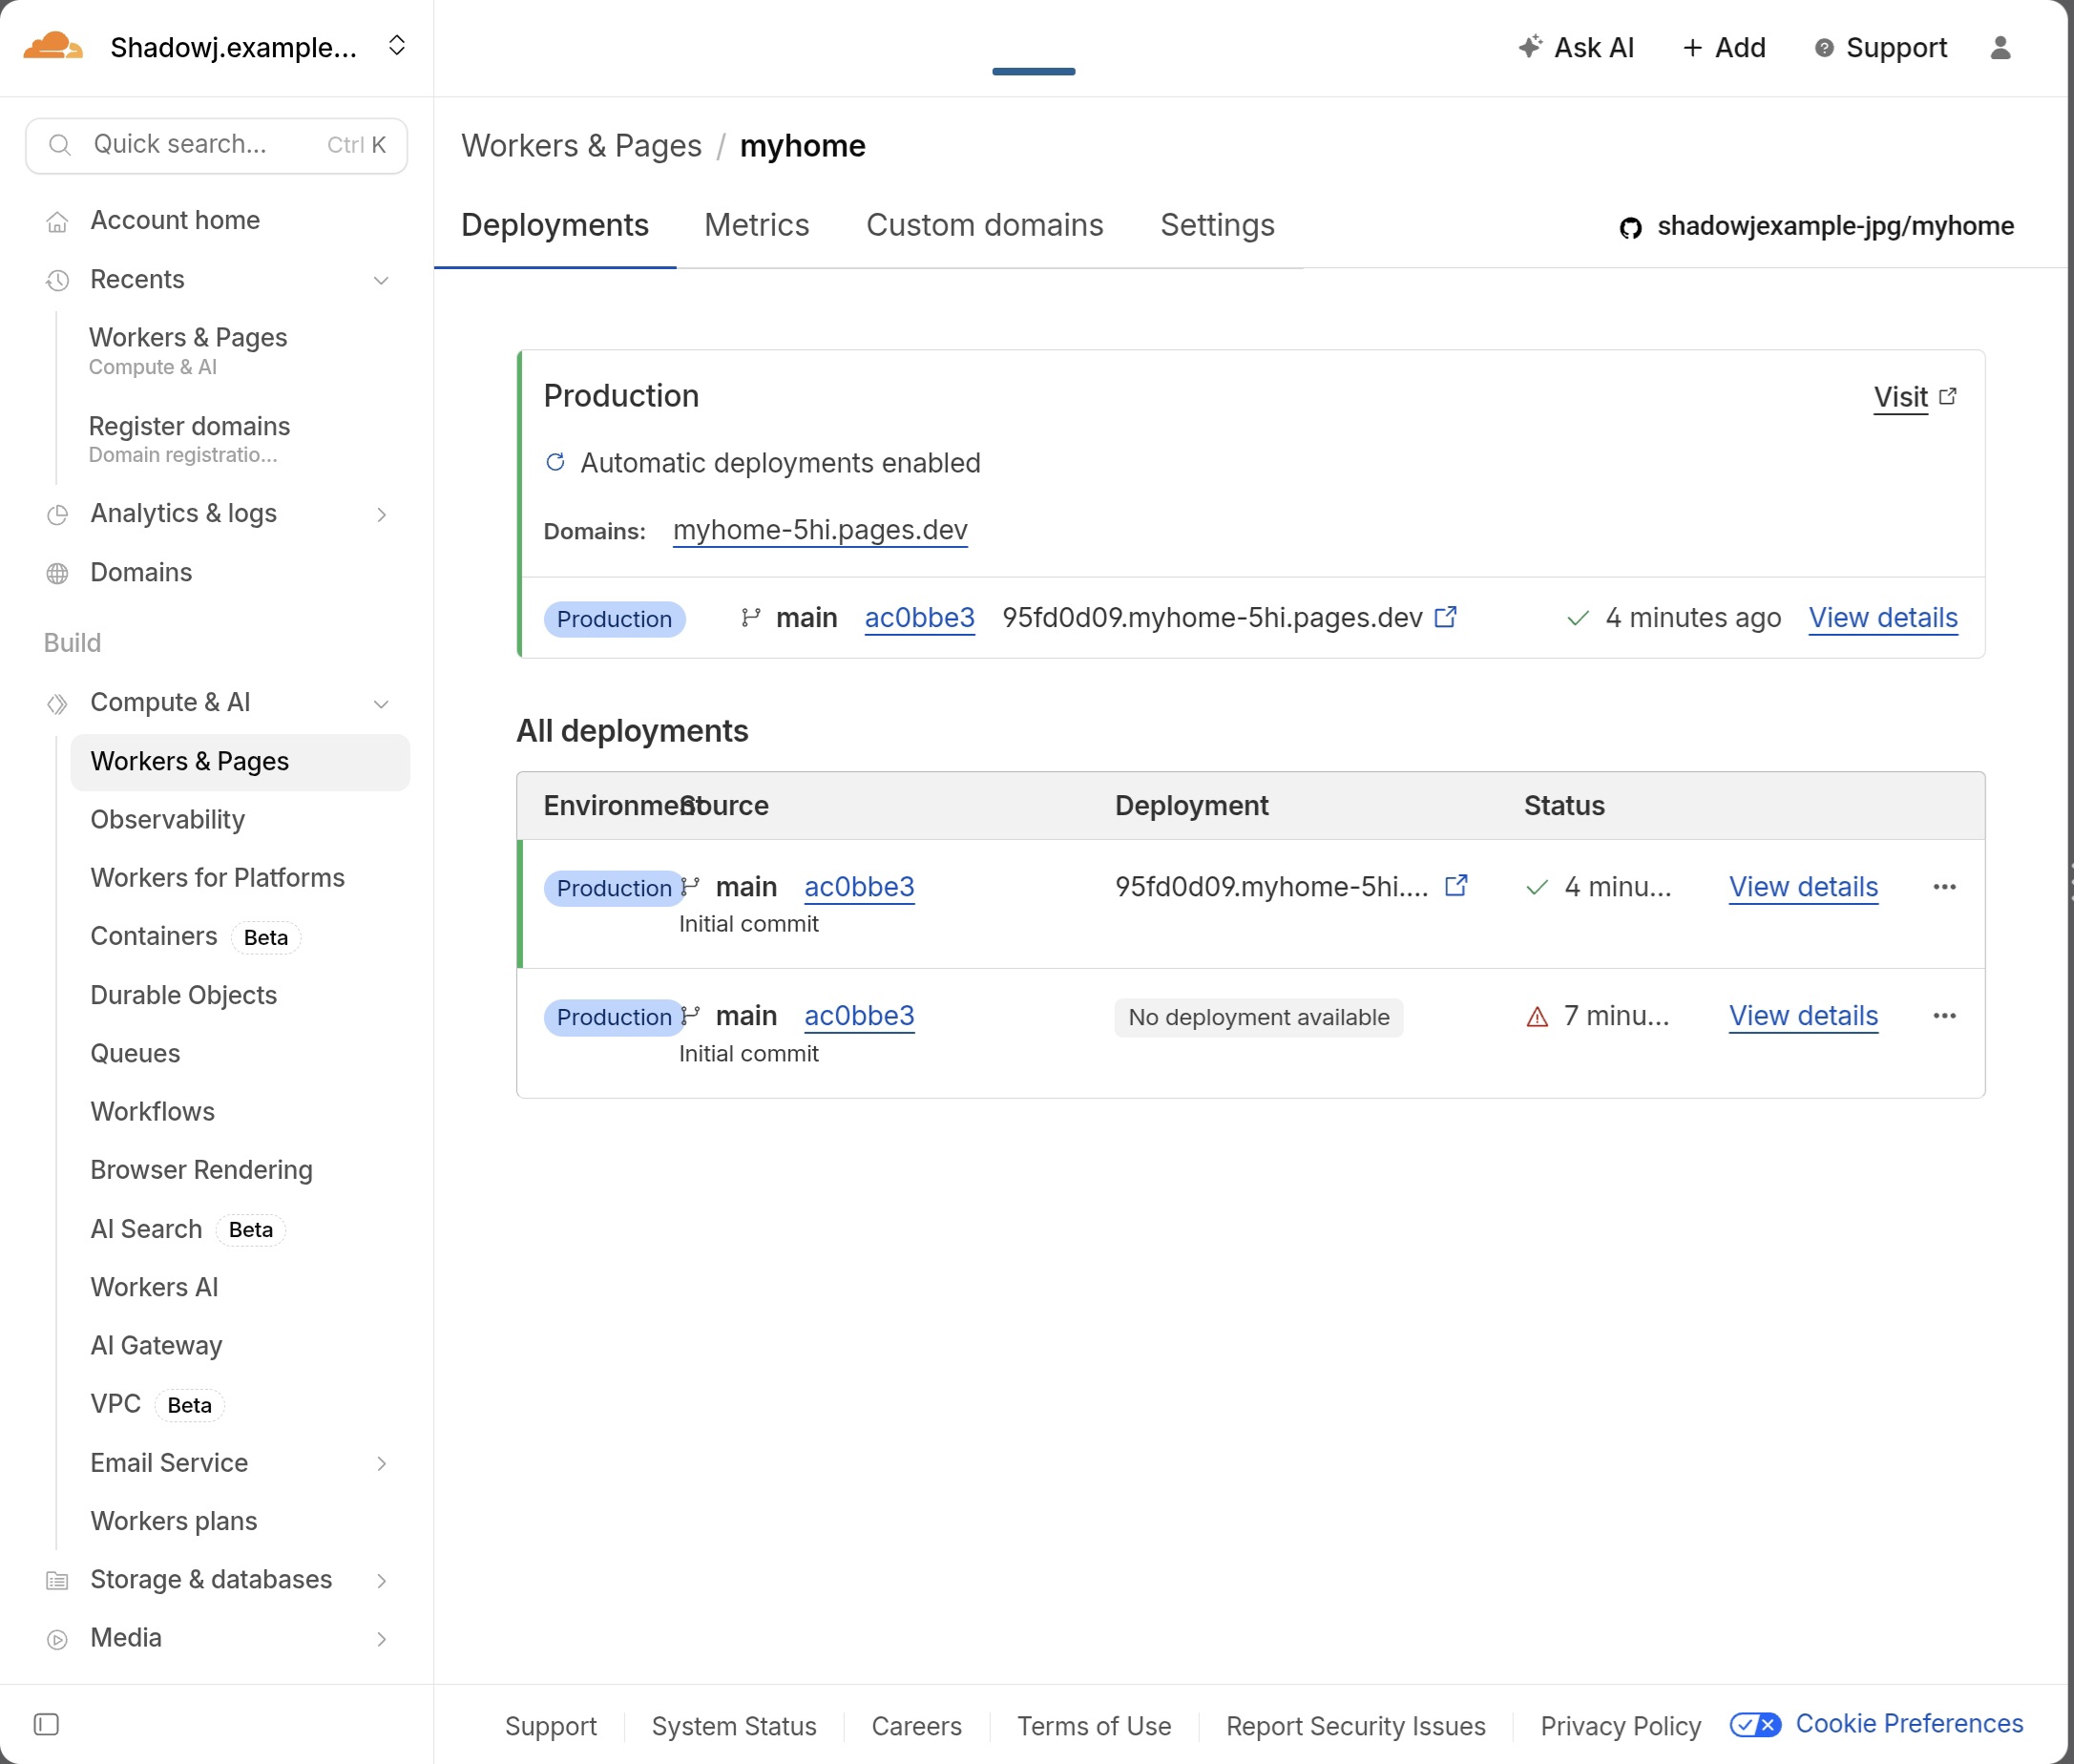
(50) EN: You can preview via the temporary domain before connecting your real domain.
(50) KR: 도메인을 연결하기전 임시 도메인 미리보기를 할 수 있습니다. 글 업로드나 레이아웃 수정이 잘 반영됐는지 확인할 때 씁니다.
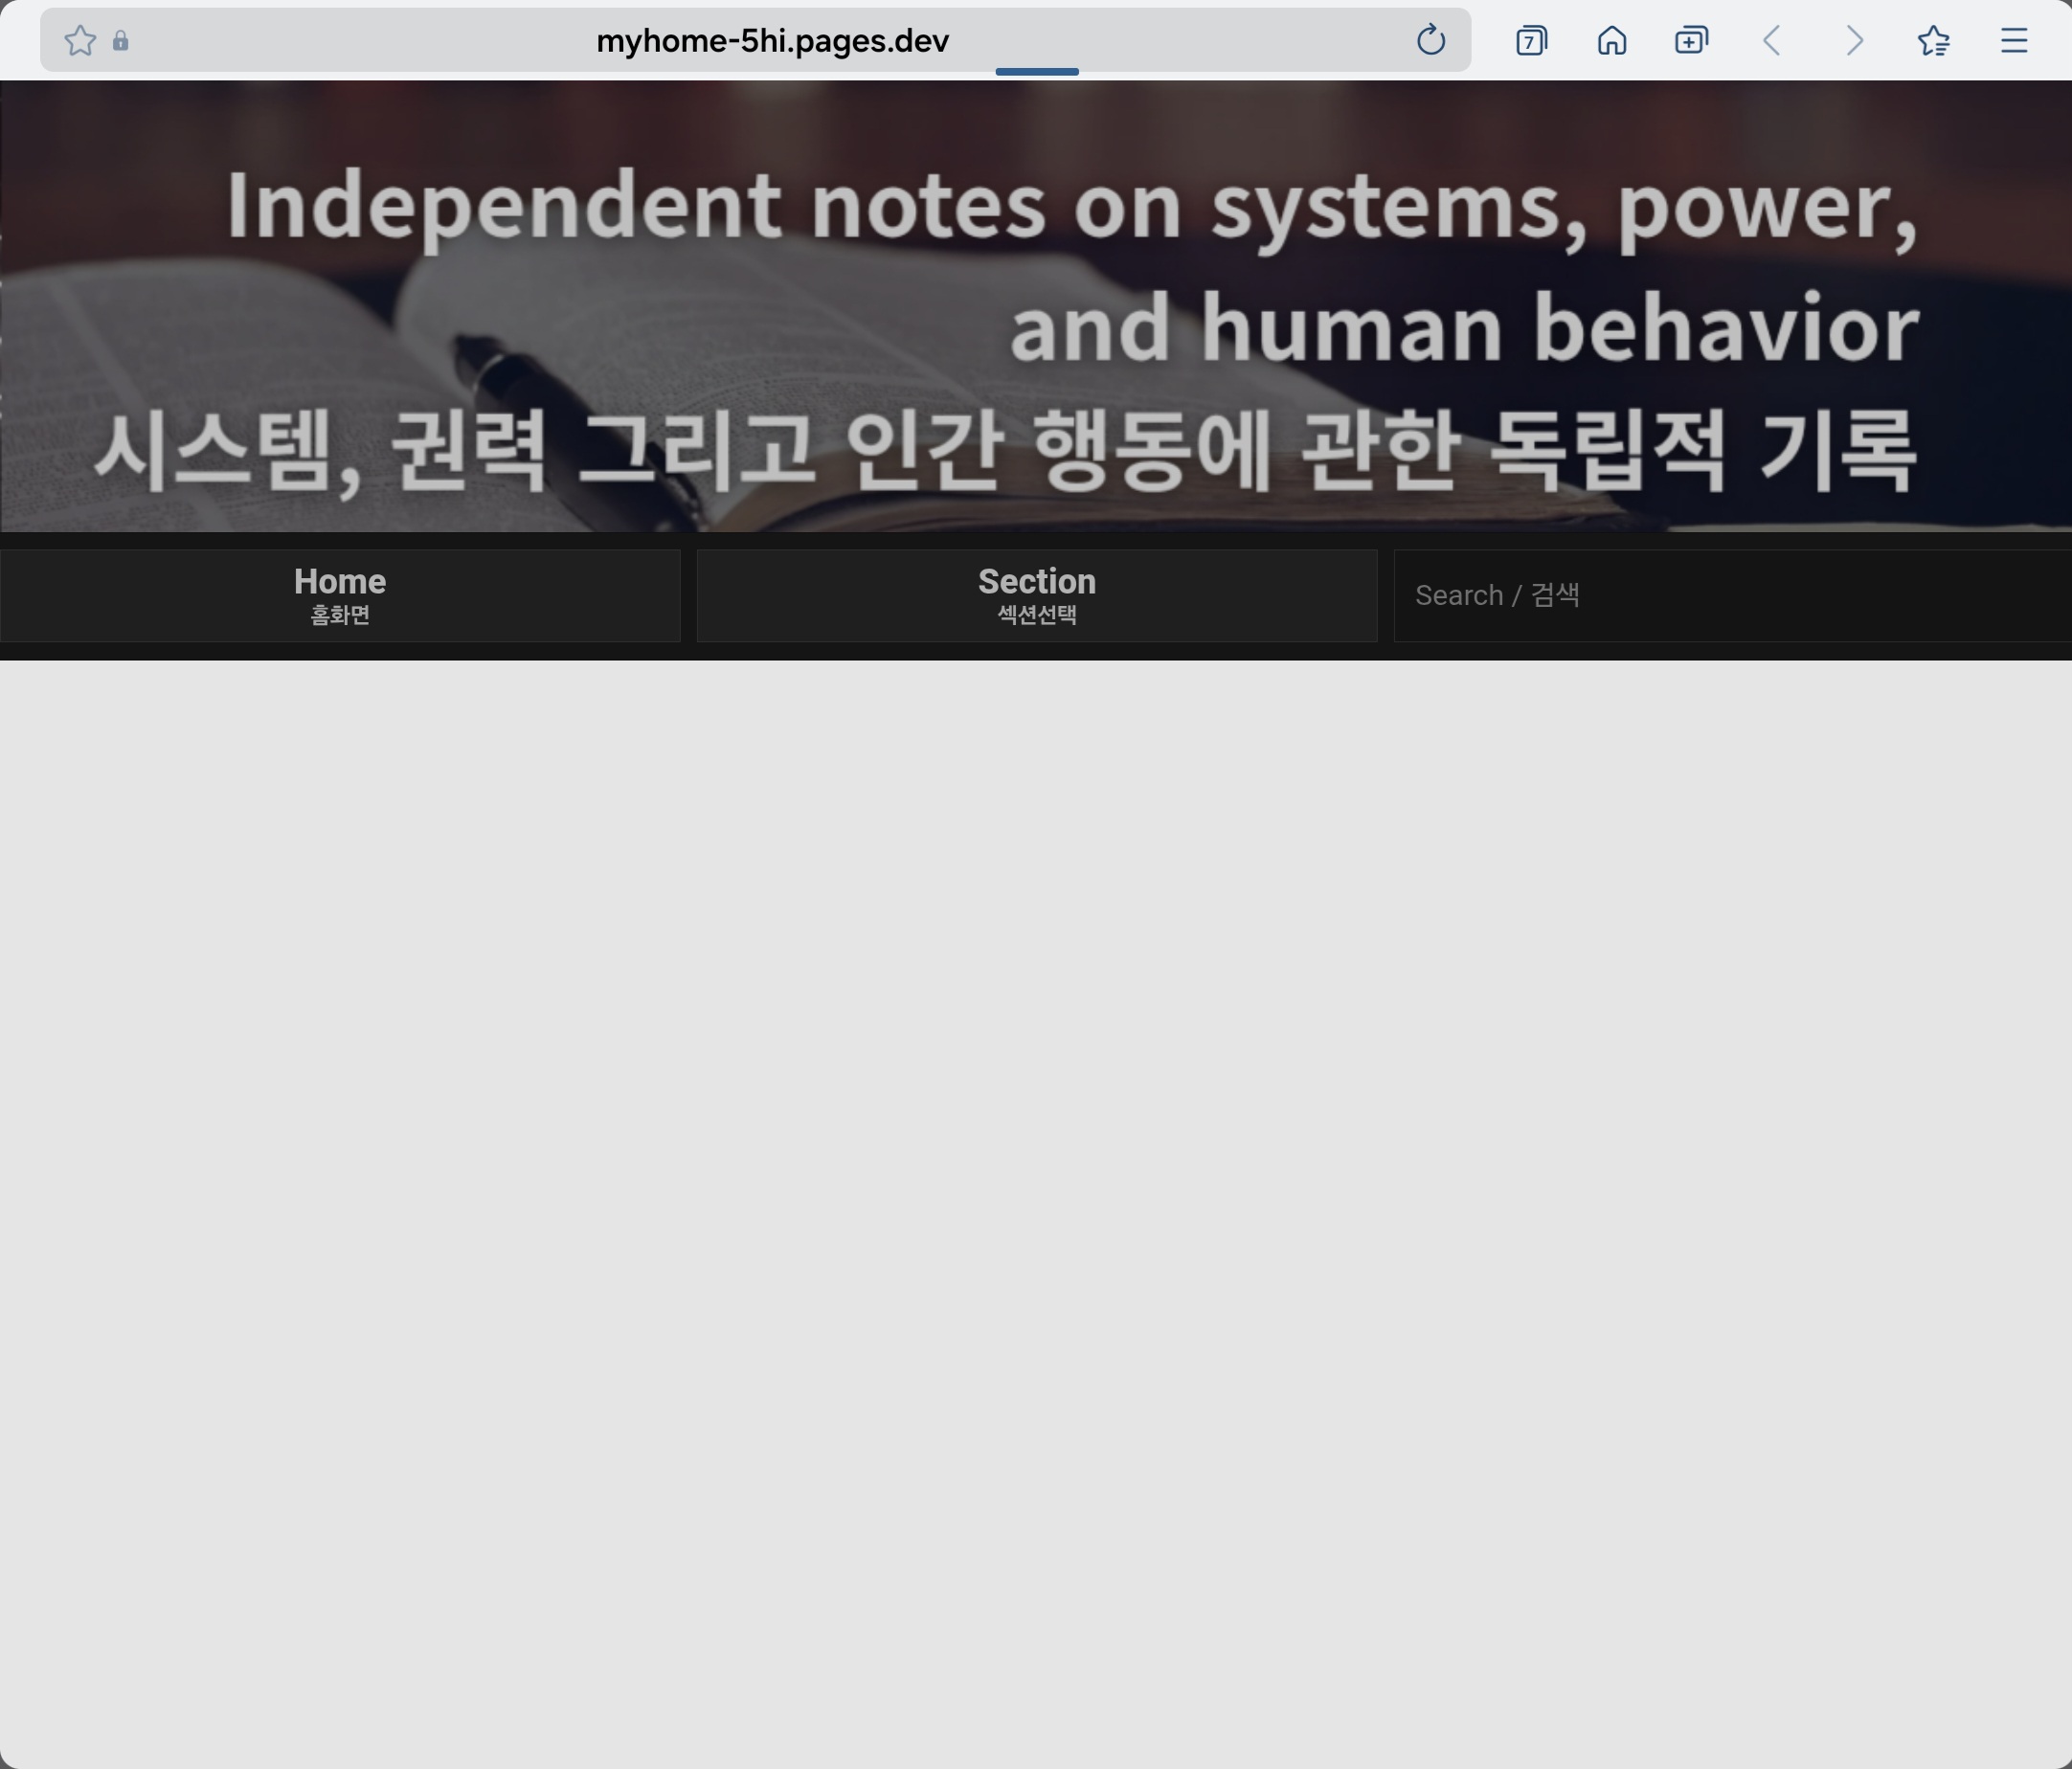
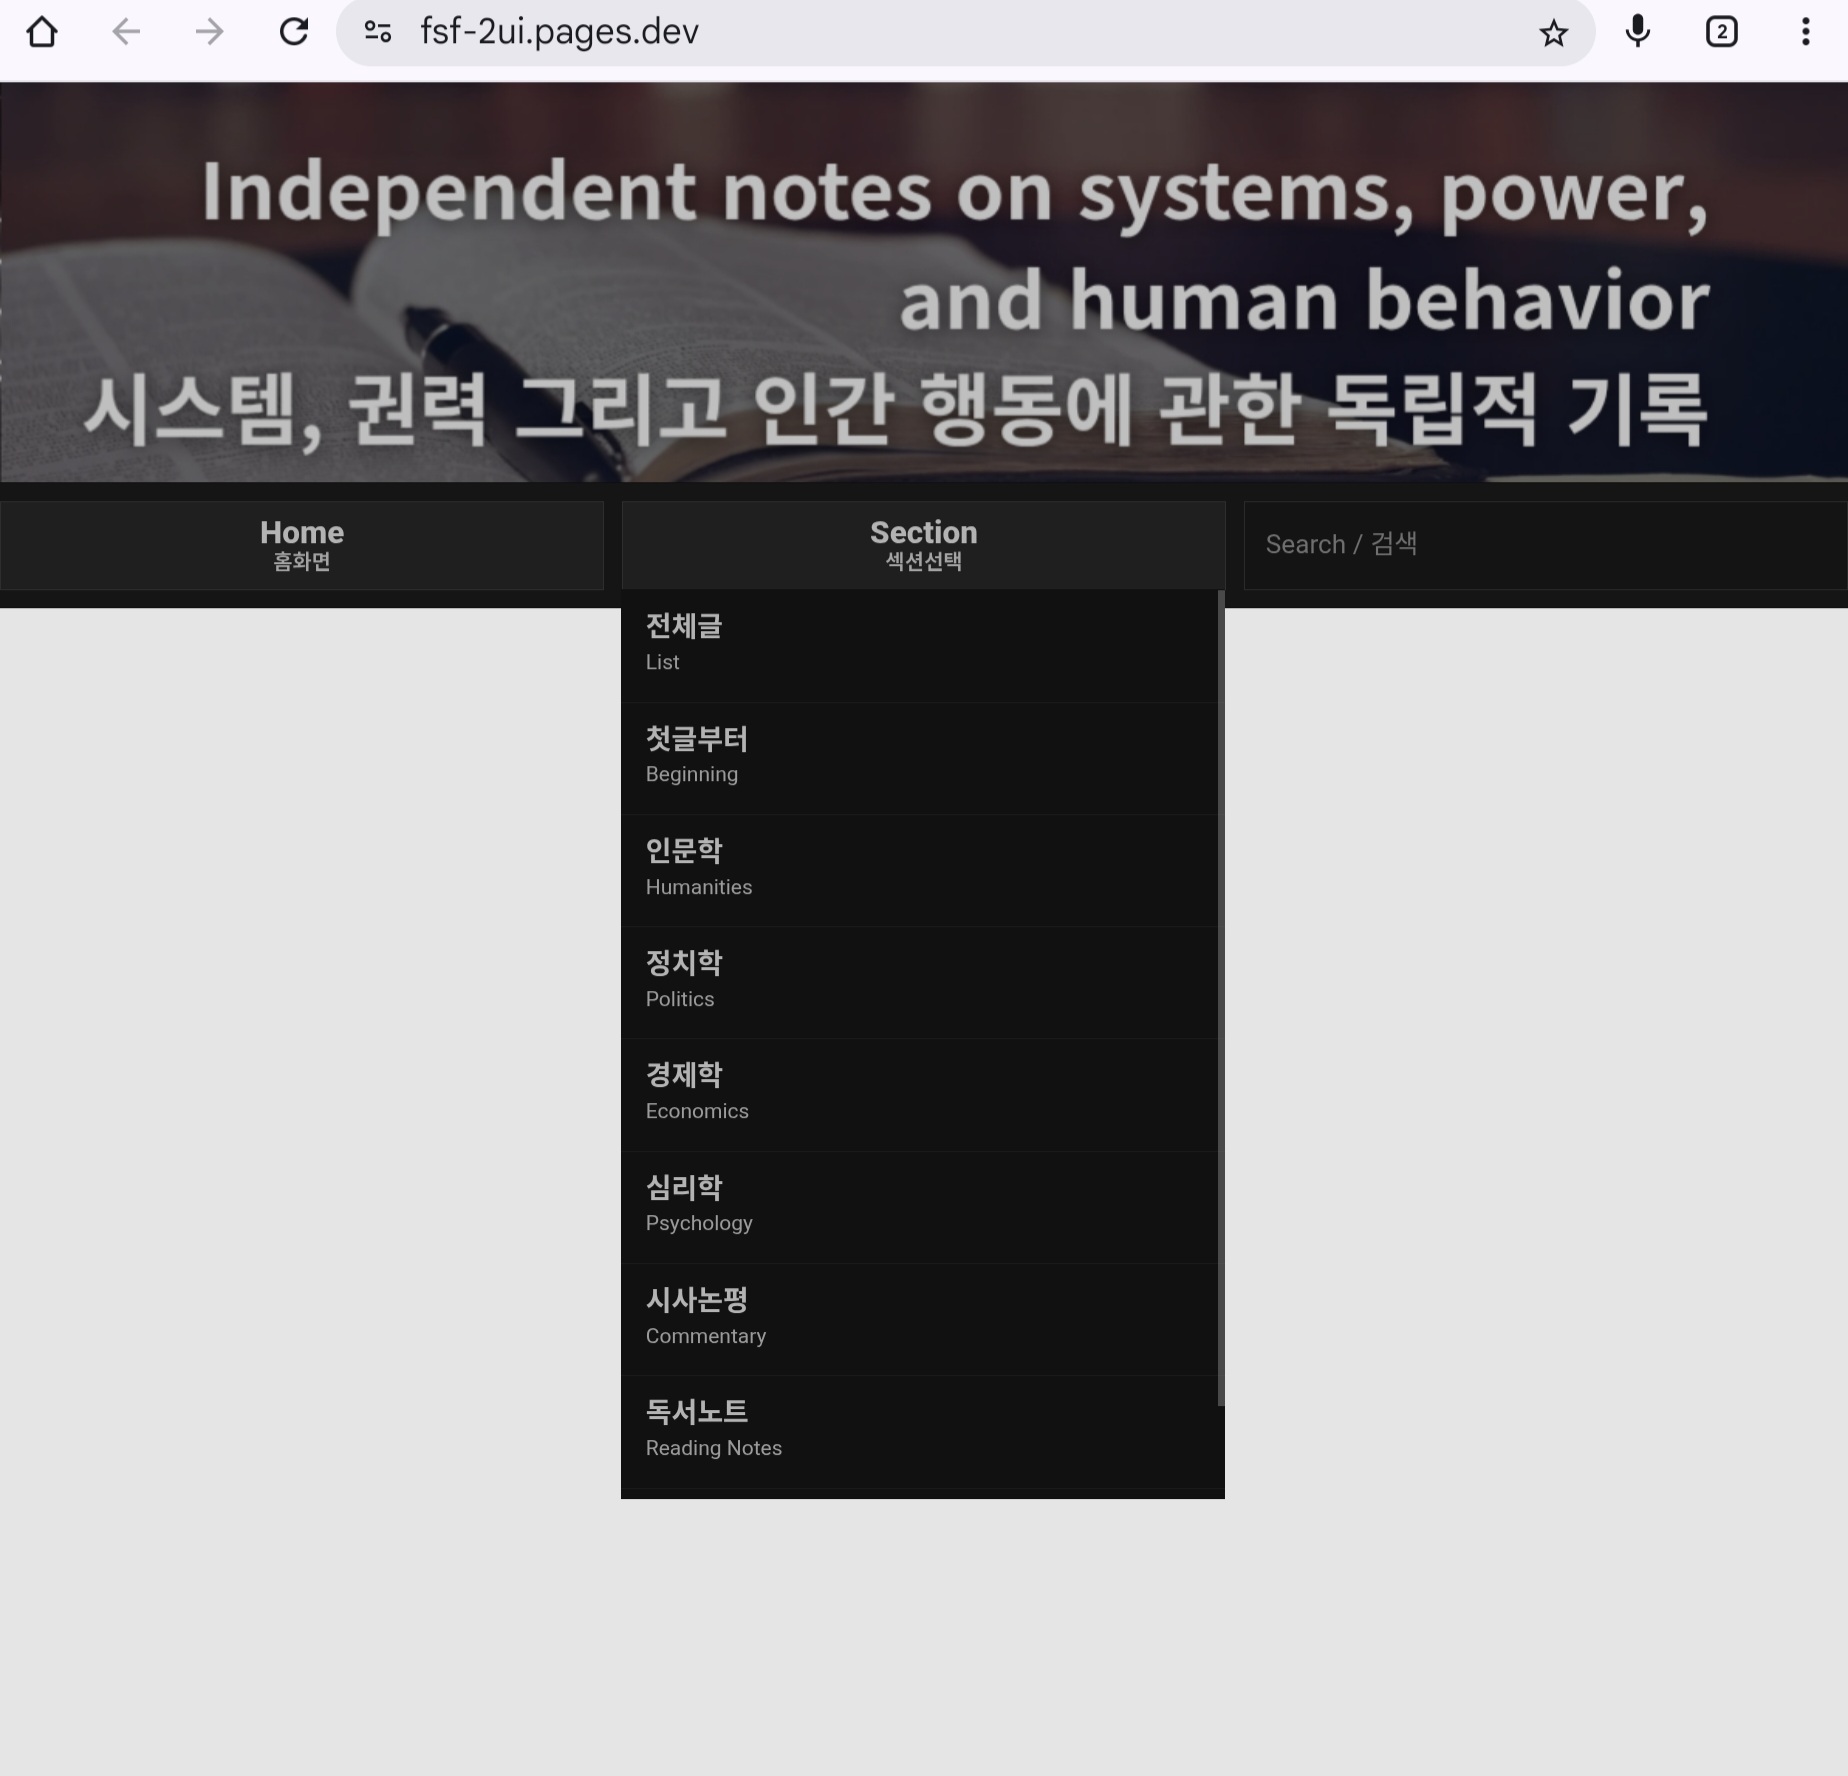
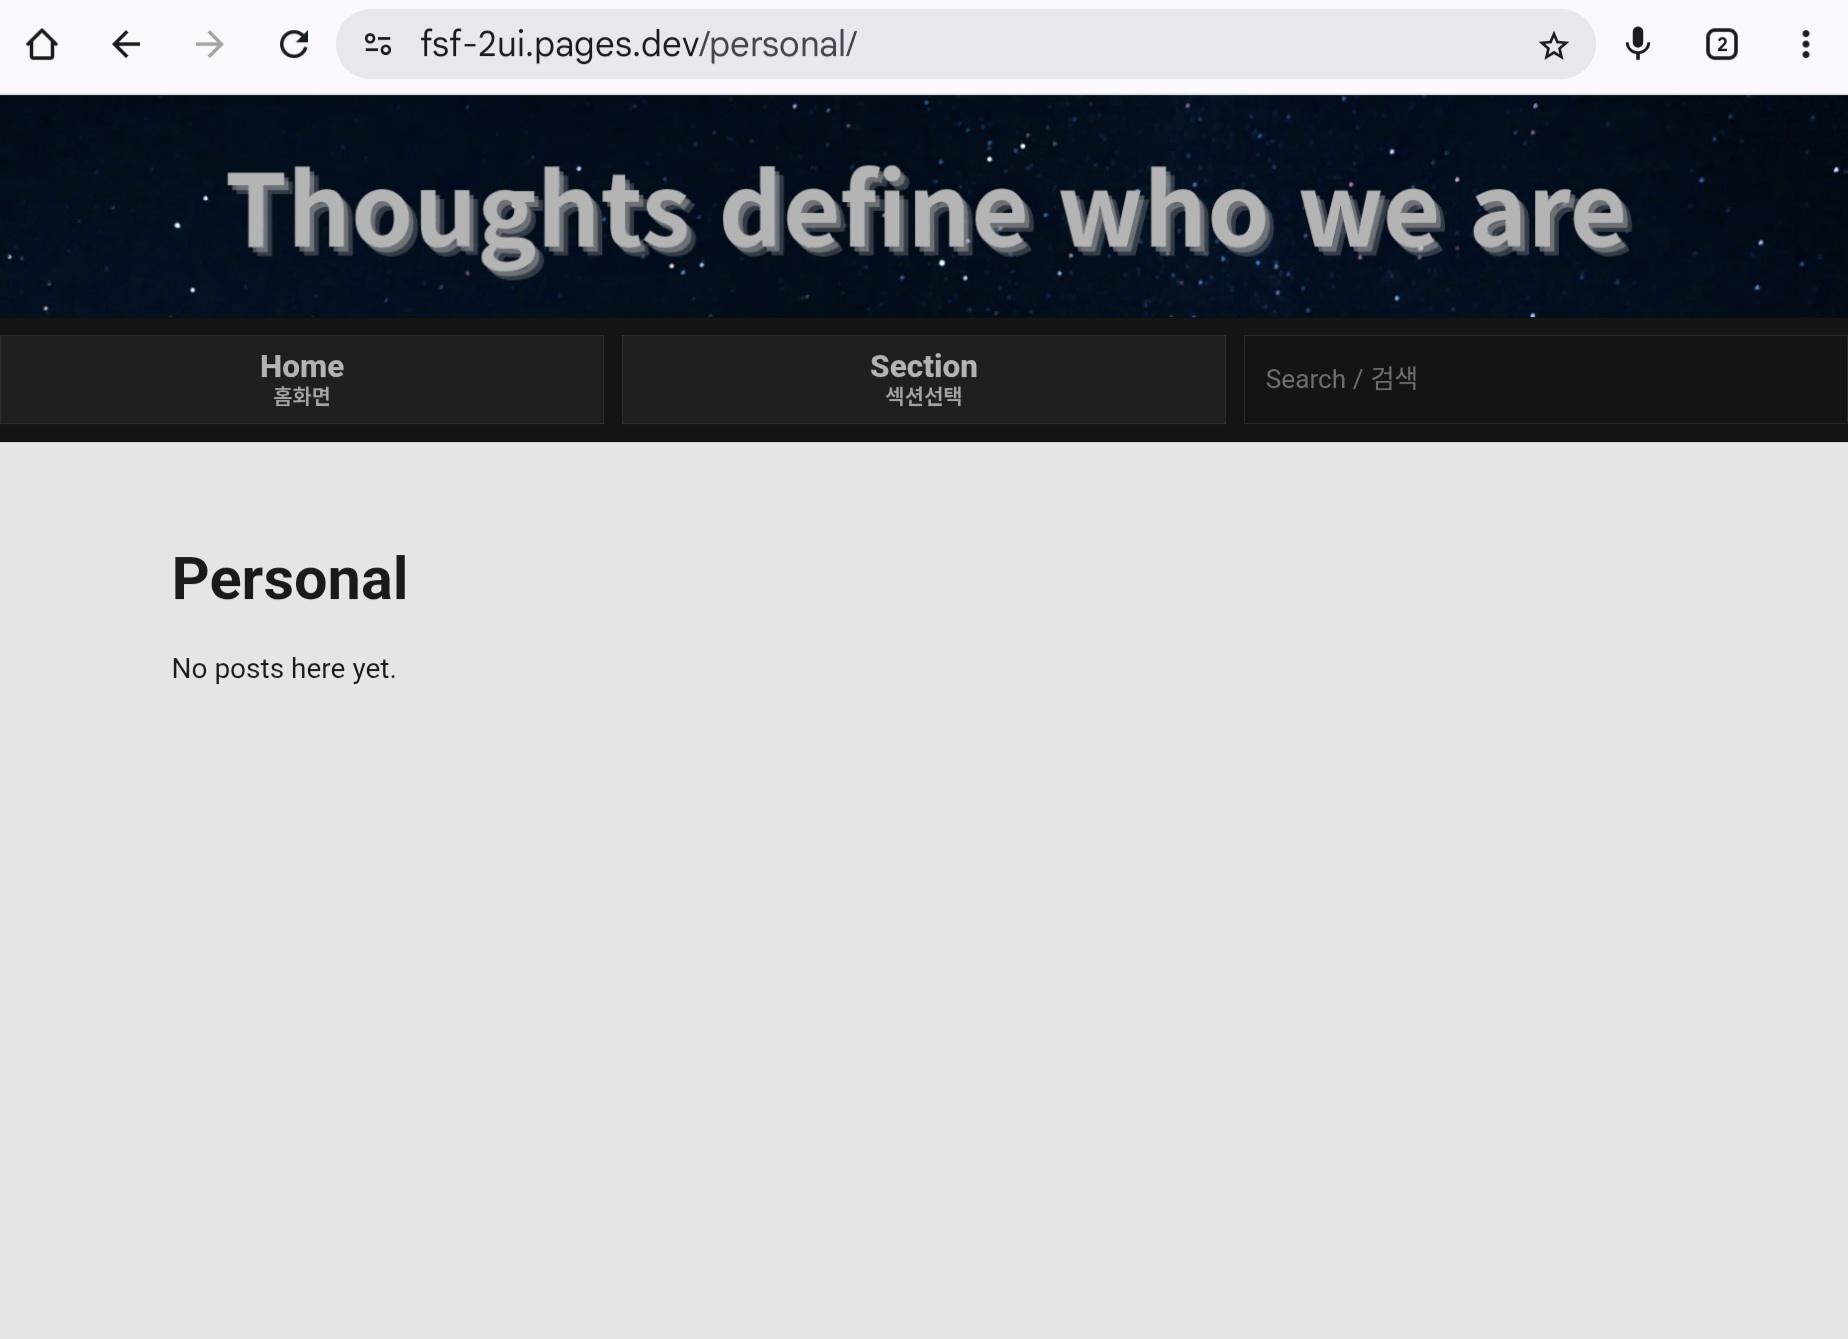
(51) EN: Confirm your homepage works: header link, Home button, Section dropdown, section pages, clicking the header returns to home, etc.
Home shows the latest-post feed. “List” and “Beginning” show post titles per section in newest-first and oldest-first order.
The last “Personal” area appears after one more scroll, so it feels more private/hidden psychologically.
Search is configured as keyword-based (word) search.
(51) KR: 메인 화면이 나오면 헤더/홈/섹션선택/각 섹션 이동/헤더 눌러 홈 복귀 등을 전부 눌러보며 정상동작을 확인합니다.
홈화면은 최신글 피드형식으로 나오고, 리스트와 비기닝은 각 섹션에 업로드한 글을 최신순, 오래된순으로 각각 리스트 제목이 나옵니다.
섹션의 맨 마지막 개인기록(퍼스널은) 스크롤을 한번더 밑으로 내림으로써 나오게 만들어서 좀더 심리적으로 퍼스널하게 사용하실수 있습니다.
검색은 단어 검색 설정되어 있습니다.
Shadow J Baseline 미사용 시 권장 설정 Recommended Settings (Without Shadow J Baseline)
EN: If you are building a Hugo-based website independently without purchasing Shadow J Baseline, the following settings are generally recommended for stable deployment:
Framework preset: Hugo Build command: hugo Build output directory: public (Recommended) Environment variable Key: HUGO_VERSION Value: 0.147.7
Hugo generates the final site in the public directory, so this value must be set correctly for proper deployment.
KR: Shadow J Baseline을 구매하지 않고, Hugo 기반으로 홈페이지를 직접 구축하려는 경우에는 아래와 같이 설정하는 것이 일반적으로 안정적입니다.
Framework preset: Hugo Build command: hugo Build output directory: public (권장) Environment variable Key: HUGO_VERSION Value: 0.147.7
Hugo는 빌드 결과를 public 폴더에 생성하므로, 해당 값을 정확히 설정해야 정상적으로 배포됩니다.
8. 도메인 연결 / Connect your custom domain
.jpg)
(52) EN: Go to Custom domains → Set up a custom domain.
(52) KR: custom domains 선택 → set up a custom domain 선택
.jpg)
(53) EN: Enter your domain and Continue. Then add www.yourdomain.com too. When both are active, test the domain in the browser.
(53) KR: 도메인 입력하고 continue → 다시 set up 눌러서 www. 추가 → 둘 다 active 확인 후 주소창에서 접속 확인
.jpg)
(54) EN: Enter the domain you purchased and click Continue. When it becomes active, click “Set up a custom domain” again at the top right.
(54) KR: 내가 구매한 도메인값을 입력하고 continue 버튼을 누릅니다. 활성 버튼이 뜨면 다시 우측상단에 set up a custom domain을 누르고
.jpg)
(55) EN: Add it one more time. Type www.yourdomain and click Continue again. When both show green “active”, test your domain in the browser to confirm it connects to your site.
(55) KR: 한번더 또 추가합니다. www.yourdomain.com 쓰고 다시 continue를 누릅니다. 둘다 active 초록불이 켜지면 도메인 주소를 입력해서 홈페이지랑 연결이 되나 확인해봅니다.
(56) EN: If you want www.yourdomain.com to redirect to yourdomain (without www), set up a redirect Page Rule.
(56) KR: www가 자동으로 www없는 주소로 통합되길 원하면 Page Rules로 301 리다이렉트를 설정합니다.
.jpg)
(57) EN: Create a Page Rule.
(57) KR: Create a Page Rule 클릭
.jpg)
(58) EN:
URL: www.yourdomain.com/*
Setting: Forwarding URL
Status: 301 Permanent Redirect
Destination: http://yourdomain.com/$1
Save
(58) KR:
URL값: www.내도메인/*
Forwarding URL
301 - Permanent Redirect
http://내도메인/$1
Save
🔴 매우 중요: GitHub는 수정 후 반드시 “Commit” 해야 저장됩니다 / GitHub requires Commit
EN:
When you edit a file on GitHub, it is NOT saved until you click “Commit changes”.
Commit = Save.
KR:
깃허브에서 파일을 수정한 뒤에는 반드시 초록색 Commit changes(커밋) 을 눌러야 저장됩니다.
Commit을 누르지 않으면 Cloudflare 배포에도 반영되지 않습니다.
Commit = 저장 입니다.
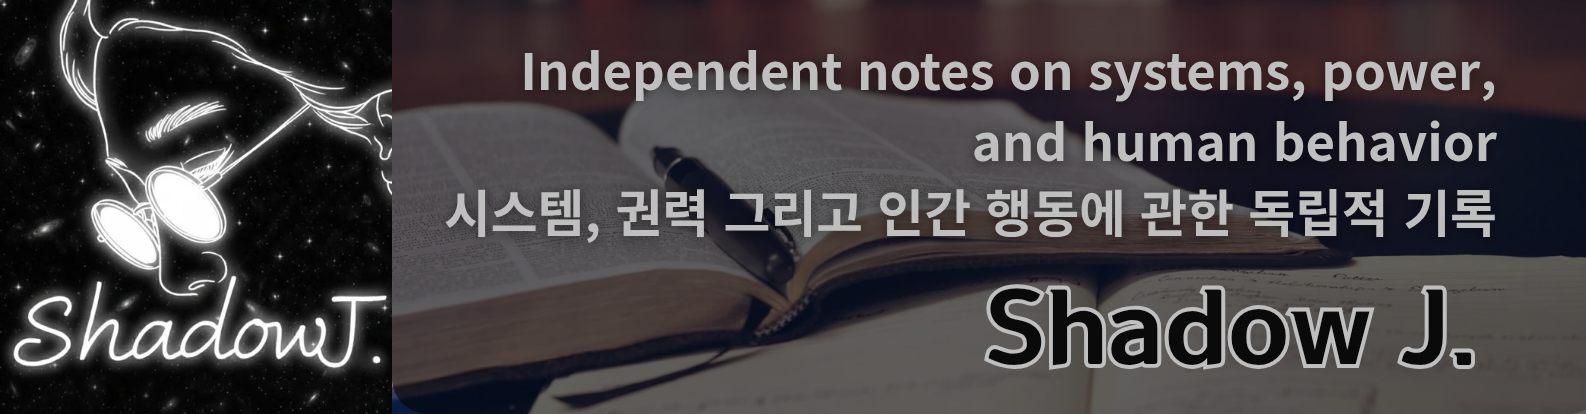
9. 헤더 이미지 바꾸기 / Change header images
EN: Header Image and Section Configuration Guide
The Shadow J Baseline website can be used as provided, without any modifications.
However, if you wish to change the main header image, modify section header images, or adjust the section list and structure, please refer to the instructions below.
KR: 헤더 이미지 및 섹션 구성 변경 안내
Shadow J Baseline 홈페이지는 기본 설정 그대로 바로 사용하셔도 무방합니다.
다만, 메인 헤더 이미지 또는 각 섹션의 헤더 이미지를 변경하거나, 섹션 목록 및 구성을 수정하고자 하는 경우에는 아래 안내를 참고하시기 바랍니다.
(59) EN: Upload your images into static/img/ (png or jpg).
Then edit layouts/partials/header.html.
IMPORTANT: Do NOT delete the rest of the file.
Keep the full file structure and only change the image file names in src="...".
(59) KR: static/img/ 폴더에 원하는 이미지를 넣고(.png .jpg)
layouts/partials/header.html 파일에서 이미지 파일명만 바꾸면 됩니다.
절대 파일의 다른 부분을 지우지 마세요. “전체 파일” 구조를 유지하고, src="/img/..." 파일명만 바꾸는 방식이 가장 안전합니다.
아래는 layouts/partials/header.html 에 들어있는 전체 코드 예시입니다.
(이 파일을 편집할 때는 “이 전체 구조”를 유지한 채로, main.png / being.png만 원하는 파일명으로 바꾸세요.)
header.html 전체코드 (FULL FILE)
<header class="top__banner">
  {{ if .IsHome }}
    <a href="/" aria-label="Go to Home">
      <img src="/img/main.png" alt="Main header" />
    </a>
  {{ else }}
    <a href="/" aria-label="Go to Home">
      <img src="/img/being.png" alt="Being header" />
    </a>
  {{ end }}
</header>
(60) EN:
-
To change the HOME header image: replace
main.pngwith your file name (and make sure the file exists in/static/img/). -
To change the SECTION header image: replace
being.pngwith your file name (and make sure the file exists in/static/img/).
After editing, click the pencil icon, then 반드시 “Commit changes”.
(60) KR:
-
홈 화면 헤더 이미지를 바꾸고 싶으면
main.png를 원하는 파일명으로 바꿉니다. (이미지는static/img/안에 있어야 합니다) -
섹션 화면 헤더 이미지를 바꾸고 싶으면
being.png를 원하는 파일명으로 바꿉니다. (이미지는static/img/안에 있어야 합니다)
수정할때는 연필모양을 클릭하고 수정한 뒤에는 반드시 초록색 “Commit changes(커밋)”을 눌러야 저장됩니다.
커밋을 눌러야 Cloudflare 배포에도 반영됩니다.
10. 섹션페이지 리스트(메뉴) 이름만 바꾸기 / Change only menu names safely
(61) EN:
Changing actual folder paths and URLs requires deeper code changes and can break the baseline.
The safer allowed change is: keep folder names + URL slugs as-is, and only change the visible menu labels.
(61) KR:
섹션리스트에 해당되는 페이지와 깃허브 폴더까지 다 바꾸려면 더 복잡한 코드작업이 필요합니다.
코드를 아예 모르는 사람은 자칫 원본 레이아웃까지 박살내서 복구 불가가 될 수 있습니다.
그나마 안전한 방식은: 깃허브 컨텐츠 폴더명(슬러그)과 URL은 그대로 유지하고, 메뉴에 보이는 이름만 바꾸는 것입니다.
예시(hugo.toml에서 보이는 이름만 바꾸기):
[[params.section_menu]]
name_ko = “정치철학”
name_en = “Political Philosophy”
slug = “politics” # slug는 그대로!
11. 섹션 페이지 “본문 제목(title)”만 바꾸기 / Change section page title safely
(62) EN:
Keep the folder name.
Go to: content/<section-slug>/_index.md
Edit the title: (Front Matter) and commit.
(62) KR:
폴더명(슬러그)은 그대로 두고, 섹션 페이지 상단에 보이는 제목만 바꾸려면
content/해당섹션폴더/_index.md 를 들어가서
Front Matter의 title: 값을 수정하면 됩니다.
수정 후 반드시 Commit changes(커밋) 하세요.
예시:
title: “Economics” date: 2026-02-06 draft: false
12. 글 업로드 더 자세한 설명 / Uploading posts
.jpg)
.jpg)
(63) EN: Upload a .md file into the correct folder under content/. Then commit.
(63) KR: content 폴더 안에서 해당 섹션 폴더에 .md 파일을 업로드하고 커밋하면 글이 등록됩니다.
13. (모바일/태블릿 기준) 글 업로드 방식 안내 / Posting on mobile/tablet
EN:
If you manage on a computer, you can connect Obsidian and GitHub so edits deploy automatically.
This manual is written for tablet/mobile users (Galaxy Tab / iPad) without a computer, so you may need to upload files manually.
KR:
컴퓨터로 홈페이지를 관리할경우 옵시디언과 깃허브를 연결시켜 옵시디언에서 수정하면 바로 홈페이지에서 적용되게 설정할 수 있습니다. (그것은 AI에게 물어봐서 연결하세요)
저는 컴퓨터가 없어서 갤럭시 안드로이드 버전에서 홈페이지를 제작했으므로 컴퓨터가 없는 사람들을 대상으로 갤탭이나 아이패드 모바일 버전에서 홈페이지를 제작하고 사용할수 있는 메뉴얼만 작성합니다.
태블릿 모바일버전에서 홈페이지 관리하고 글을 업로드 하는것은 일반 플랫폼에서 주어지는 환경보다는 글쓰기가 불편한 환경임은 감안하셔야 합니다.
15. 글 업로드 할때 기본 원칙(Front Matter값 입력필수)
EN: Text files must be written in a format that the Hugo system can recognize.
Documents should be created as .md or .txt files, and the required Front Matter must be placed at the beginning of each document in order for the uploaded content to be properly recognized.
This website is an independent platform that does not rely on centralized services.
While this structure may involve a certain level of inconvenience, it allows for more autonomous and resilient operation compared to platforms that are easily subject to censorship or external control.
Digital independence often requires accepting a degree of inconvenience.
In that sense, preserving digital sovereignty is a conscious choice rather than a default condition.
KR: 텍스트 파일은 Hugo 시스템이 읽을 수 있게 작성해야 하며, 옵시디언 문서인 .md나 .txt 문서로 문서 맨앞에 Front Matter(프론트 매터) 값을 입력해야 업로드 된 글이 인식됩니다.
이 홈페이지는 플랫폼에 의존하지 않는 독립 홈페이지이기 때문에 약간의 불편함은 감수해야하지만 검열이 쉬운 플랫폼에 의존하는것보다는 보다 독립적으로 운영할수 있다고 생각합니다.
디지털 독립주권은 약간의 불편함을 감수할때 지켜낼수 있습니다.
16. Front Matter(프론트 매터) 예시 / Front Matter examples (IMPORTANT)
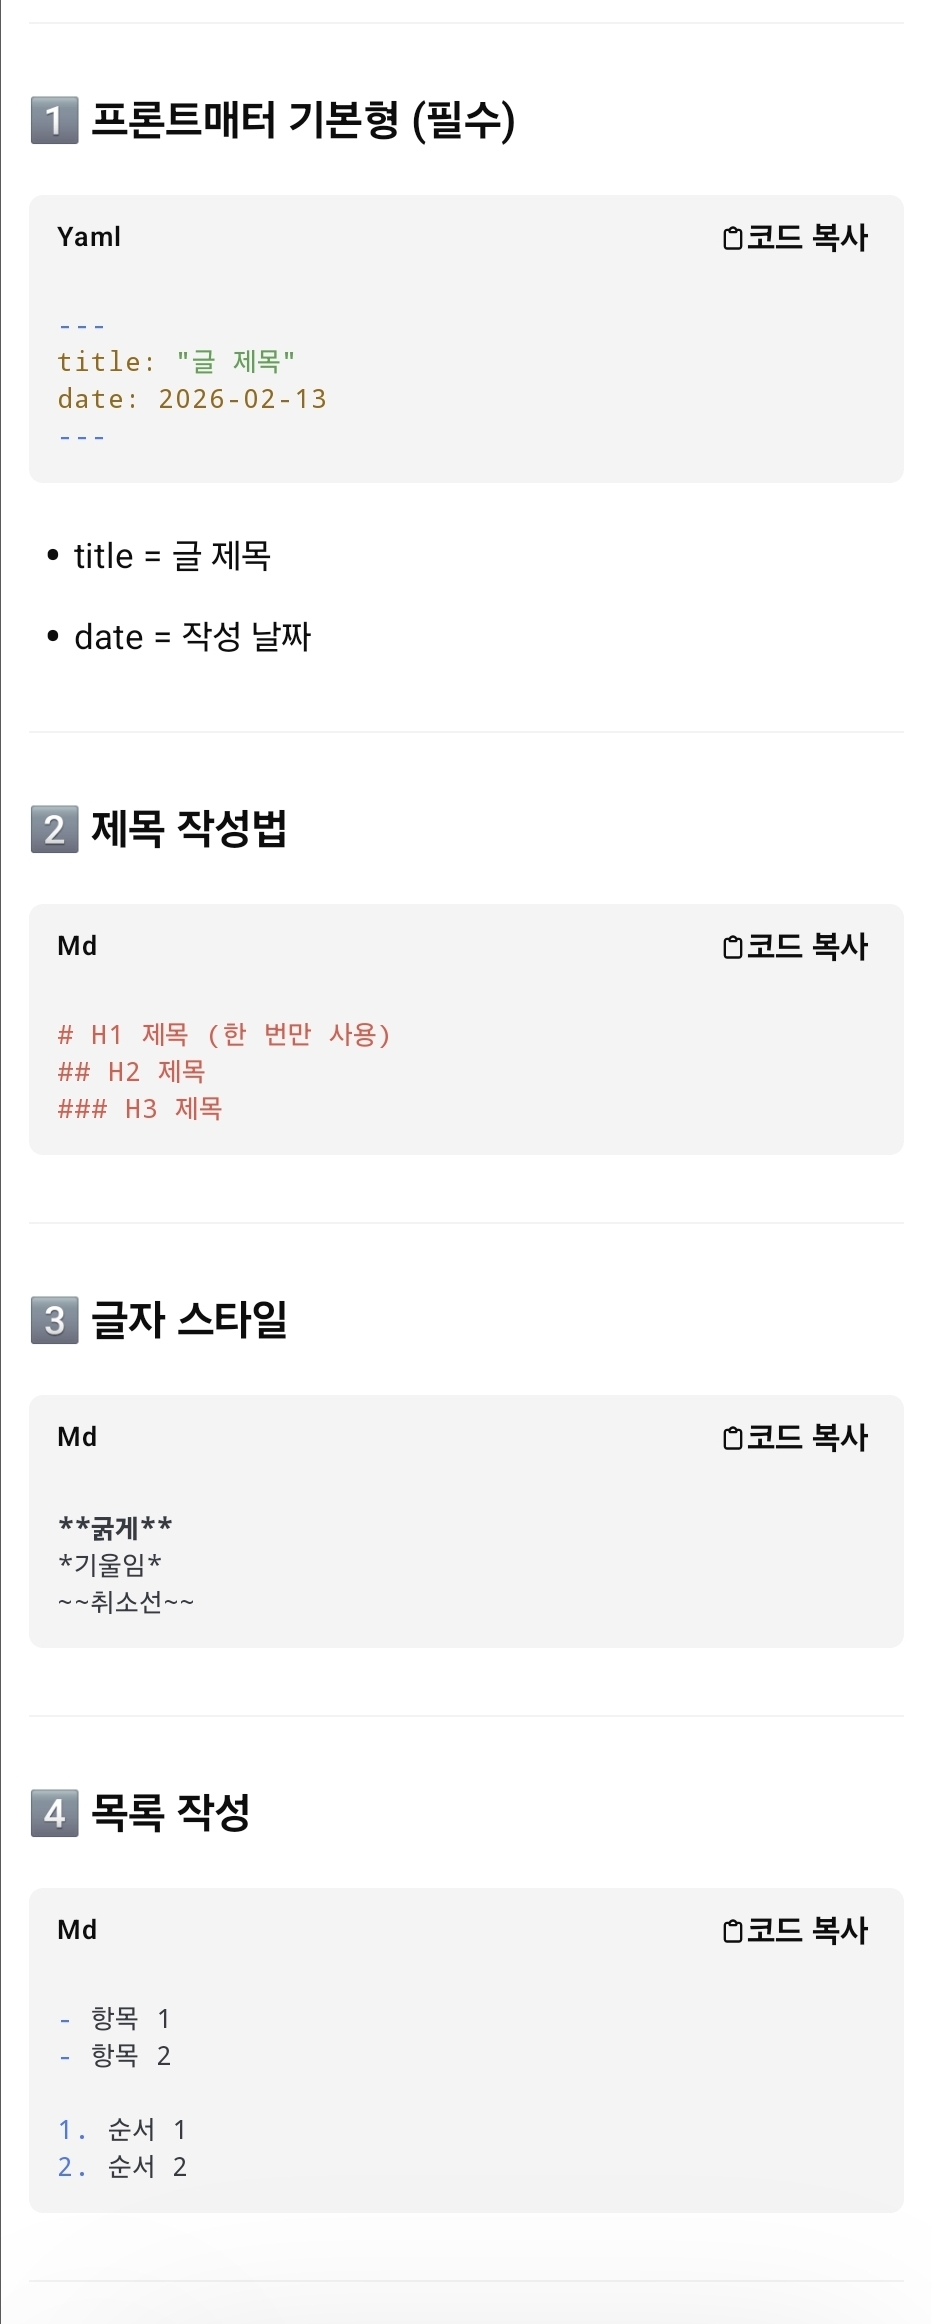
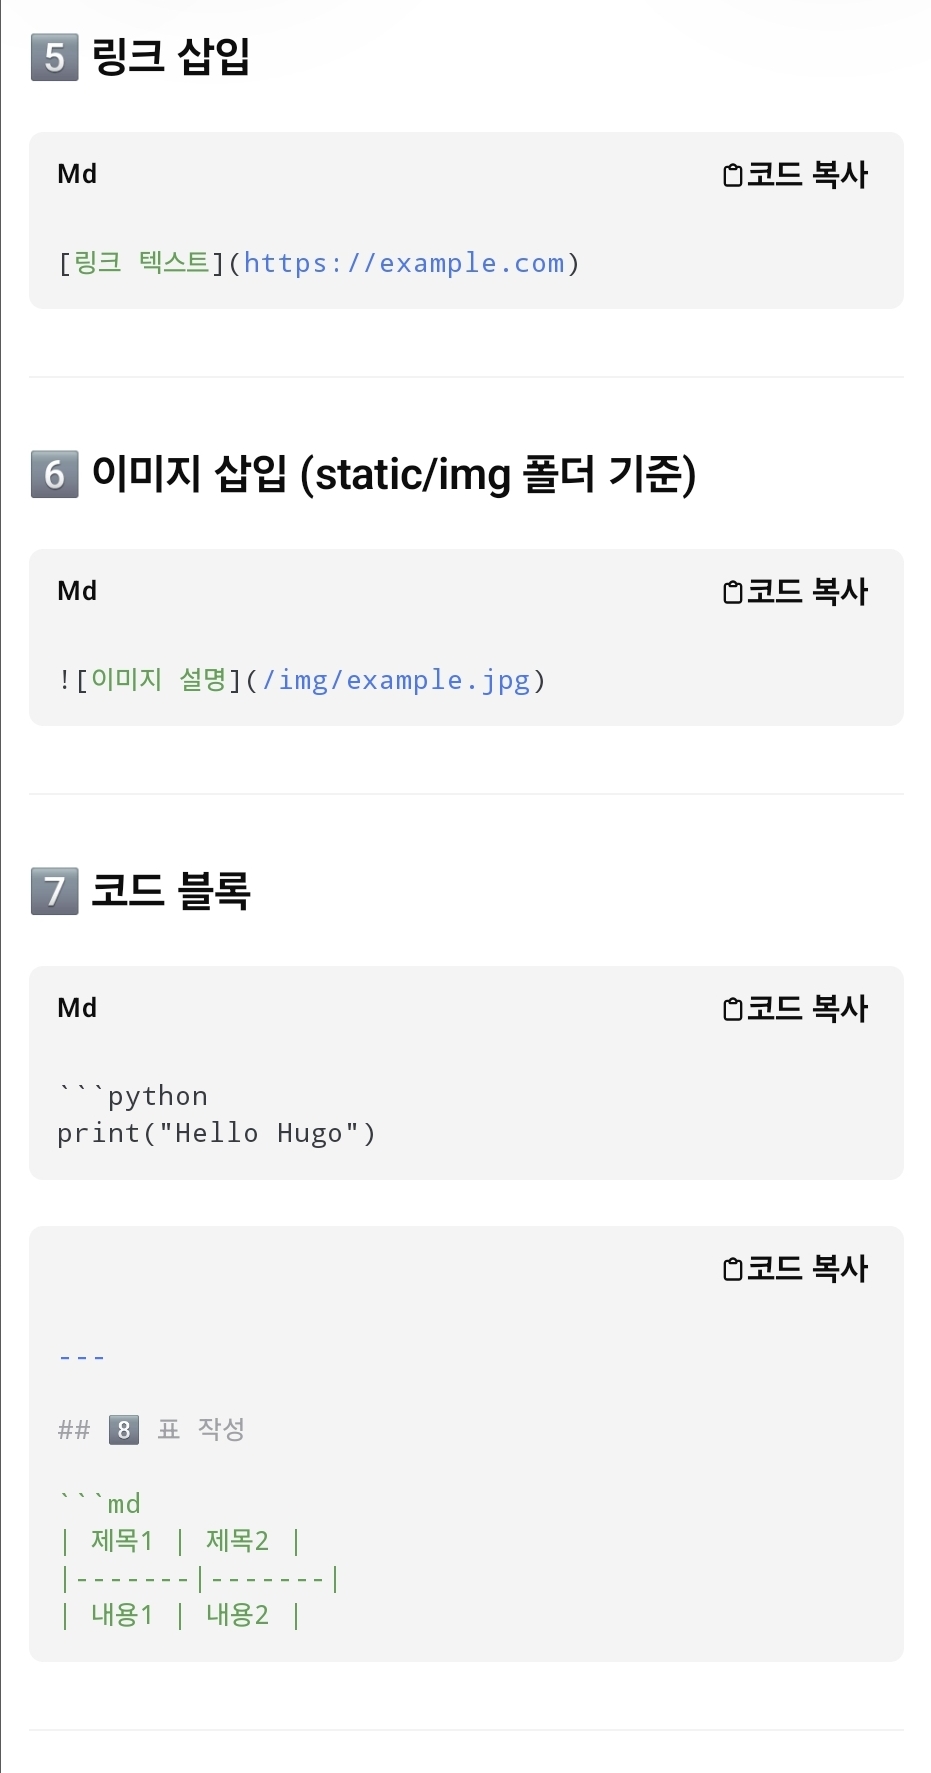
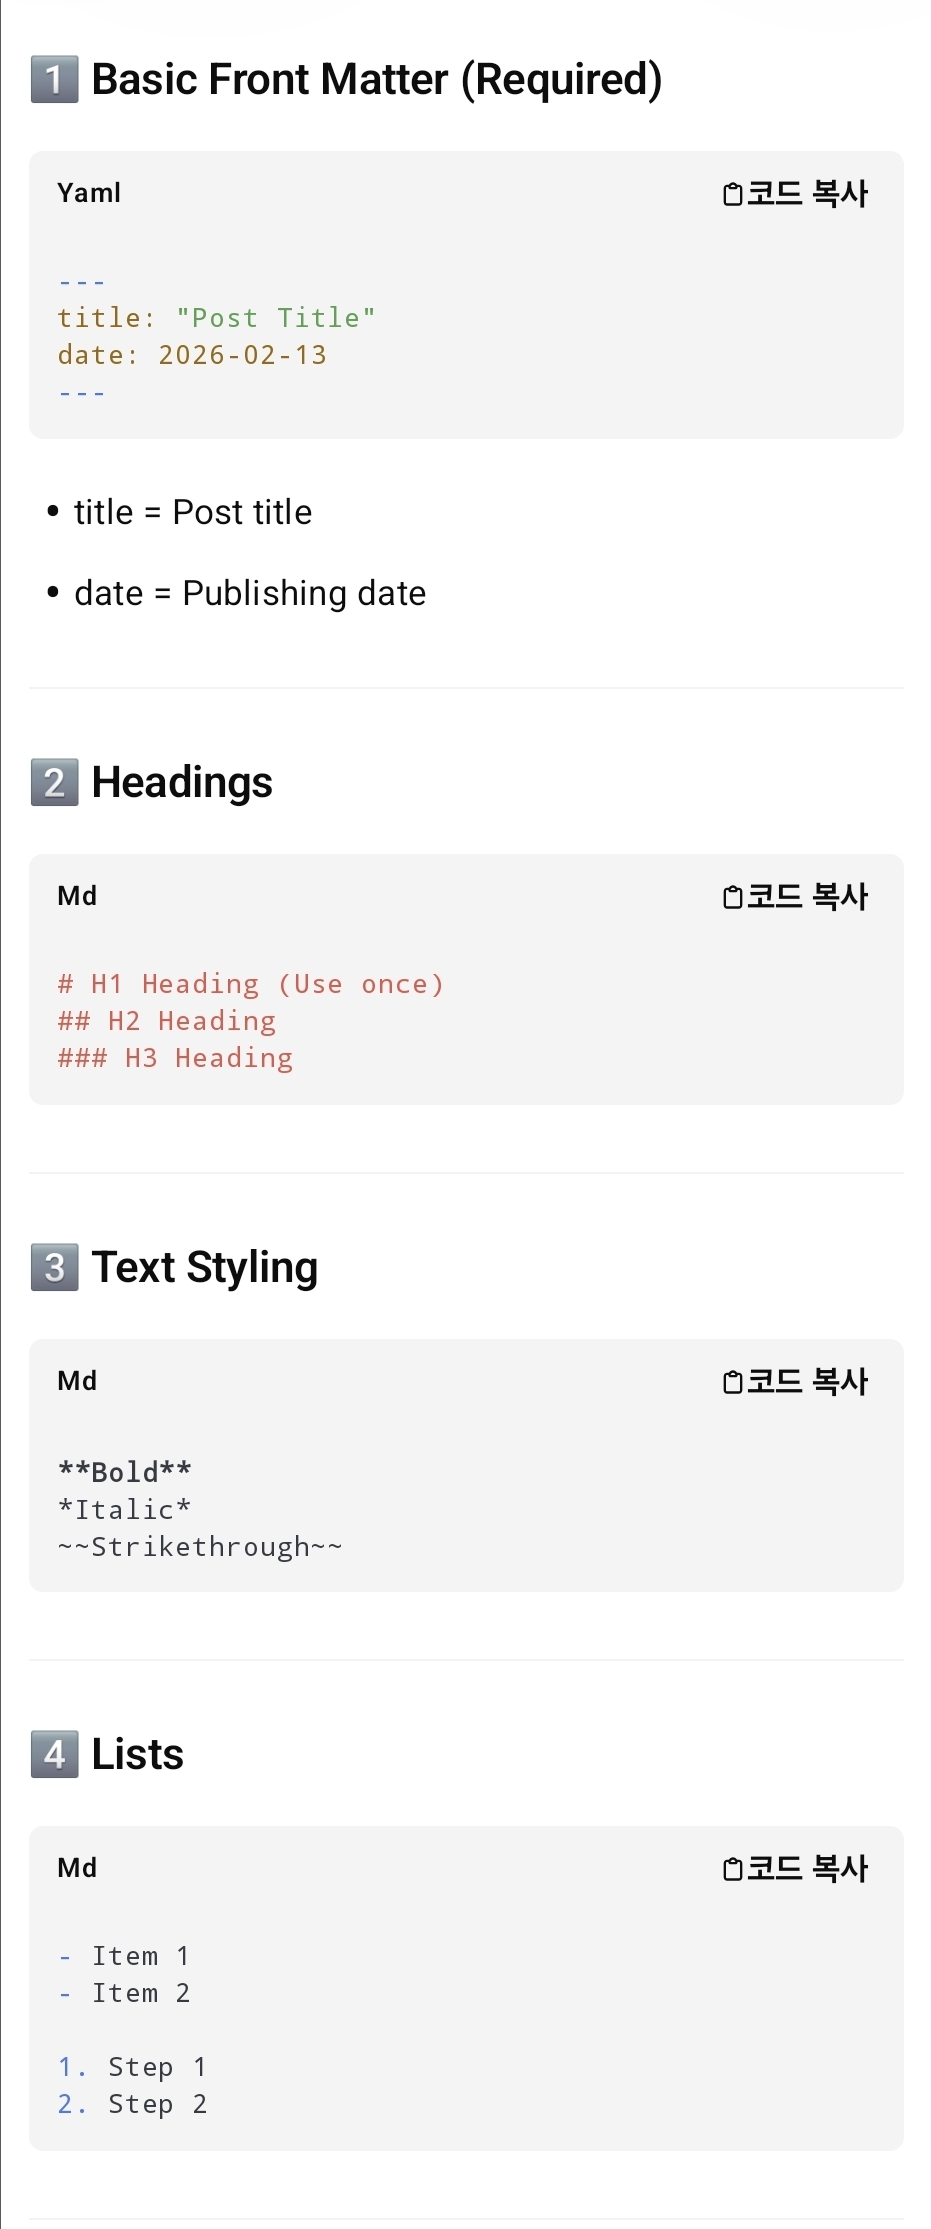
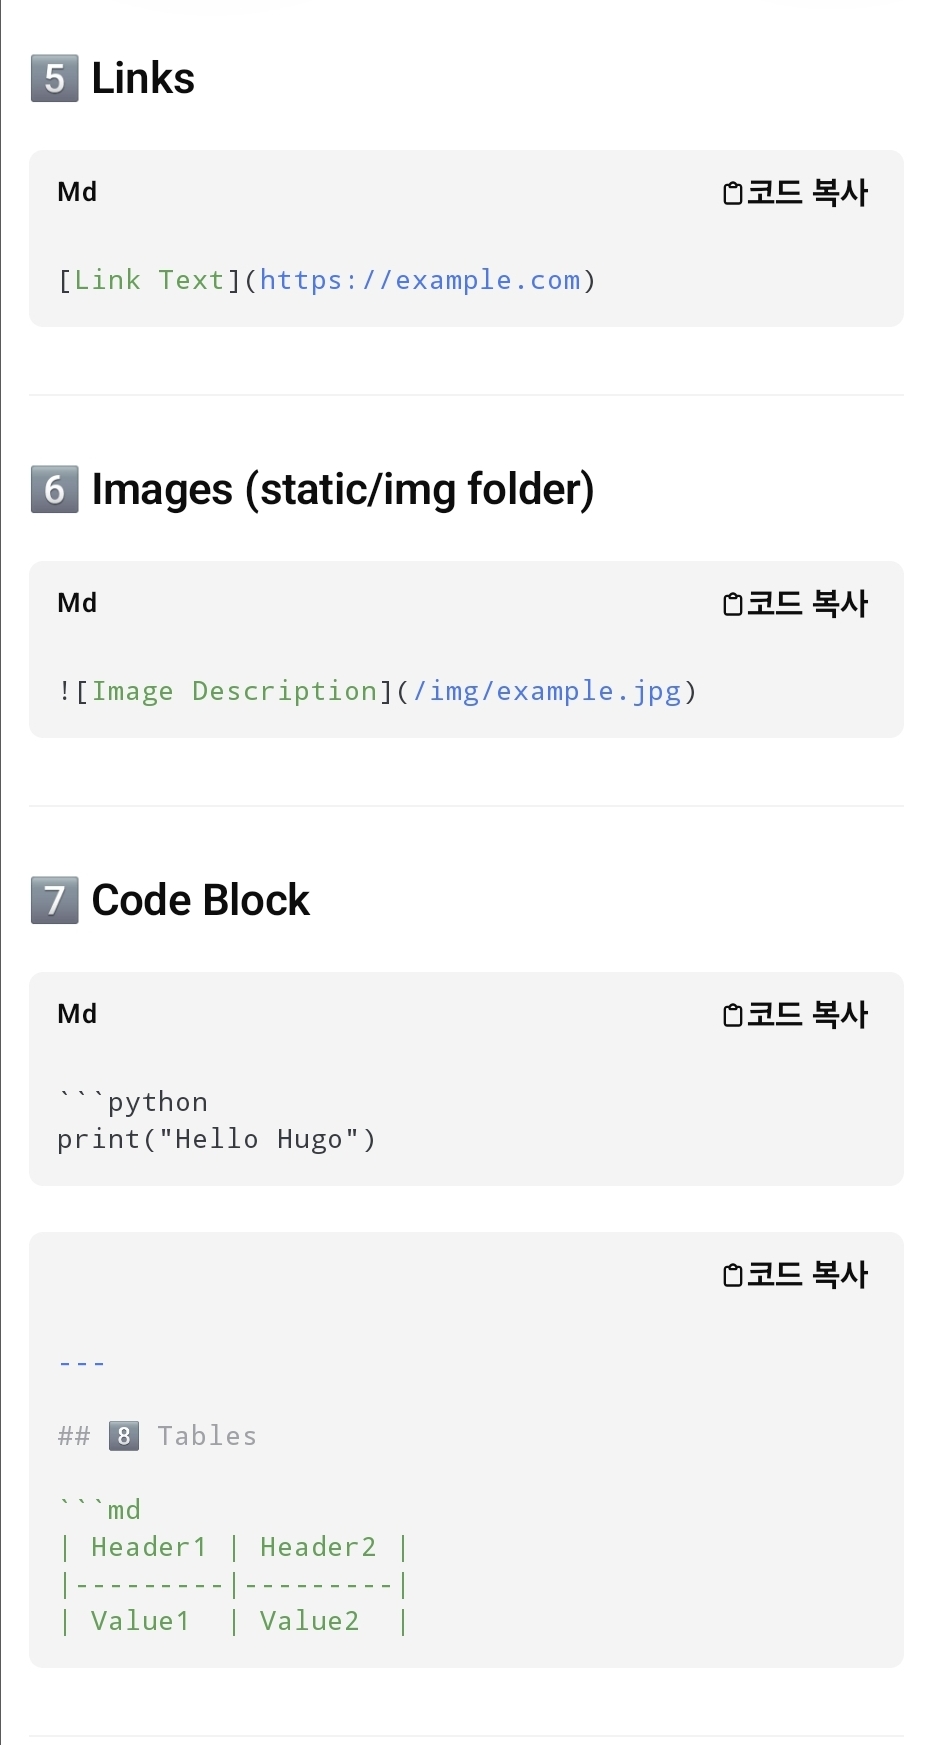
(64) EN: Hugo reads posts when a file starts with Front Matter. Use .md files (recommended).
Example:
---
title: "글 제목"
date: 2026-02-13
---
(64) KR: Hugo가 글을 인식하려면 문서 맨 앞에 Front Matter(프론트 매터) 가 있어야 합니다.
.md 문서 업로드가 가장 유리합니다.
(65) EN: If Front Matter or Obsidian formatting feels hard, you can write with AI and then paste into your .md file, as long as you keep the Front Matter at the top.
(65) KR: 프론트 매터나 옵시디언 문서 작성이 어렵다면 AI로 글을 작성한 뒤 그대로 붙여넣어도 됩니다. 단, 문서 맨 위에 Front Matter(프론트 매터)는 반드시 유지해야 Hugo가 글을 인식합니다.
17. (Front Matter)글 상단 설정값 입력 방법 How to Write the Top Settings
by Shadow J.